
Note: My working Homelab-as-Code github repository can be found at
Introduction
In my previous post I outlined my plan to build a Homelab-as-Code architecture. This post will document step #1 of this plan which is to deploy my Kubernetes clusters.
I’ll be using Talos Linux for this – a minimal distribution with just enough OS to run Kubernetes. Talos is so lightweight that it doesn’t even have a shell. You can only interact with a Talos machine through the Talos API using talosctl.
And, of course, I’ll be putting my clusters on Tailscale!
Getting the Talos ISO
The first thing we need to do is get an ISO file for Talos, which can be downloaded from their GitHub releases page. The Talos documentation will have a link to it here.
At the time of this writing, the link is for Talos version 1.9. You should see a notification at the top of the page prompting you with a link to the latest version if this one is out of date.
I’m using Proxmox, so I need to upload the ISO to my node’s storage so that I can create VM’s with it. Click on the node –> local (or whatever storage you’re using) –> ISO Images –> Upload.
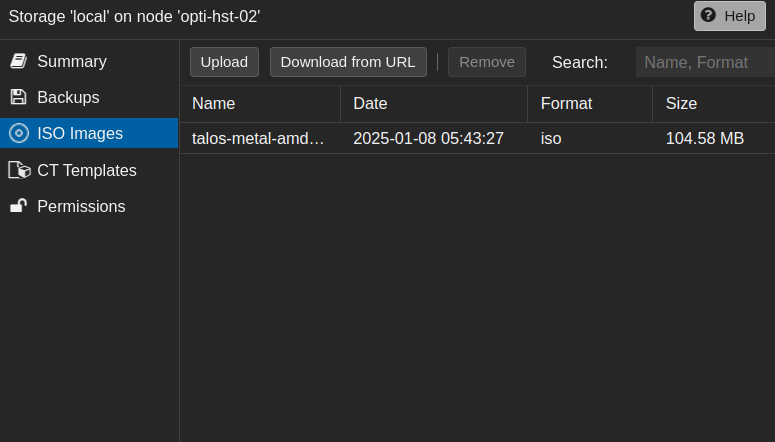
I have a three-node cluster and don’t currently have a shared storage medium that hold’s ISOs, so I need to do this three times… YMMV.
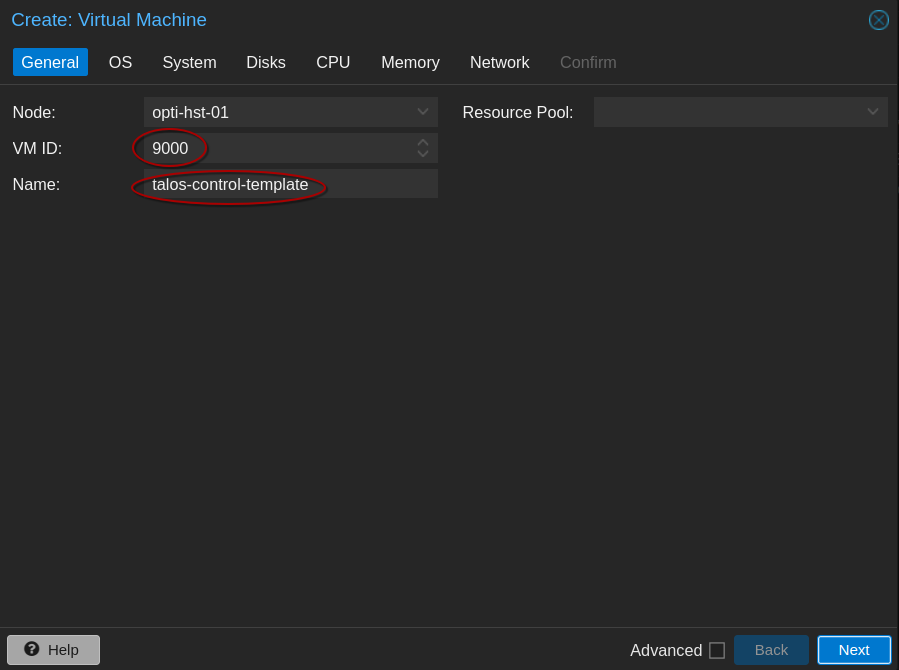
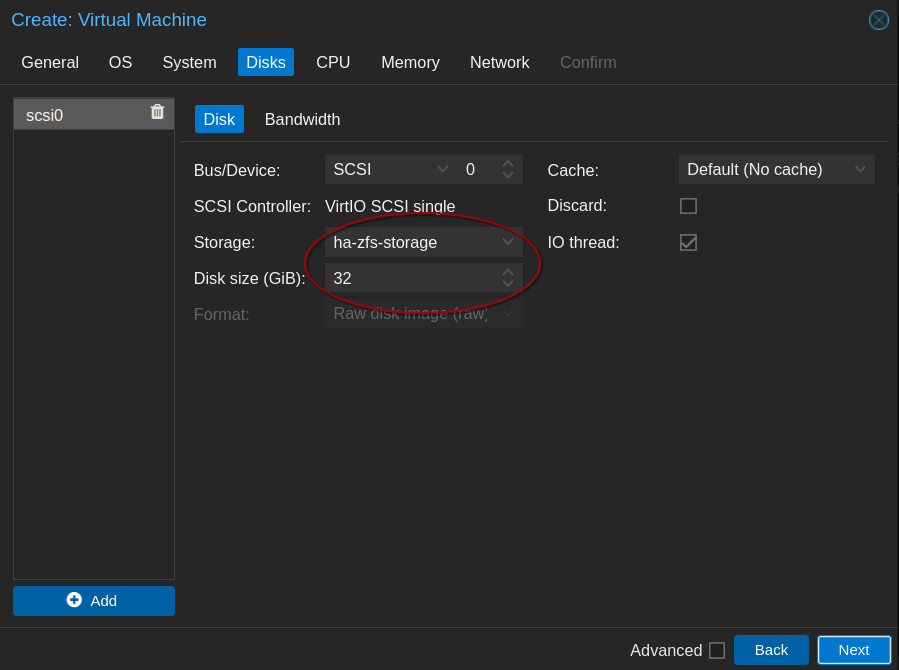
Creating a VM Template and Deploy VMs
Once the ISO is uploaded we need to create a virtual machine template. Right click on the desired node and select create VM. Enter the necessary information as shown below. Modify everything for your environment, of course.
After the VM is created – right click on it and select convert to template.
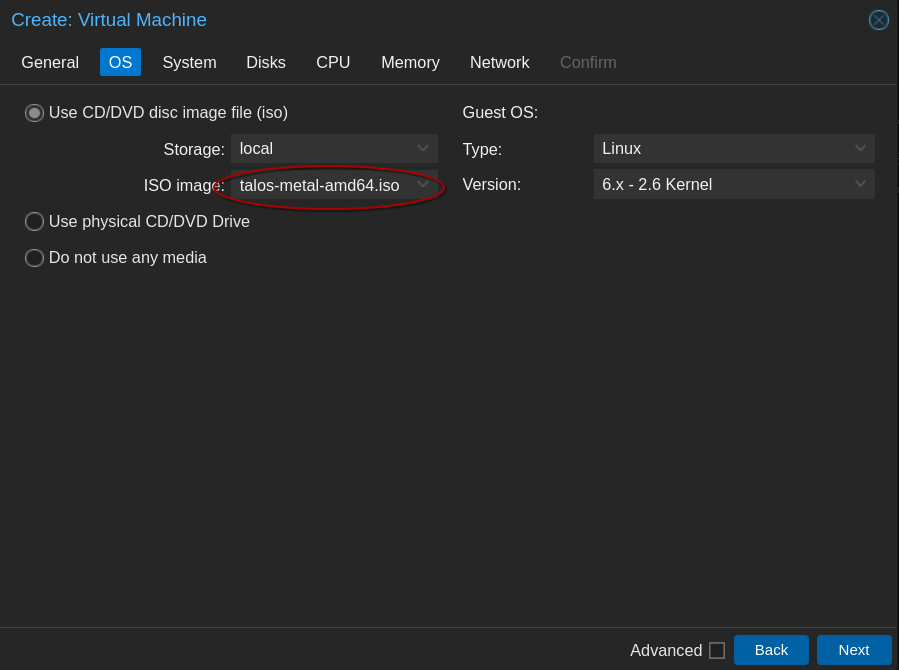
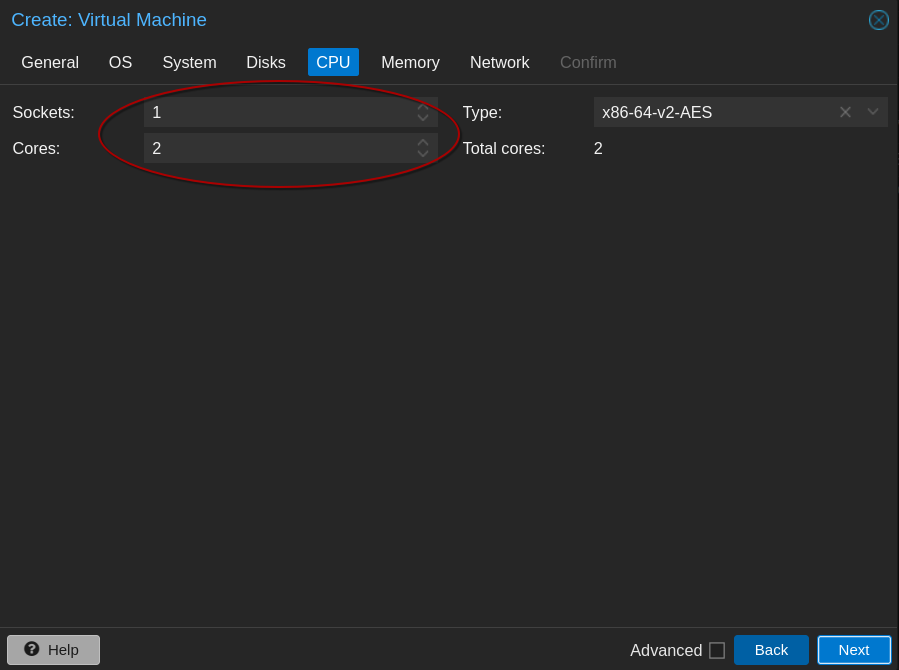
Be aware of the hardware requirements for Talos. You’ll need a minimum of 2GB of memory and 2 cores for a control plane node and 1GB of memory and 1 core for a worker node.
I imagine just about any environment can handle that!
Note: I forgot to grab a screenshot of it, but you’ll want to ensure that the QEMU Guest Agent is enabled during the VM creation wizard. You can enable it later if you forget, but it will require rebooting the VM from the Proxmox Web UI to take effect.
Configure Talos
Once you have a template created, you’ll want to clone it to create your first Talos node. I’ll be creating two clusters:
- One single node cluster for staging/testing new services and configs
- One ‘production’ cluster with 3 control plane nodes and 3 worker nodes.
I recommend this article for understanding how many nodes to put in your control plane. It’s not as simple as “more is better” for availability. The TL;DR is:
- Control planes with an even number of nodes are less highly available than control planes with an odd number of nodes.
- The more nodes you add, the higher latency you’ll have when interacting with the Kubernetes API.
With the nodes booted up, we’re ready to generate their configuration files.
Get Schematic ID From Talos Factory
Since I plan on using Tailscale and, eventually, Longhorn for persistent storage, there is some software that I’ll need installed on my nodes. But since Talos doesn’t even have a shell, how do we install software? That’s where the Talos image factory comes in.
Go to https://factory.talos.dev to create a custom image schematic. Go through the wizard, selecting your hardware type, Talos version and machine architecture.
When you get to system extensions, select the following:
siderolabs/tailscale– For connecting to Tailscalesiderolabs/iscsi-tools– Required for Longhorn storagesiderlolabs/util-linux-tools– Also required for Longhornsiderolabs/qemu-guest-agent– So that the Proxmox dashboard can display information about the VM such as hostname and IP.
Skip the extra kernal arguments, and you should be presented with a schematic ID and a config that looks something like this:
customization:
    systemExtensions:
        officialExtensions:
            - siderolabs/iscsi-tools
            - siderolabs/qemu-guest-agent
            - siderolabs/tailscale
            - siderolabs/util-linux-tools
We don’t actually need to save this config, but if you do, it will make it easier to retrieve your schematic ID later if you ever need it again. If you save the above config to a file, for example schematic.yaml, you can run the following curl command to retrieve the schematic ID:
curl -X POST --data-binary @schematic.yaml https://factory.talos.dev/schematics
{"id":"077514df2c1b6436460bc60faabc976687b16193b8a1290fda4366c69024fec2"}
In my situation, all I really need to do is construct an install image URL from this schematic ID. It will look like this:
factory.talos.dev/installer/{{ schematic ID }}:{{ talos version }}
for example:
factory.talos.dev/installer/077514df2c1b6436460bc60faabc976687b16193b8a1290fda4366c69024fec2:v1.9.4
Keep this URL handy, we’ll need it when we generate the configs with talosctl.
Note: You may notice the Talos factory will also produce a link to an ISO for you to download. This ISO will contain the software listed above on first boot. You can choose to dowload this ISO and simply boot your machines off of it rather than passing the above URL to the
talosctl gen configcommand as we will do in the next step.
Generate Talos Configs
Once you have a Talos node booted up, in its console will be a screen that looks like this:
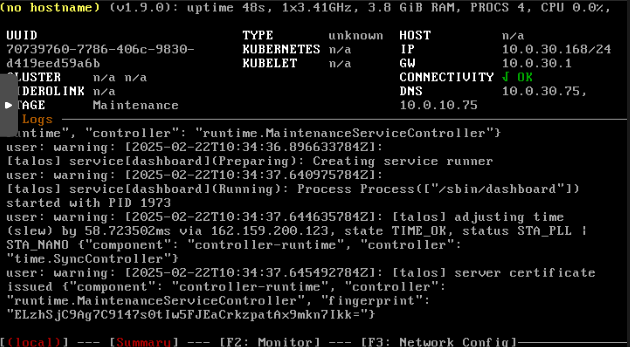
If you try to log in or interact with the VM via command line in any way, you won’t be able to. You can only interact with Talos via an API.
I recommend leaving this console up in another window while running the remaining steps so that you can see the changes made in real time.
Install talosctl
First, we’ll need to install the talosctl command-line utility which will allow us to interact with the Talos API. The easiest way to install it is with homebrew:
brew install siderolabs/tap/talosctl
You can view the Talos documentation for alternative installation methods.
Generate Configs
Next, we need to generate the config files from the endpoint URL of our first Talos node. We’ll also pass an additional argument telling talos to use the custom image URL we generated from the Talos factory earlier.
From the console above you can see the node’s IP. Generally, you would use this IP to construct the talosctl gen config command. However, since we are going to be immediately applying a machine patch which changes this IP to a static one (as well as installing Tailscale, which will provide us yet another IP/hostname to connect to), we are going to anticipate our endpoint URL.
The command will look like this:
talosctl gen config <cluster-name> https://<endpoint-ip-or-hostname>:6443 --install-image=factory.talos.dev/installer/58e4656b31857557c8bad0585e1b2ee53f7446f4218f3fae486aa26d4f6470d8:v1.9.4
Replace cluster-name with a name of your choice, such as “production” or “staging”.
The endpoint will depend on the cluster, which I will cover next.
Note: This command needs to be run per cluster. So, in my case, I will run it once for staging and once for production. This will give me two sets of config files.
The command should generate three files into your current working directory:
- controlplane.yaml
- worker.yaml
- talosconfig
Staging Cluster Endpoint
For my staging cluster, I will use the node’s hostname (in my case, talos-staging). Tailscale’s Magic DNS will resolve this and I will be able to reach this endpoint from anywhere over Tailscale. So, for my staging cluster, my gen config command will look like this:
talosctl gen config staging https://talos-staging:6443 --install-image=factory.talos.dev/installer/58e4656b31857557c8bad0585e1b2ee53f7446f4218f3fae486aa26d4f6470d8:v1.9.4
Production Cluster Endpoint
For my production cluster, this is a bit trickier… since I will have multiple control plane nodes. I don’t want to just pick one of the control plane nodes and use that as an endpoint, since that won’t be a highly available control plane. If that node goes down, I will lose access to the Kubernetes API (ie. kubectl will stop working).
Talos provides three examples for an HA control plane endpoint:
- Using a dedicated load balancer: I could potentially use Traefik for this, but that becomes its own single point of failure
- Creating multiple DNS records with the same hostname: Since I can’t manually create entries in Tailscale’s Magic DNS, this option is out. I don’t want to use a self-hosted DNS solution for this.
- Layer 2 Virtual IP: This option is the most attractive, but it presents a challenge. I want my control plane available over Tailscale, but this option requires a local IP to be the endpoint rather than a Tailscale IP.
For now, it would seem that the virtual IP (VIP) is the best option. It won’t be available over Tailscale natively, but I can set up a Tailscale subnet router to make that local IP available whenever I’m connected to Tailscale, effectively achieving my goal anyway.
So, in an ideal world I would generate my config using this VIP. However, since the VIP won’t exist until after Kubernetes has been bootstrapped, this will cause a problem when we go to bootstrap Kubernetes later; Kubernetes can’t bootstrap off an endpoint that doesn’t exist yet.
So, we’ll have to generate configs using the first control plane node’s IP, at least initially. Then, after Kubernetes has been bootstrapped, we can change the endpoint in the controlplane.yaml and worker.yaml files back to the VIP.
So, my gen config command for my production cluster will look like this (where 10.0.30.80 is the static IP of my first controlplane node):
talosctl gen config production https://10.0.30.80:6443 --install-image=factory.talos.dev/installer/58e4656b31857557c8bad0585e1b2ee53f7446f4218f3fae486aa26d4f6470d8:v1.9.4
Create Patch Files
Next, we’ll create our machine-specific patch files containing the node’s IP and hostname. We’ll also create a patch file for our Tailscale configuration.
Machine-Specific Patch Files
In a file called hostname.patch.yaml (where hostname is the desired machine’s hostname), we’ll add the following:
machine:
  # Static IP Configuration
  network:
    hostname: talos-staging
    interfaces:
      - deviceSelector:
          physical: true
        addresses:
          - 10.0.30.86/24
        routes:
          - network: 0.0.0.0/0 # The route's network.
            gateway: 10.0.30.1 # The route's gateway.
        dhcp: false
  # Mounts Required for Longhorn on Worker Nodes
  # Remove This Section for Control Plane Nodes!
  # (Leave for Single Node Cluster)
  kubelet:
    extraMounts:
      - destination: /var/lib/longhorn
        type: bind
        source: /var/lib/longhorn
        options:
          - bind
          - rshared
          - rw
Modify the hostname and IP settings for your use case. The extraMounts section should only be necessary on worker nodes. The exception being a single node cluster, because that node will run the control plane but also run workloads and require Longhorn storage.
Note the deviceSelector section. This is applying the configuration to all physical interfaces. You may need to adjust this to your use case. In my case, my nodes only have one interface, so this saves me the headache of trying to figure out what the interface name is.
Tailscale Patch File
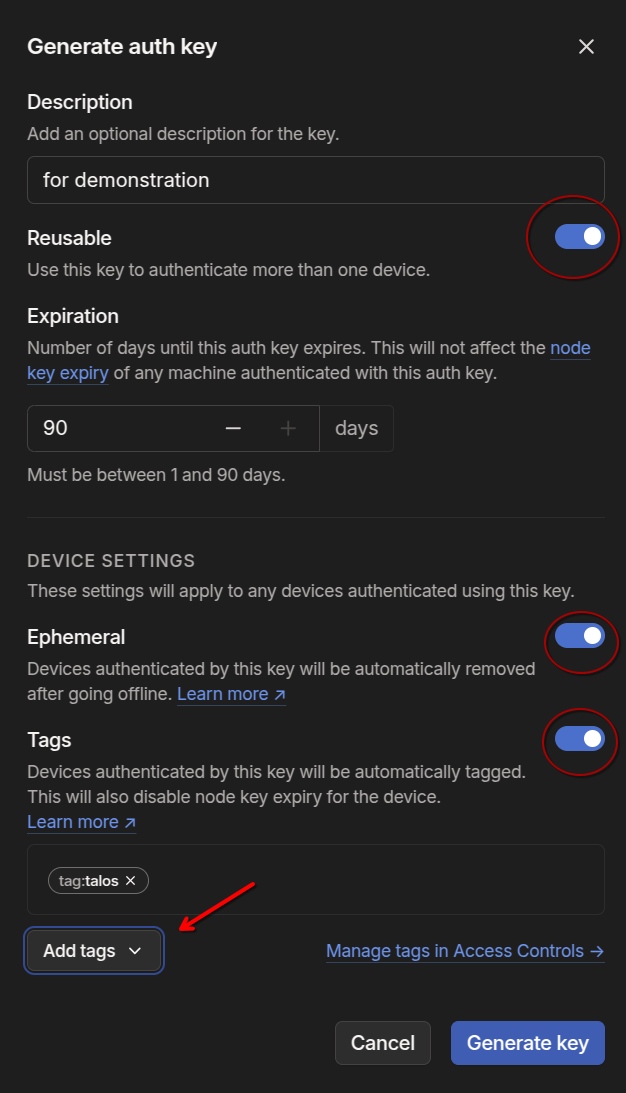
Before creating the Tailscale patch file, you’ll need to generate an Authkey. To do this, go to your Tailscale admin console, go to settings –> Keys (located under personal settings).
- Set the key to be reusable
- I recommend leaving the ephemeral setting selected. This will allow a node to be automatically removed from your Tailnet when it comes offline, preventing duplicate machine entries in Tailscale.
- I also recommend adding a tag. This helps keep things organized and allows for configuring RBAC in the Tailscale ACL. If you don’t see any tags listed, you’ll need to create them first in the Tailnet ACL file.
Note that the Authkey is only good for a maximum of 90 days. This does not mean that your nodes will be removed from the Tailnet after 90 days. It only means that the key can no longer be used to add additional nodes after 90 days. At which point, you would need to generate a new one.
Once you have your Authkey (I recommend saving it in a password manager) we can create the Tailscale patch file.
In a file called tailscale.patch.yaml add the following contents:
apiVersion: v1alpha1
kind: ExtensionServiceConfig
name: tailscale
environment:
  - TS_AUTHKEY=tskey-auth-your-authkey-here
This will configure the Tailscale extension with your authkey, allowing nodes to authenticate into your Tailnet.
Modify Configs for Staging and Production
At this point you should have at least five total files per cluster:
- hostname.patch.yaml (you will have one of these per node)
- tailscale.patch.yaml
- controlplane.yaml
- worker.yaml
- talosconfig
Note: These files have secrets in them! Don’t commit these to a public repo without using some kind of secret management tool.
In my case, there are a couple of tweaks I will need to make to the controlplane.yaml files for both the staging and the production clusters.
Staging Modifications
Since my staging cluster is going to be a single node cluster, I need to add a line in the configuration to allow workloads to be scheduled on controlplane nodes.
In controlplane.yaml, find the cluster section and add the following:
cluster:
    allowSchedulingOnControlPlanes: true
This is documented in the Talos documentation here.
Production Modifications
For my production cluster, I will need to add the VIP configuration. Talos offers a built-in feature for control plane nodes to share a virtual IP. The only requirements are that the nodes are on the same layer 2 subnet, and that your selected VIP is also from that same subnet.
The configuration looks like this. Search for the network settings in controlplane.yaml.
network:
  interfaces:
    - deviceSelector:
        physical: true
      dhcp: false # Set to false since machine patch will provide static IP
      vip:
        ip: 10.0.30.25 # <-- ensure this is on the same subnet as your controlplane nodes!
Apply the Configs
We’re finally ready to apply our configs. The command will look like this
talosctl apply-config --insecure -f controlplane.yaml -n 10.0.30.168 -e 10.0.30.168 --config-patch @talos-staging.patch.yaml --config-patch @tailscale.patch.yaml
Note that the IP we’re using is the IP we saw in the machine’s console earlier. This is the IP it received from the DHCP server and should be the last time you need to specify this IP. Going forward, you will use the machine’s static IP that you specified in the machine’s patch file.
The --insecure flag is only necessary the first time you run this command (for each given node). This is because the node is still in maintenance mode and doesn’t have a configured certificate authority yet.
There are two --config-patch flags specifying the two patch files we created earlier. These can be absolute or relative paths to the file. What this does is applies the general configuration (from controlplane.yaml or worker.yaml), which doesn’t contain configs for the machine’s hostname, IP and the machine’s Tailscale extension patch, and immediately patches those configurations into the controlplane.yaml or worker.yaml configs. This prevents us from having to maintain separate, enormous controlplane.yaml and worker.yaml files for each node.
You’ll be running this command against each node, modifying the IP as necessary and swapping out controlplane.yaml for worker.yaml for worker nodes. For now though, run this against your first control plane node only until after you’ve bootstrapped the cluster.
Once you apply the config, you should see the IP and hostname change in the Talos console and the node will likely reboot. Within a few minutes, the node should appear in your Tailscale admin console:

Bootstrap the Cluster
With our configs applied, we are ready to bootstrap Kubernetes. This only has to be done once, against the first control plane node!
Run the following command (note that we are now specifying the machine’s static IP, and we are not using the –insecure flag!):
talosctl bootstrap --nodes 10.0.30.86 --endpoints 10.0.30.86 --talosconfig=./talosconfig
If you run into any errors when running this command, ensure you are running it from the directory that contains the talosconfig file. Otherwise, you can modify the --talosconfig flag to specify the relative/absolute path to the file.
You can also export the path to the $TALOSCONFIG environment variable and omit the --talosconfig flag altogether. Example:
export $TALOSCONFIG=/path/to/talosconfig
For my Production Cluster:
At this point, with Kubernetes bootstrapped on my production cluster, I’ll want to change the following line in both controlplane.yaml and worker.yaml to my VIP:
cluster:
    id: <super-secret> # Globally unique identifier for this cluster (base64 encoded random 32 bytes).
    secret: <super-secret> # Shared secret of cluster (base64 encoded random 32 bytes).
    # Provides control plane specific configuration options.
    controlPlane:
        endpoint: https://10.0.30.25:6443 # Change this to the VIP!!
    clusterName: production # Configures the cluster's name.
Then, I’ll need to re-run the commands from earlier to apply this config. At this point we can omit the --insecure flag. Don’t forget the patches!
Get Your Kubeconfig File
Finally, we just need to get our kubeconfig from Talos:
talosctl kubeconfig --nodes 10.0.30.86 --endpoints 10.0.30.86 --talosconfig=./talosconfig
Once again, we are using the machine’s static IP now and omitting the --insecure flag.
You should now have access to the cluster through kubectl:
kubectl get nodes
NAME            STATUS   ROLES           AGE   VERSION
talos-staging   Ready    control-plane   16h   v1.32.0
Apply Configs to Additional Nodes
With Kubernetes bootstrapped, the only thing left to do is apply the configuration to each subsequent node in the cluster, replacing controlplane.yaml with worker.yaml as appropriate.
For control plane nodes:
talosctl apply-config --insecure -f controlplane.yaml -n <ip-of-node> -e <ip-of-node> --config-patch @talos-staging.patch.yaml --config-patch @tailscale.patch.yaml
For workers:
talosctl apply-config --insecure -f worker.yaml -n <ip-of-node> -e <ip-of-node> --config-patch @talos-staging.patch.yaml --config-patch @tailscale.patch.yaml
Conclusion
I now have two fully functional Kubernetes clusters to begin my journey into Homelab-as-Code.
I can switch contexts in kubectl with:
kubectl config use-context admin@production # admin@staging for the staging cluster
Production:
kubectl get nodes
NAME                    STATUS   ROLES           AGE   VERSION
talos-prod-control-01   Ready    control-plane   10h   v1.32.0
talos-prod-control-02   Ready    control-plane   10h   v1.32.0
talos-prod-control-03   Ready    control-plane   10h   v1.32.0
talos-prod-worker-01    Ready    <none>          10h   v1.32.0
talos-prod-worker-02    Ready    <none>          10h   v1.32.0
talos-prod-worker-03    Ready    <none>          10h   v1.32.0
Staging:
kubectl get nodes
NAME            STATUS   ROLES           AGE   VERSION
talos-staging   Ready    control-plane   15h   v1.32.0
The next step will be to get Longhorn installed and configured on both clusters for persistent storage. Once that is complete, I’ll need to install and configure Traefik and Tailscale for ingress and service objects. Then I will be ready to start running workloads on Kubernetes!