I’ve recently been playing with Ansible in my homelab. I love that it’s agent-less, simple and idempotent. You don’t need to install any software on your targets to get started; you just need to be able to SSH into them. If you can SSH into it, you can deploy configs with Ansible. It’s really that simple! Ansible also uses YAML syntax which is very straight forward and easy to read.
If you’ve never used Ansible, I highly recommend Jeff Geerling’s book Ansible for DevOps to get started. I haven’t read it cover to cover, but it’s a great resource to get you going with Ansible even if you chapter hop like I’ve been doing (blame my un-diagnosed ADHD for that). Ansible’s documentation is also interactive and easy to follow, I’ve used both to get me going.
What I’ve Been Trying to Accomplish
My goal with learning Ansible has been to automate my homelab infrastructure. My end state is the security in knowing that everything (or close to everything) in my homelab infrastructure is defined in code and can be redeployed with a single command. The work in progress is in the ansible repo on my github.
So far, I’ve gotten a few things figured out. I’ve automated baseline configurations for my Ubuntu machines (users, packages, firewall etc). I’ve figured out how to manage docker containers (it’s very similar to docker compose). But what the struggle has been, is how to manage VMs in Proxmox with Ansible.
A Tour of My Proxmox Cluster

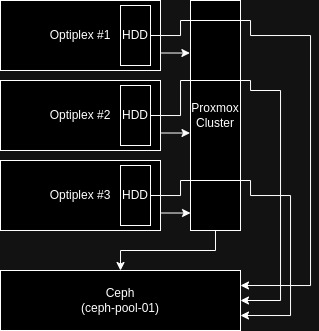
For context, it’s important that you understand what my proxmox setup looks like. I have a three-node cluster with shared storage configured via ceph. Each node is a dell optiplex (two 7040s and one 7050) with one 128gb SSD as a boot drive and an additional mechanical drive for VM storage (varying capacities). These mechanical hard drives are added as OSDs to my Ceph pool (ceph-pool-01) for shared storage and high availability across the cluster.
A Tour of My Playbook
Since I’m trying to create essentially one giant, idempotent playbook that ensures the proper state of my infrastructure, I didn’t want it all in one file. I’ve made use of the include_* and import_* capabilities with Ansible, so my main playbook looks like this:
---
- name: Homelab Setup
  hosts: all
  become: yes
  user: josh

- import_playbook: baseline/proxmox/main.yml
- import_playbook: baseline/ubuntu/main.yml
- import_playbook: services/docker.yml
- import_playbook: services/uptimekuma.yml
...
This playbook simply contains lines that import other playbooks in the appropriate order. The first playbook (is supposed to) ensure that all of the VMs that the remaining playbooks will run against, actually exist. The second playbook ensures a baseline configuration of all of my Ubuntu machines, the third ensures docker is installed on all desired hosts, and the fourth ensures the container for Uptime Kuma is running on the desired host (more playbooks for additional services will follow). To give some additional context, the full file structure looks like this:
└── ansible
    ├── baseline
    │   ├── proxmox
    │   │   ├── machines.yml
    │   │   ├── main.yml
    │   │   ├── secrets.yml
    │   │   └── security.yml
    │   ├── tailscale
    │   │   ├── example_oauth_key.yml
    │   │   ├── tailscale_oauth_key.yml
    │   │   └── tailscale.yml
    │   └── ubuntu
    │       ├── main.yml
    │       ├── security.yml
    │       └── user.yml
    ├── example_hosts.ini
    ├── hosts.ini
    ├── main.yml
    ├── README.md
    ├── services
    │   ├── docker.yml
    │   ├── gitea.yml
    │   ├── media.yml
    │   ├── paperless.yml
    │   └── uptimekuma.yml
    └── TAILSCALE.md
Focusing on the contents of the baseline folder for now, let’s take a look at baseline/proxmox/main.yml
---
- name: Initial setup for proxmox servers
  hosts: proxmox
  user: root
  become: true

  tasks:
    - name: Update apt and install required system packages
      apt:
        pkg:
          - aptitude
          - curl
          - nano
          - vim
          - git
          - ufw
          - neofetch
          - python3-proxmoxer
          - python3-requests
        state: latest
        update_cache: true

    - name: Basic security hardening
      import_tasks: security.yml

    - name: Install and bring up tailscale
      import_tasks: ../tailscale/tailscale.yml

    - name: Deploy VMs
      import_tasks: machines.yml
...
You’ll notice we have four total tasks. The first three are making some baseline configurations on the proxmox hosts, and the final one is deploying our VMs:
- The first task updates apt and installs some desired packages.
- The second task imports tasks from security.yml, which essentially just copies my SSH key and disables password-based SSH authentication.
- The third imports tasks from tailscale.yml, which will install and bring up tailscale on the system.
- The final task is what we’re focusing on here. This task is meant to be my desired state of VMs in the cluster.
NOTE: The packages python3-proxmoxer and python3-requests are dependencies for the module in machines.yml to work. These are python modules that would normally be installed with pip, but when I attempted this, proxmox yelled at me and told me to use apt with the python3-* prefix instead.
My goal with this machines.yml file is to ensure the presence of a set of VMs with their desired hardware configurations. Now, I currently deploy my VMs by cloning a cloudinit template. So, what I’m looking for is the ability to clone a cloudinit template in the case that a declared VM doesn’t exist. If you need a run-down on how to set up a cloudinit template, TechnoTim has a great video and blog post on it (it’s what I used to guide my setup).
What Didn’t Work
I initially came across the community.general.proxmox module. However, from what I can gather, this module is for managing LXC containers on a Proxmox host, NOT for managing VMs. Be wary of this, as this was returned frequently as a top result in many of my google searches.
What Did Work
I came across this post from Ron Amosa which made me realize I should have been using the community.general.proxmox_kvm module. Ron’s example is it’s own playbook. All I need are the tasks since my main.yml will import them. So, I removed the first three lines of Ron’s example:
- name: 'Deploy our Cloud-init VMs'

  hosts: proxmox

  tasks:
Which left me with this as my machines.yml file after adding my own storage, node and api info:
---
- name: Clone cloud-init template
  community.general.proxmox_kvm:
    node: opti-hst-01 # Changed from value: proxmox
    vmid: 9000 # This happened to be the same value as my cloudinit VM
    clone: gemini # Left this as is, later discovering the value doesn't matter since a vmid is specified above..
    name: cloud-1
    api_user: root@pam # Changed from value: ansible@pam
    api_token_id: "{{ proxmox_token_id }}" # Changed from value: ansible_pve_token
    api_token_secret: "{{ proxmox_token_secret }}" # Changed from value: 1daf3b05-5f94-4f10-b924-888ba30b038b
    api_host: 192.168.0.100 # Changed from value: your.proxmox.host
    storage: ceph-pool-01 # Changed from value: ZFS01
    timeout: 90

- name: Start VM
  community.general.proxmox_kvm:
    node: opti-hst-01 # Changed from value: proxmox
    name: cloud-1
    api_user: root@pam # Changed from value: ansible@pam
    api_token_id: "{{ proxmox_token_id}}" # Changed from value: ansible_pve_token
    api_token_secret: "{{ proxmox_token_secret }}" # Changed from value: 1daf3b05-5f94-4f10-b924-888ba30b038b
    api_host: 192.168.0.100 # Changed from value: your.proxmox.host
    state: started
A quick overview of this playbook: There’s a group in our hosts file called ‘proxmox.’ On all hosts in that group, we’re going to run the tasks ‘Clone cloud-init template’ and ‘Start VM.’ The ‘Clone cloud-init template’ task is ensuring that there exists a clone of a template with vmid 9000 somewhere on the cluster. That clone’s name should be ‘cloud-1’ and it should be stored on ‘ceph-pool-01.’ It’s interacting with the Proxmox API with the user ‘root@pam’ and an API token ID of “{{ proxmox_token_id }}” and a token secret of “{{ proxmox_token_secret }}” (these are variables stored in ansible vault — a topic deserving of it’s own post entirely — if you aren’t familiar and want to test this out, you can hard-code your API info, but do not do this in a production environment).
I’ll explain line-by-line what’s going on here:
- community.general.proxmox_kvm: This playbook is using the community.general.proxmox_kvm module
- node: This is the node on which the playbook will operate. Think of when you clone a template VM in the proxmox GUI. You need to right click on the template, which exists on one of your nodes in the cluster. This is the value that should be set here.
- vmid: This is the vmid of the template to be cloned
- clone: This is the name (as it would appear in the GUI) of the template to be cloned. The documentation appears to suggest that this line does need to exist, but if you set a value for vmid, it can be a bogus value.
- name: This is the name of the VM after it’s been cloned
- api_user: This is the username of the user that the API token is tied to
- api_token_id: The name of the API token. Note that when you create the token initially the syntax will be <username>@pam!<token_id>. The value that goes here will NOT be this syntax, you just need the token ID.
- api_token_secret: This is your actual API token. It should be treated like a password. Once again… Do NOT hard code this into your playbook in a production environment. You’ll notice that Ron’s example does have it hard-coded, however he clearly points out in his post that this is only for testing and should never be done in practice.
- api_host: This is the host where you will connect to the proxmox API from. It’s the equivalent to going to https://<api_host>:8006 in your browser.
- storage: This the name of the storage in your cluster where your VM will be stored. In my case, this was my ceph pool.
- timeout: I’m not sure if this value is necessary in this playbook, but I left it anyway. The docs state that this value is for graceful VM stop. So if you were trying to stop a VM with “state: stopped” it would wait 90 seconds for the VM to gracefully stop. At 90 seconds, if the VM hasn’t stopped, it will be forcefully stopped.
Issues I Had
Working Off of the Wrong Node
The first error I received was because I had the wrong value set for node. My error looked like this:
FAILED! => {“changed”: false, “msg”: “Unable to clone vm ansible-deploy-test from vmid 9000=500 Internal Server Error: unable to find configuration file for VM 9000 on node ‘opti-hst-01′”, “vmid”: 9000}
I received this error because I had the value for node set to a node where my cloud-init template didn’t exist.
Issues with Parallelism
After adjusting my node value, I had semi-success. The VM deployed, and I saw ‘changed’ on my first host in the cluster, but the other two displayed this error:
FAILED! => {“changed”: false, “msg”: “Reached timeout while waiting for creating VM. Last line in task before timeout: [{‘t’: ‘trying to acquire lock…’, ‘n’: 1}]”}
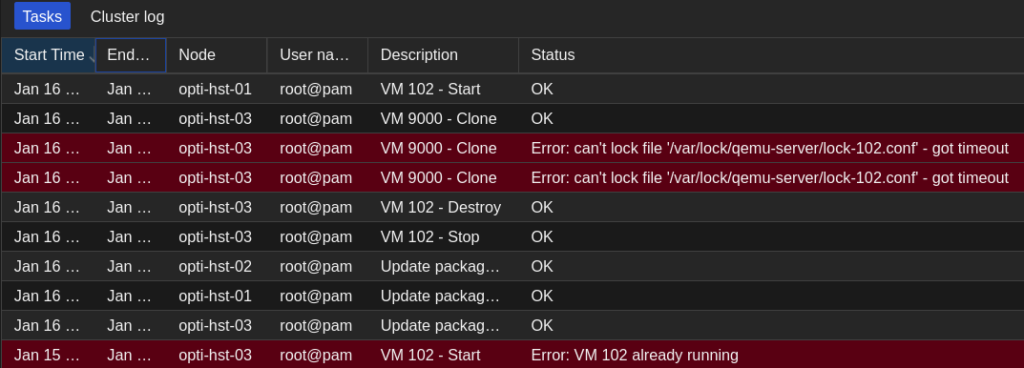
It took me a minute to figure this out. But I realized that this was an issue with the way Ansible uses parallelism. By default, Ansible will run your tasks against the desired hosts in batches, or forks. The default fork value for forks is 5. This means that if our proxmox group had 9 hosts, Ansible would run its tasks against the first 5 all at once, and then the remaining 4 all at once. So what was happening (since I added all 3 of my proxmox nodes to the proxmox group in my hosts file) was that Ansible was trying to clone and start the exact same VM, with the same machine ID, from 3 different hosts all at once. This is what caused the ‘trying to acquire lock’ error. Flipping over to the Proxmox GUI we see this:

You’ll see that there are three simultaneous tasks with the file lock error. One succeeded and two timed out.
There are several fixes for this. We could change the default fork value in our ansible.cfg file, but that would change the parallelism across the board. We really just need an adjustment for this playbook. So, I opted to use the serial keyword. By adding the line serial: 1 to the main playbook, we’re telling Ansible to set the batch size to one host at a time for this playbook. Main.yml now looks like this:
---
- name: Initial setup for proxmox servers
  hosts: proxmox
  serial: 1
  user: root
  become: true

  tasks:
    - name: Update apt and install required system packages
      apt:
        pkg:
          - aptitude
          - curl
          - nano
          - vim
          - git
          - ufw
          - neofetch
          - python3-proxmoxer
          - python3-requests
        state: latest
        update_cache: true

    - name: Basic security hardening
      import_tasks: security.yml

    - name: Install and bring up tailscale
      import_tasks: ../tailscale/tailscale.yml

    - name: Deploy VMs
      import_tasks: machines-copy.yml
...
Network Issues
After fixing the node value and the parallelism issues, I finally had a completely successful playbook run. The only issue was that my VM didn’t have any network connection. I quickly realized this was because the cloud-init template doesn’t have a VLAN tag.

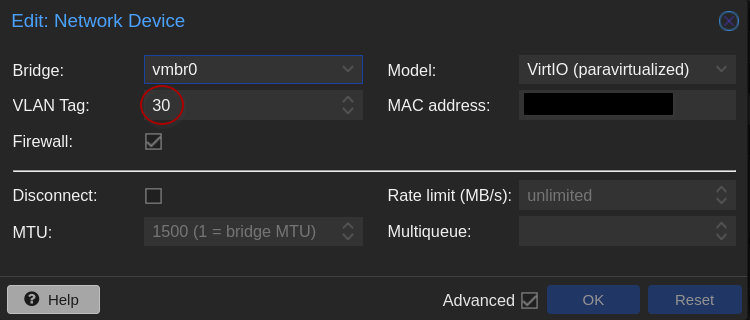
Since I have my home network segmented with VLANs, I use the ‘VLAN aware’ feature on my network brigde in proxmox. This allows me to connect the host to a trunk (or tagged) port on the switch, and select the VLAN in the Proxmox GUI when I create a VM. The host will send traffic over the wire pre-tagged with the selected VLAN, allowing it to traverse the trunk port. This gives me added flexibility when creating VMs and it’s something I was previously doing manually after cloning my cloud-init template.
A quick read of the docs left me with this addition to the machines.yml file
net: ‘{“net0″:”virtio,bridge=vmbr0,tag=7”}’
---
- name: Clone cloud-init template
  community.general.proxmox_kvm:
    node: opti-hst-01 # Changed from value: proxmox
    vmid: 9000 # This happened to be the same value as my cloudinit VM
    clone: gemini # Left this as is, later discovering the value doesn't matter since a vmid is specified above..
    name: cloud-1
    net: '{"net0":"virtio,bridge=vmbr0,tag=7"}'
    api_user: root@pam # Changed from value: ansible@pam
    api_token_id: "{{ proxmox_token_id }}" # Changed from value: ansible_pve_token
    api_token_secret: "{{ proxmox_token_secret }}" # Changed from value: 1daf3b05-5f94-4f10-b924-888ba30b038b
    api_host: 192.168.0.100 # Changed from value: your.proxmox.host
    storage: ceph-pool-01 # Changed from value: ZFS01
    timeout: 90

- name: Start VM
  community.general.proxmox_kvm:
    node: opti-hst-01 # Changed from value: proxmox
    name: cloud-1
    api_user: root@pam # Changed from value: ansible@pam
    api_token_id: "{{ proxmox_token_id}}" # Changed from value: ansible_pve_token
    api_token_secret: "{{ proxmox_token_secret }}" # Changed from value: 1daf3b05-5f94-4f10-b924-888ba30b038b
    api_host: 192.168.0.100 # Changed from value: your.proxmox.host
    state: started
Unfortunately, after several attempts, the playbook would run with no errors but the VM would not have the tag added to it’s network interface. After some google-fu, I suspect this to be a bug (or at least a lack of a feature) to the proxmox_kvm module. Apparently at some point the Proxmox API only supported modification of VM hardware on creation; lacking the ability to ‘update’ an existing VM’s hardware. There’s an open issue regarding this — the comments seem to indicate that the feature has been merged, but the issue remains open. I left this as a ‘future me’ problem for now… I’ll just have to manually add the tag to my VMs until I can figure something out.
Specifying the Target Host
At this point, I had everything working (except the VLAN tags). The playbook ran with no errors, and the VM deployed properly with a network connection. However, I noticed that the VM would deploy only on the node set in the node value. Since I have a cluster, I wanted the ability to specify what node the VM would be cloned to. Luckily this is as easy as adding the line:
target: <desired node name>
So my final playbook looks like this:
---
- name: Clone cloud-init template
  community.general.proxmox_kvm:
    node: opti-hst-01 # Changed from value: proxmox
    target: opti-hst-03 # added
    vmid: 9000 # This happened to be the same value as my cloudinit VM
    clone: gemini # Left this as is, later discovering the value doesn't matter since a vmid is specified above..
    name: cloud-1
    net: '{"net0":"virtio,bridge=vmbr0,tag=7"}' # Added but not working
    api_user: root@pam # Changed from value: ansible@pam
    api_token_id: "{{ proxmox_token_id }}" # Changed from value: ansible_pve_token
    api_token_secret: "{{ proxmox_token_secret }}" # Changed from value: 1daf3b05-5f94-4f10-b924-888ba30b038b
    api_host: 192.168.0.100 # Changed from value: your.proxmox.host
    storage: ceph-pool-01 # Changed from value: ZFS01
    timeout: 90

- name: Start VM
  community.general.proxmox_kvm:
    node: opti-hst-01 # Changed from value: proxmox
    name: cloud-1
    api_user: root@pam # Changed from value: ansible@pam
    api_token_id: "{{ proxmox_token_id}}" # Changed from value: ansible_pve_token
    api_token_secret: "{{ proxmox_token_secret }}" # Changed from value: 1daf3b05-5f94-4f10-b924-888ba30b038b
    api_host: 192.168.0.100 # Changed from value: your.proxmox.host
    state: started
Unfortunately, as it stands, the playbook is not meeting my desired end state, since I cannot declaratively define the VM’s hardware. I suspect that a solution to this could be foregoing the cloning of a template entirely… do I really need to clone a template if I can define what I want in code? But this, also is a problem for future Josh.
