Earlier this week I tried using Ansible to declaratively define the VMs in my homelab’s Proxmox cluster. My method of attack was to basically ‘lift and shift’ my manual methods into an automation platform.

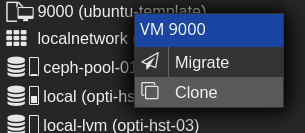
What do I mean by this? Well, my manual method was to right-click and clone a cloud-init template, modify the VM’s hardware, power up the clone and be off to the races. So, I attempted to use Ansible to do exactly this; to clone a cloud-init template.
But there’s a problem with this lift and shift methodology. It doesn’t take into account the theory behind the automation platform. In the same way that a business shouldn’t necessarily lift and shift their infrastructure to the cloud, you shouldn’t lift and shift your tasks into an automation platform either. What I failed to take into account was this: since Ansible is declarative by nature, there really isn’t a need for a template in the first place. Your code is your template!
This post will detail my attempts to provision a VM declaratively with Ansible and cloud-init (not by cloning a template, by creating it ‘from scratch’). As it turns out, there appears to be a limitation of the module which, unfortunately, does end up requiring a template to exist in the cluster. I kicked this can down the road for now and will likely have to include another task that will automate the creation of the template(s) in the first place.
The final code requires a cloud-init VM template to exist somewhere in the cluster (created as with the commands described in TechnoTim’s post). Beyond that, modifying the machine_inventory.yml file is all that is required to provision your desired VMs in the cluster! Read on to see my problems along the way. Or, jump to the working code here.
More Credit to TechnoTim
In my previous post I referenced one of TechnoTim’s videos in which he shows us how to configure a cloud-init template. My strategy in that post was to ‘take it from there’ with Ansible — by having Ansible ensure that X amount of clones of my cloud-init template VM existed. However, after realizing my strategy was wrong, I have now set out to essentially translate the commands in TechnoTim’s post into Ansible. What follows is the problems I encountered, and what I learned along the way.

First Attempt
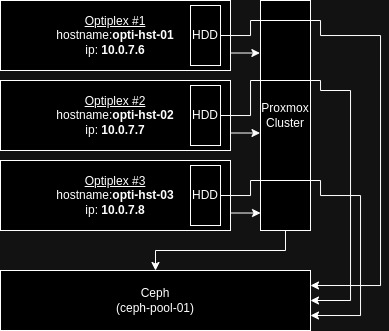
This was the untested code of my first attempt based only on reading the docs. The diagram to the right (click/tap to expand) will be helpful in understanding the code as it outlines my Proxmox environment.
As a reminder, this is a file called machines.yml which is called by an import_tasks line in main.yml
---
- name: Import API token
  include_vars: secrets.yml

- name: Create VM
  community.general.proxmox_kvm:
    # Credentials and host/node to work from
    node: opti-hst-01
    api_user: root@pam
    api_token_id: "{{ proxmox_token_id }}"
    api_token_secret: "{{ proxmox_token_secret }}"
    api_host: 10.0.7.6
    timeout: 90

    # Basic VM info
    vmid: 105
    name: cloud-test
    ostype: l26 # See https://docs.ansible.com/ansible/latest/collections/community/general/proxmox_kvm_module.html

    # Hardware info
    memory: 8192
    cores: 2
    scsi:
      scsi0:
        storage: ceph-pool-01
        size: 64
        format: qcow2
    scsihw: virtio-scsi-pci
    ide:
      ide2: 'ceph-pool-01:cloudinit,format=qcow2'
    vga: serial0
    boot: order=scsi0,ide2

    # Storage and network info
    storage: ceph-pool-01
    net:
      net0: 'virtio,bridge=vmbr0,tag=7'
    ipconfig:
      ipconfig0: 'ip=10.0.7.251/24,gw=10.0.7.1'
    nameservers: 10.0.30.75

    # Cloud-init info
    ciuser: josh
    cipassword: "{{ cipassword }}"

    # Desired state
    state: present
Unfortunately this gave me the following error:
FAILED! => {“changed”: false, “msg”: “creation of qemu VM cloud-test with vmid 105 failed with exception=400 Bad Request: Parameter verification failed.”, “vmid”: 105}
Syntax Issues – Finally Getting a VM to Populate
I had a few small syntax issues that seemed to be producing this error — you’ll notice the different syntax for scsi0 and the use of semicolons (;) instead of commas (,) for the boot order. The following code got a VM to deploy:
---
- name: Import API token
  include_vars: secrets.yml

- name: Create VM
  community.general.proxmox_kvm:
    # Credentials and host/node to work from
    node: opti-hst-03
    api_user: root@pam
    api_token_id: "{{ proxmox_token_id }}"
    api_token_secret: "{{ proxmox_token_secret }}"
    api_host: 10.0.7.6

    # Basic VM info
    vmid: 105
    name: cloud-test
    ostype: l26 # See https://docs.ansible.com/ansible/latest/collections/community/general/proxmox_kvm_module.html

    # Hardware info
    memory: 8192
    cores: 2
    scsi:
      scsi0: 'ceph-pool-01:64,format=qcow2'
    scsihw: virtio-scsi-pci
    ide:
      ide2: 'ceph-pool-01:cloudinit,format=qcow2'
    vga: serial0
    boot: order=scsi0;ide2

    # Storage and network info
    net:
      net0: 'virtio,bridge=vmbr0,tag=7'
    ipconfig:
      ipconfig0: 'ip=10.0.7.251/24,gw=10.0.7.1'
    nameservers: 10.0.30.75

    # Cloud-init info
    ciuser: josh
    cipassword: "{{ cipassword }}"
    sshkeys: "{{ lookup('file', lookup('env','HOME') + '/.ssh/id_rsa.pub') }}"

    # Desired state
    state: present
However, there are still two main issues with the VM that this code produces:

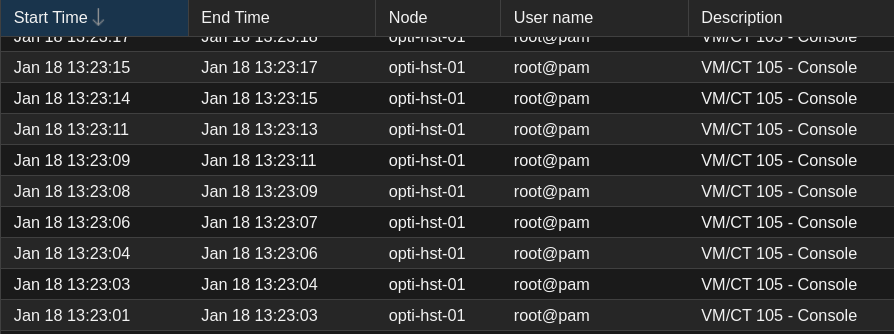
- There’s an issue with the serial port required for the VNC console to work. Even attempting to boot the VM causes a loop of ‘Console’ events in the Proxmox GUI
- The scsi disk that it’s meant to boot from is just a blank disk, not the cloud-init image that we need
So, let’s take care of these issues one at a time.
Adding the serial port
TechnoTim runs the following command to set up the serial port:
qm set 8000 --serial0 socket --vga serial0
This is adding the port serial0 to the VM, and redirecting the VGA output of the VM to this newly created serial0 interface.
Initially, I thought this was taken care of with the line:
vga: serial0
However, this was only doing half the job. It’s trying to redirect the VGA output of the device to serial0 which doesn’t exist on the VM yet. (Probably why the console loop was happening). The proxmox_kvm module has a serial parameter that we can use to finish the job. The documentation had me a little confused with this though. This serial parameter takes a dictionary value, however the docs state that the key should be serial[n] and the value should be ‘(/dev/.+|socket)‘
The key makes sense — serial[n] just means serial + a number. So, starting with 0, our key would be serial0
However, what tripped me up was the value — what this syntax means is that you have two options: you can pass through a physical serial device, in which case the value would be a path that begins with /dev/ — OR your value can just be ‘socket‘ in which case you would give the VM a virtual socket.
Fun fact: the .+ is a regular expression (regex) that means any character, one or more times. And the | (pipe symbol) in this context simply represents a logical OR.
So, after over complicating things, it’s as simple as adding these lines to the playbook. (Commented with # ADDED):
---
- name: Import API token
  include_vars: secrets.yml

- name: Create VM
  community.general.proxmox_kvm:
    # Credentials and host/node to work from
    node: opti-hst-03
    api_user: root@pam
    api_token_id: "{{ proxmox_token_id }}"
    api_token_secret: "{{ proxmox_token_secret }}"
    api_host: 10.0.7.6

    # Basic VM info
    vmid: 105
    name: cloud-test
    ostype: l26 # See https://docs.ansible.com/ansible/latest/collections/community/general/proxmox_kvm_module.html

    # Hardware info
    memory: 8192
    cores: 2
    # scsi:
    #   scsi0: 'ceph-pool-01:64,format=qcow2'
    scsihw: virtio-scsi-pci
    ide:
      ide2: 'ceph-pool-01:cloudinit,format=qcow2'
    serial: # ADDED
      serial0: socket # ADDED
    vga: serial0
    boot: order=scsi0;ide2

    # Storage and network info
    net:
      net0: 'virtio,bridge=vmbr0,tag=7'
    ipconfig:
      ipconfig0: 'ip=10.0.7.251/24,gw=10.0.7.1'
    nameservers: 10.0.30.75

    # Cloud-init info
    ciuser: josh
    cipassword: "{{ cipassword }}"
    sshkeys: "{{ lookup('file', lookup('env','HOME') + '/.ssh/id_rsa.pub') }}"

    # Desired state
    state: present
Importing the Cloud-Init Disk Image to scsi0
Now for the disk image… In TechnoTim’s walkthrough, one of the commands he runs after creating the blank VM is:
qm importdisk 8000 jammy-server-cloudimg-amd64.img local-lvm
This command imports the disk image jammy-server-cloudimg-amd64.img to a VM with vmid 8000, and its backend storage is local-lvm. Note that when this command is run, it will save the disk as vm-<vmid>-disk-0 on the directed storage (in TechnoTim’s case, local-lvm). Next, he attaches the drive to scsi0 with the command:
qm set 8000 --scsihw virtio-scsi-pci --scsi0 local-lvm:vm-8000-disk-0
Now, we need to find a way to translate this into Ansible. Unfortunately, it doesn’t look like there is a clean way to do this with the proxmox_kvm module. We could handle it with Ansible’s built in shell module, but I want to avoid doing that as it could ruin the declarative nature that I’m trying to achieve.
I opted instead to add an additional task using the proxmox_disk module. This module has an import_from parameter. The docs provide the option of using <storage>:<vmid>/<full_name> or <absolute_path>/<full_path>.
I first got this to work using the first option, which is importing the disk from an existing one on another VM (in this case, the template). However, I realized the limitations of this are that this task will only work when the VM has been created on the same node as the template (or whatever VM the disk is being imported from).
So, I tried using the absolute path option, but ran into permission errors even though the playbook is being run as root (and all of the api credentials are root too). I’m not sure if this is a bug or if I’m just missing something.
I was about ready to give in and simply accept this limitation. However, after sleeping on it, I realized I could simply create the VM and import the disk on the node that holds the template, and then add another task that migrates the VM to the desired node afterwards!
Now, as for automating the creation of the template itself… (or, more ideally, finding a solution that doesn’t require a template in the first place)… I’ve put that off for another day.
The below code contains the additional task to import the disk from the template VM as well as a final task to power the VM on once created.
---
- name: Import API token
  include_vars: secrets.yml

- name: Create VM
  community.general.proxmox_kvm:
    # Credentials and host/node to work from
    node: opti-hst-03 # This is the node where the VM will be created
    api_user: root@pam
    api_token_id: "{{ proxmox_token_id }}"
    api_token_secret: "{{ proxmox_token_secret }}"
    api_host: 10.0.7.8

    # Basic VM info
    vmid: 105
    name: cloud-test
    ostype: l26 # See https://docs.ansible.com/ansible/latest/collections/community/general/proxmox_kvm_module.html

    # Hardware info
    memory: 8192
    cores: 2
    scsihw: virtio-scsi-pci
    ide:
      ide2: 'ceph-pool-01:cloudinit,format=qcow2'
    serial:
      serial0: socket
    vga: serial0
    boot: order=scsi0;ide2

    # Storage and network info
    net:
      net0: 'virtio,bridge=vmbr0,tag=7'
    ipconfig:
      ipconfig0: 'ip=10.0.7.251/24,gw=10.0.7.1'
    nameservers: 10.0.30.75

    # Cloud-init info
    ciuser: josh
    cipassword: "{{ cipassword }}"
    sshkeys: "{{ lookup('file', lookup('env','HOME') + '/.ssh/id_rsa.pub') }}"

    # Desired state
    state: present

- name: Import cloud-init disk
  community.general.proxmox_disk:
    api_user: root@pam
    api_token_id: "{{ proxmox_token_id }}"
    api_token_secret: "{{ proxmox_token_secret }}"
    api_host: 10.0.7.8 # This must be the IP of the node where the disk exists
    vmid: 105
    disk: scsi0
    import_from: ceph-pool-01:base-9000-disk-0
    storage: ceph-pool-01
    state: present

- name: Migrate VM to desired node
  community.general.proxmox_kvm:
    node: opti-hst-01
    vmid: 105
    api_user: root@pam
    api_token_id: "{{ proxmox_token_id }}"
    api_token_secret: "{{ proxmox_token_secret }}"
    api_host: 10.0.7.6
    migrate: true
    state: started

- name: Start VM
  community.general.proxmox_kvm:
    vmid: 105
    api_user: root@pam
    api_token_id: "{{ proxmox_token_id }}"
    api_token_secret: "{{ proxmox_token_secret }}"
    api_host: 10.0.7.6
    state: started
  ignore_errors: true
Success! I finally have a working playbook that will create a VM configured with all of my cloud-init parameters. I can run this playbook, take a short coffee break, and then ssh into the VM and do whatever I want with it. That’s pretty freaking cool if you ask me!
Improving the Code with Variables
The code above isn’t very portable, though. You would have to change several areas in the code to make it fit your own use case. So I’ve added another variable file called machine_inventory.yml — In this file you could add as many machines as you like with the given attributes and the below code will create/migrate them.
---
- name: Import encrypted variables
  include_vars: secrets.yml

- name: Import machine inventory
  include_vars: machine_inventory.yml

- name: Create VM
  community.general.proxmox_kvm:
    # Credentials and host/node to work from
    node: opti-hst-03
    api_user: "{{ proxmox_username }}"
    api_token_id: "{{ proxmox_token_id }}"
    api_token_secret: "{{ proxmox_token_secret }}"
    api_host: "{{ ansible_facts['vmbr0.7']['ipv4']['address'] }}"

    # Basic VM info
    vmid: "{{ item.vmid }}"
    name: "{{ item.name }}"
    ostype: "{{ item.ostype }}" # See https://docs.ansible.com/ansible/latest/collections/community/general/proxmox_kvm_module.html

    # Hardware info
    memory: "{{ item.memory }}"
    cores: "{{ item.cores }}"
    scsihw: virtio-scsi-pci
    ide:
      ide2: '{{ item.storage }}:cloudinit,format=qcow2'
    serial:
      serial0: socket
    vga: serial0
    boot: order=scsi0;ide2

    ## TODO - Find a way to specify number of interfaces in vars
    # Storage and network info
    net:
      net0: 'virtio,bridge=vmbr0,tag={{ item.vlan }}'
    ipconfig:
      ipconfig0: 'ip={{ item.ip_address }},gw={{ item.gateway }}'
    nameservers: "{{ nameservers }}"

    # Cloud-init info
    ciuser: "{{ ciuser }}"
    cipassword: "{{ cipassword }}"
    sshkeys: "{{ lookup('file', lookup('env','HOME') + '/.ssh/id_rsa.pub') }}"

    # Desired state
    state: present

  # Loop through list of machines in machine_inventory.yml
  loop: "{{ machines }}"

# Import the cloud-init disk from the template VM
- name: Import cloud-init disk
  community.general.proxmox_disk:
    api_user: "{{ proxmox_username }}"
    api_token_id: "{{ proxmox_token_id }}"
    api_token_secret: "{{ proxmox_token_secret }}"
    api_host: "{{ ansible_facts['vmbr0.7']['ipv4']['address'] }}"
    vmid: "{{ item.vmid }}"
    disk: scsi0
    import_from: "{{ item.storage }}:base-9000-disk-0"
    storage: "{{ item.storage }}"
    state: present
  loop: "{{ machines }}"

# Once the disk has been imported, the VM can be migrated to the desired node
- name: Migrate VM to desired node
  community.general.proxmox_kvm:
    vmid: "{{ item.vmid }}"
    node: "{{ item.node }}"
    api_user: "{{ proxmox_username }}"
    api_token_id: "{{ proxmox_token_id }}"
    api_token_secret: "{{ proxmox_token_secret }}"
    api_host: "{{ ansible_facts['vmbr0.7']['ipv4']['address'] }}"
    state: present
    migrate: true
  loop: "{{ machines }}"

# After migration, the VM can be powered on
- name: Start VM
  community.general.proxmox_kvm:
    vmid: "{{ item.vmid }}"
    api_user: "{{ proxmox_username }}"
    api_token_id: "{{ proxmox_token_id }}"
    api_token_secret: "{{ proxmox_token_secret }}"
    api_host: "{{ ansible_facts['vmbr0.7']['ipv4']['address'] }}"
    state: started
  loop: "{{ machines }}"
  ignore_errors: true
An example of machine_inventory.yml
machines:
  - name: machine-1
    vmid: 105
    memory: 8192
    cores: 2
    node: opti-hst-02 # The node to migrate to after creation
    ostype: l26
    storage: ceph-pool-01
    vlan: 7
    ip_address: 10.0.7.251/24
    gateway: 10.0.7.1
    nameservers:
      - 10.0.30.75
      - 10.0.10.75

  - name: machine-2
    vmid: 110
    memory: 4096
    cores: 1
    node: opti-hst-01 # The node to migrate to after creation
    ostype: l26
    storage: ceph-pool-01
    vlan: 30
    ip_address: 10.0.30.251/24
    gateway: 10.0.30.1
    nameservers:
      - 10.0.30.75
      - 10.0.10.75
The next step is to figure out a way to avoid the need to migrate the VMs to the desired node. Ideally, the playbook would create the machines on their desired nodes directly. Additionally, it would be ideal to figure out how to avoid the need for a template VM altogether.
Another shout out to TechnoTim for his blog post and video that ultimately inspired this one. He makes great content on multiple platforms and also streams on Twitch. If you haven’t yet, definitely go check out his work!
