Introduction
SSO - or single sign on, is the concept of maintaining one directory of users with their associated permissions across all of your apps. With SSO you don’t have to manage separate sets of credentials per user on each application server, and users don’t have to remember multiple sets of credentials for the various services they use. But, more just being a convenience factor, SSO also improves your overall security posture. You’re able to implement the principle of least privilege by restricting users to only the services they need through a single pane of glass.
Authentik is a free and open source identity provider that integrates with your existing applications. For applications that support OIDC - Open ID Connect, it should integrate seamlessly. But for applications that don’t support OIDC or any of the other modern protocols supported by Authentik, you can also use a proxy provider. That’s what I’ll be going over today, using the forward auth mode and Nginx Proxy Manager.
Prerequisites
You’ll need to own a domain for this. We won’t be exposing anything publicly, but to get valid HTTPS certificates with LetsEncrypt you’ll need to own a domain and be able to prove you own it through a DNS challenge. To follow along, make sure your DNS provider for the domain is Cloudflare. You can either purchase the domain from Cloudflare or follow your registrars instructions to allow Cloudflare to provide your DNS. I originally bought mine through Namecheap and followed their instructions.
For the remainder of this article, any references to example.com refer to the domain you own.
Installing Authentik and NPM
The scope of this post is not meant to cover installing Authentik or Nginx Proxy Manager. I installed them using Ansible and my custom role that automatically adds the containers to Tailscale. For Authentik, this took some dissecting of the Docker compose file they provide. If you’re interested in how this works, I’ll be writing a post about my homelab collection on Ansible galaxy soon. Refer to my tailscale-info github repo for more info on how Tailscale works in my homelab. Here was the playbook for Authentik:
---
- name: Install Authentik
  hosts: authentik

  tasks:
    - name: Include variables
      ansible.builtin.include_vars:
        dir: "{{ vars_dir_path }}/vars"

    - name: Ensure templates folder has correct permissions
      become: true
      ansible.builtin.file:
        path: /home/{{ ansible_user }}/authentik-server/custom-templates
        state: directory
        owner: 1000
        group: "docker"
        mode: "0775"

    - name: Ensure media folder has correct permissions
      become: true
      ansible.builtin.file:
        path: /home/{{ ansible_user }}/authentik-server/media
        state: directory
        owner: 1000
        group: "docker"
        mode: "0775"

    - name: Ensure certs folder has correct permissions
      become: true
      ansible.builtin.file:
        path: /home/{{ ansible_user }}/authentik-worker/certs
        state: directory
        owner: 1000
        group: "docker"
        mode: "0775"

    - name: Install Authentik DB
      ansible.builtin.include_role:
        name: joshrnoll.homelab.tailscale_container
      vars:
        tailscale_container_oauth_client_secret: "{{ tailscale_containers_oauth_client['secret'] }}"
        tailscale_container_no_serve: true
        tailscale_container_service_name: authentik-db
        tailscale_container_image: docker.io/library/postgres
        tailscale_container_tag: 16-alpine
        tailscale_container_userspace_networking: "false"
        tailscale_container_volumes:
          - /home/{{ ansible_user }}/authentik-db/data:/var/lib/postgresql/data
        tailscale_container_env_vars:
          POSTGRES_PASSWORD: "{{ AUTHENTIK_DB_PASS }}"
          POSTGRES_USER: "{{ AUTHENTIK_DB_USER }}"
          POSTGRES_DB: "{{ AUTHENTIK_DB_NAME }}"

    - name: Install Redis
      ansible.builtin.include_role:
        name: joshrnoll.homelab.tailscale_container
      vars:
        tailscale_container_oauth_client_secret: "{{ tailscale_containers_oauth_client['secret'] }}"
        tailscale_container_no_serve: true
        tailscale_container_service_name: authentik-redis
        tailscale_container_image: docker.io/library/redis
        tailscale_container_tag: alpine
        tailscale_container_userspace_networking: "false"
        tailscale_container_volumes:
          - /home/{{ ansible_user }}/authentik-redis/data:/data
        tailscale_container_commands: --save 60 1 --loglevel warning

    - name: Install Authentik server
      ansible.builtin.include_role:
        name: joshrnoll.homelab.tailscale_container
      vars:
        tailscale_container_oauth_client_secret: "{{ tailscale_containers_oauth_client['secret'] }}"
        tailscale_container_service_name: authentik-server
        tailscale_container_image: ghcr.io/goauthentik/server
        tailscale_container_tag: 2024.8.3
        tailscale_container_commands: server
        tailscale_container_userspace_networking: "false"
        tailscale_container_serve_port: 9000
        tailscale_container_volumes:
          - /home/{{ ansible_user }}/authentik-server/media:/media
          - /home/{{ ansible_user }}/authentik-server/custom-templates:/templates
        tailscale_container_env_vars:
          AUTHENTIK_REDIS__HOST: authentik-redis.mink-pirate.ts.net
          AUTHENTIK_POSTGRESQL__HOST: authentik-db.mink-pirate.ts.net
          AUTHENTIK_POSTGRESQL__USER: "{{ AUTHENTIK_DB_USER }}"
          AUTHENTIK_POSTGRESQL__NAME: "{{ AUTHENTIK_DB_NAME }}"
          AUTHENTIK_POSTGRESQL__PASSWORD: "{{ AUTHENTIK_DB_PASS }}"
          AUTHENTIK_SECRET_KEY: "{{ AUTHENTIK_SECRET_KEY }}"
          AUTHENTIK_ERROR_REPORTING_ENABLED: "true"
          AUTHENTIK_EMAIL__HOST: ntfy.mink-pirate.ts.net
          AUTHENTIK_EMAIL__PORT: "25"
          AUTHENTIK_EMAIL__FROM: [email protected]

    - name: Install Authentik worker
      ansible.builtin.include_role:
        name: joshrnoll.homelab.tailscale_container
      vars:
        tailscale_container_oauth_client_secret: "{{ tailscale_containers_oauth_client['secret'] }}"
        tailscale_container_no_serve: true
        tailscale_container_service_name: authentik-worker
        tailscale_container_image: ghcr.io/goauthentik/server
        tailscale_container_tag: 2024.8.3
        tailscale_container_commands: worker
        tailscale_container_userspace_networking: "false"
        tailscale_container_volumes:
          - /home/{{ ansible_user }}/authentik-server/media:/media
          - /home/{{ ansible_user }}/authentik-server/custom-templates:/templates
          - /home/{{ ansible_user }}/authentik-worker/certs:/certs
        tailscale_container_env_vars:
          AUTHENTIK_REDIS__HOST: authentik-redis.mink-pirate.ts.net
          AUTHENTIK_POSTGRESQL__HOST: authentik-db.mink-pirate.ts.net
          AUTHENTIK_POSTGRESQL__USER: "{{ AUTHENTIK_DB_USER }}"
          AUTHENTIK_POSTGRESQL__NAME: "{{ AUTHENTIK_DB_NAME }}"
          AUTHENTIK_POSTGRESQL__PASSWORD: "{{ AUTHENTIK_DB_PASS }}"
          AUTHENTIK_SECRET_KEY: "{{ AUTHENTIK_SECRET_KEY }}"
          AUTHENTIK_ERROR_REPORTING__ENABLED: "true"
          AUTHENTIK_EMAIL__HOST: ntfy.mink-pirate.ts.net
          AUTHENTIK_EMAIL__PORT: "25"
          AUTHENTIK_EMAIL__FROM: [email protected]
The above playbook needs to be called with the -J and -K flags to provide the become and Ansible vault passwords. Additionally, you’ll need to use the -e flag to provide the “vars_dir_path” so that the first task knows the full path to where your Ansible vault file is. It would look like this:
ansible-playbook playbook.yml -i hosts.yml -K -J -e "vars_dir_path=$PWD"
The playbook for NPM is much simpler:
---
- name: Install Nginx Proxy Manager
  hosts: npm

  tasks:
    - name: Include variables
      ansible.builtin.include_vars:
        dir: "{{ vars_dir_path }}/vars"

    - name: Install Nginx Proxy Manager
      ansible.builtin.include_role:
        name: joshrnoll.homelab.tailscale_container
      vars:
        tailscale_container_oauth_client_secret: "{{ tailscale_containers_oauth_client['secret'] }}"
        tailscale_container_service_name: npm
        tailscale_container_image: jc21/nginx-proxy-manager
        tailscale_container_tag: 2.12.1
        tailscale_container_no_serve: true
        tailscale_container_userspace_networking: "false"
        tailscale_container_extra_args: --stateful-filtering=false
        tailscale_container_public: false
        tailscale_container_labels:
          nautical-backup.enable: "true"
        tailscale_container_volumes:
          - /home/{{ ansible_user }}/npm/data:/data
          - /home/{{ ansible_user }}/npm/letsencrypt:/etc/letsencrypt
...
To call this one you don’t need the -K flag for the become password, but everything else is the same.
ansible-playbook playbook.yml -i hosts.yml -J -e "vars_dir_path=$PWD"
Getting a certificate
The first thing we’ll need to do is get a wildcard certificate for our domain. This will allow us to use the same certificate for any sub-domain. So if your domain name is example.com, you can use the same certificate for authentik.example.com as you do for application.example.com.
Creating a Cloudflare API token
To do this NPM will need to conduct a DNS challenge to verify that you own the domain. For some DNS providers this works by manually entering a TXT or CNAME record for the domain you’re requesting a certificate for. NPM would send a DNS request to the provider, and if it sees the entry, it knows you own/have control of the domain. With Cloudflare, we can automate this even further by providing NPM with an API token that has permissions to edit the DNS zone for the domain.
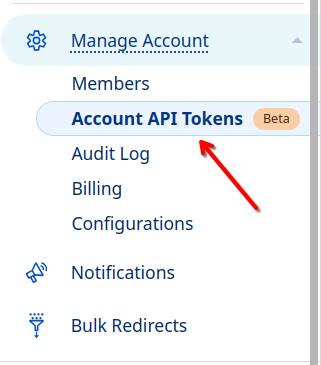
To create a cloudflare API token, log in to your Cloudflare dashboard. On the left-hand panel go to Manage Account –> Account API Tokens.
Click on Create Token.

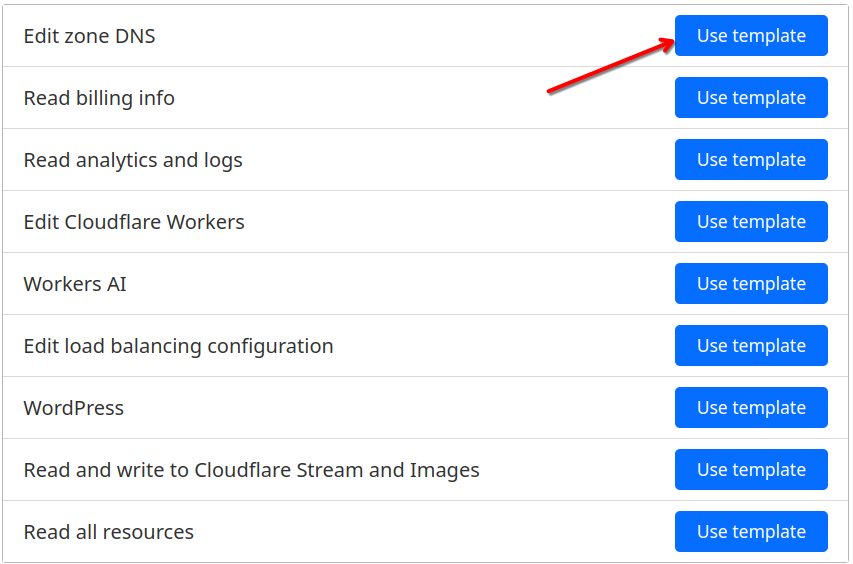
Use the Edit zone DNS template.
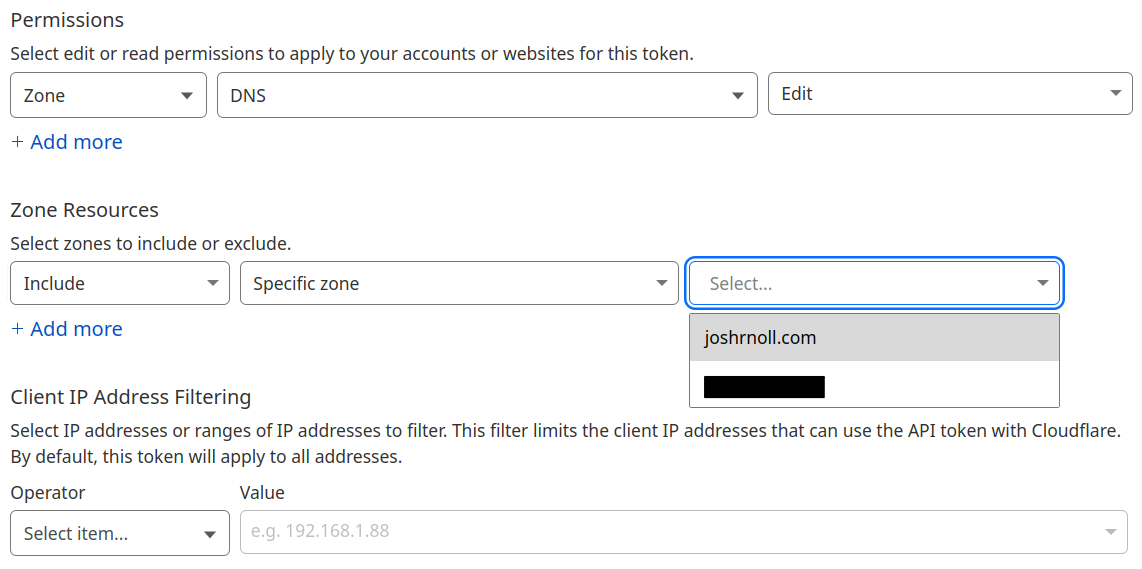
Under Permissions make sure Zone –> DNS –> Edit is selected. Under Zone Resources select Include –> Specific zone –> your domain name. You can leave client IP address filtering, or enter the public IP used by your NPM instance here.
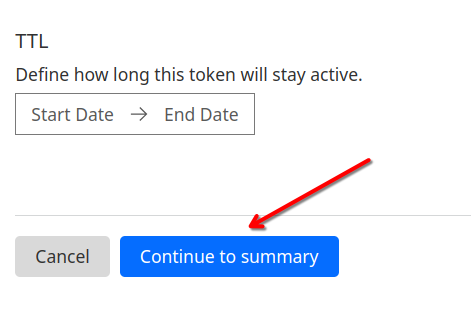
Click Continue to summary.
Finally, click Create Token.

Make sure you save the token somewhere secure like a password manager.
Requesting the Certificate in NPM
Log in to your NPM server. Then, go to SSL Certificates then click Add SSL Certificate.

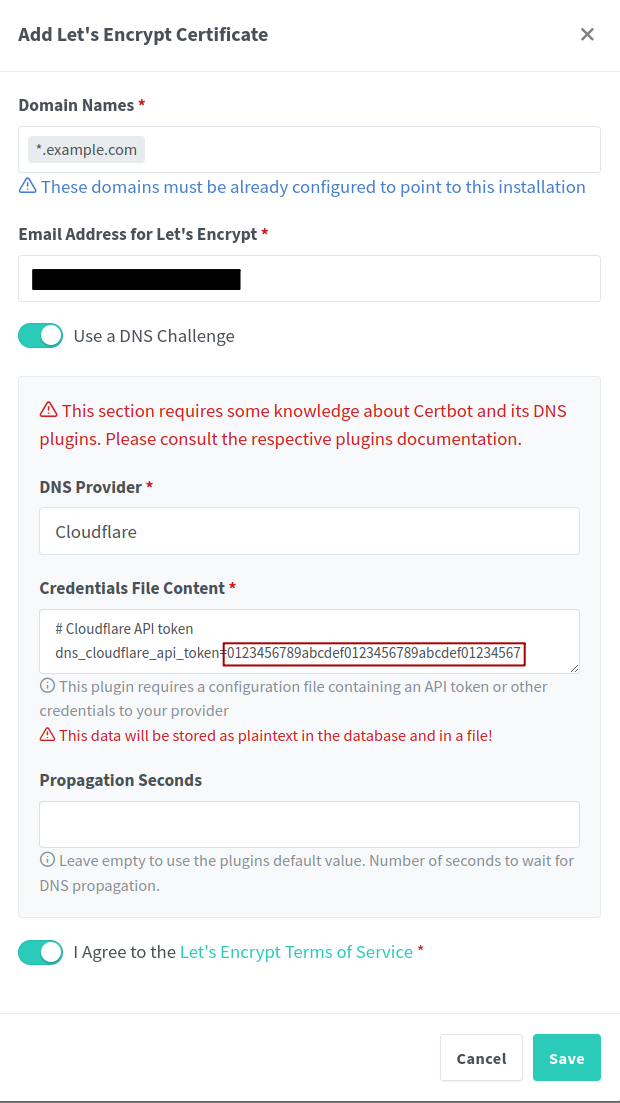
Under Domain Names add *.example.com where example.com is the domain name that you own. Ensure your email address is correct, then select Cloudflare under DNS Provider. In the Credentials File Content section, replace the string beginning in 0123 with your Cloudflare API token. Select I Agree to the Let’s Encrypt Terms of Service and then click save.
Adding Proxy Hosts
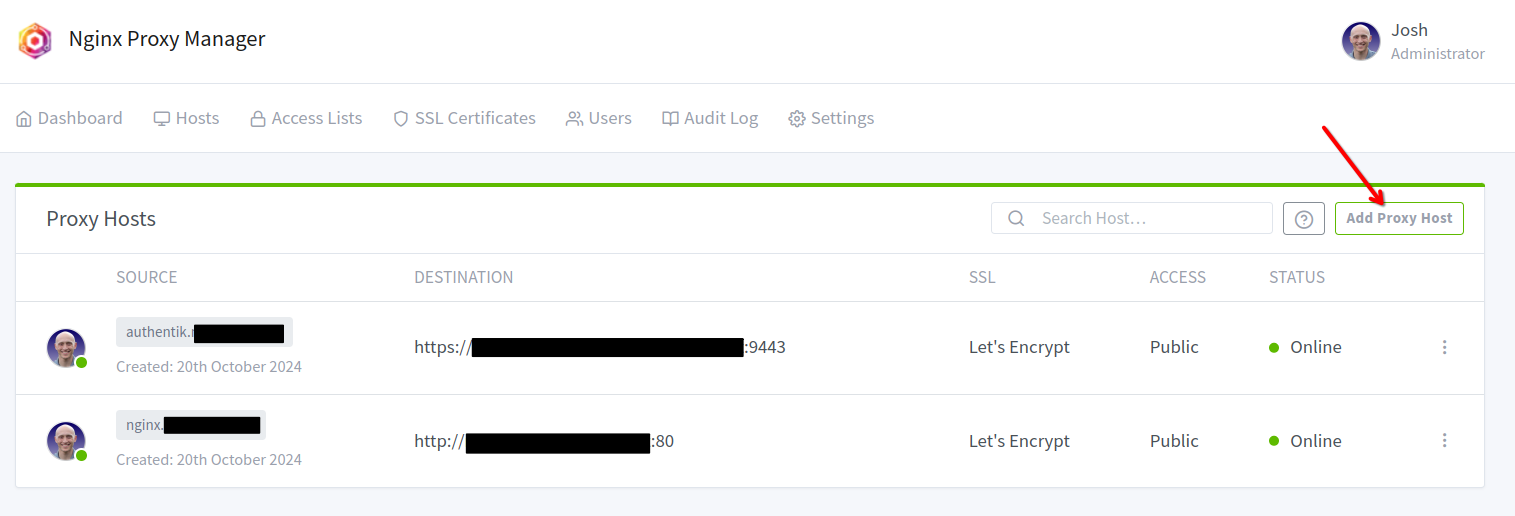
Now that we have our wildcard certificate, we can add our first proxy host. The first proxy host we’ll need to add is for Authentik itself. Go to the Hosts tab in NPM and click Add Proxy Host.
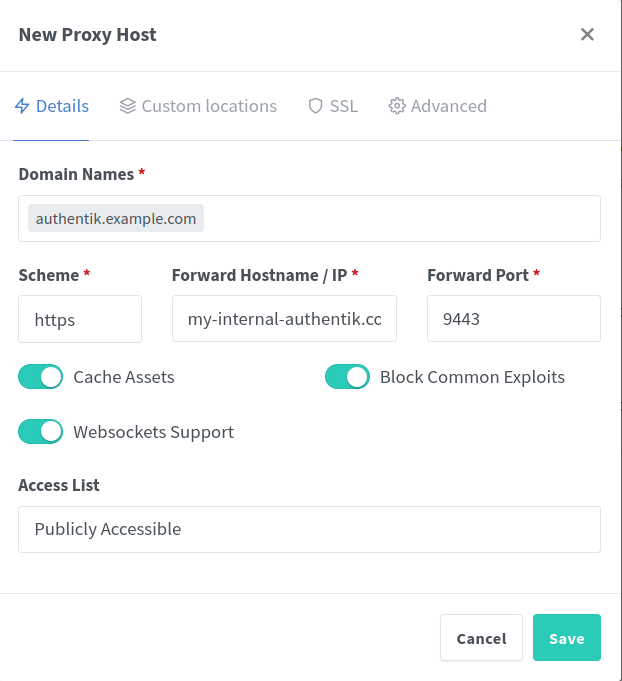
Enter the domain name you wish to access Authentik at. For example, authentik.example.com. In the Forward Hostname/IP enter the internal hostname or IP address of your Authentik server. Keep in mind, of the 4 containers that make up authentik, this is the Server – not the worker, db or redis instance.
If you installed Authentik according to their docs, you likely have the same IP for all of these – differentiated by the ports they publish. Select https and port 9443 to ensure you’re pointing to the server. (You can optionally also select http and port 9000, but I chose the former).
In my case, since each container is added separately to Tailscale, I will add the Authentik server’s magic DNS name here.
Select all of the options – Cache Assets, Websockets Support and Block Common Exploits
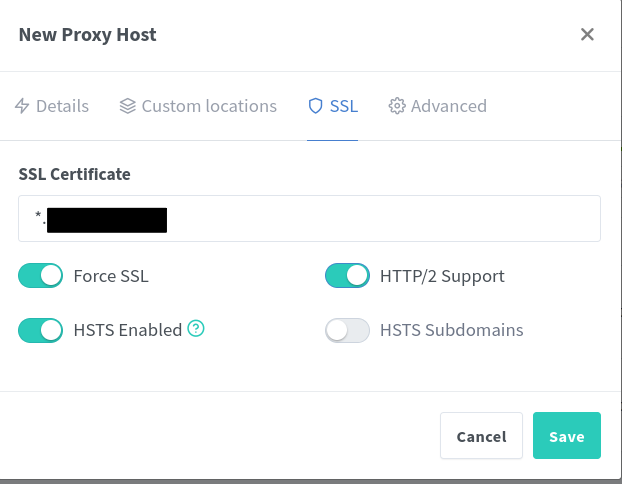
Under the SSL tab, select the certificate we added earlier in the drop-down menu. Then select the options Force SSL, HSTS Enabled, and HTTP/2 Support. Finally, click Save.
Adding DNS records to access your services
For the proxy hosts to work, you’ll need DNS to point you to your NPM instance rather than the actual service for any given host. For example, instead of authentik.example.com pointing to the internal IP of your authentik instance, it should point to the internal IP of your NPM instance. When the request reaches your NPM server, it will be proxied to the authentik server based on the config we just created.
Because I do everything through Tailscale, I add CNAME records to the services magic DNS name. So, for me, authentik.myinternaldomain.com resolves to npm.mytailnetname.ts.net which magic DNS will resolve to the Tailscale IP of my NPM server. If you’re also using tailscale, you can choose to make these entries in a public DNS as well; since Tailscale IPs are public IPs, but can’t be accessed unless you’re authenticated into the Tailnet.
Testing your services
Now, you should be able to access your Authentik instance at https://authentik.example.com. If you can’t, go back and troubleshoot. This will need to be working to continue.
Repeat that same process of adding the proxy host and DNS entries for the application server that you’re trying to add authentication to. For testing, I recommend spinning up a plain Nginx container. Once you can access this container via your domain (something like https://nginx.example.com), you’re ready to move on to the next step.
Configuring Authentik
Now that we have our proxy hosts working, let’s make the necessary configurations in Authentik. We’ll need to:
- Create an Application (a logical reference to the service you are accessing)
- Create a Provider (a configuration for the authentication provider we’ll be using, such as OIDC or SAML)
- Configure the Outpost (the Authentik component that provides services such as LDAP integrations and Proxying).
Adding an Application and Provider
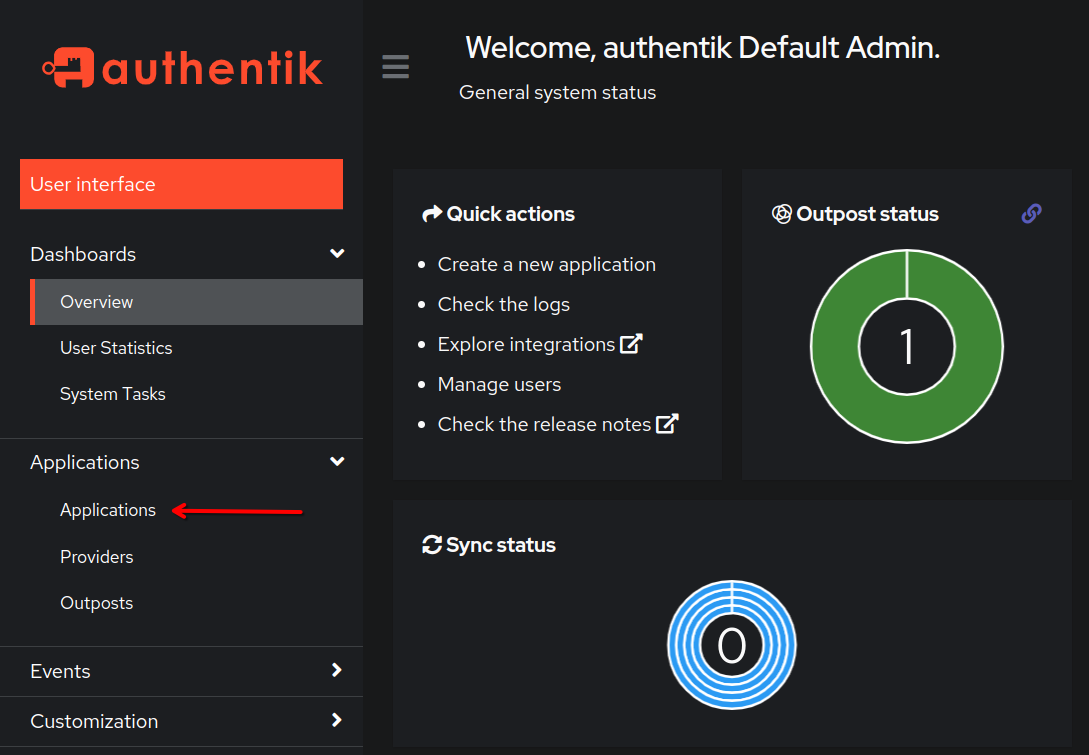
log in to our Authentik server. At the dashboard go to Applications –> Applications.
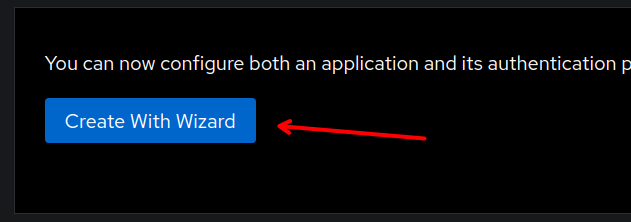
Then click on the Create with Wizard button. This will create both the Application and the associated Provider in one wizard.
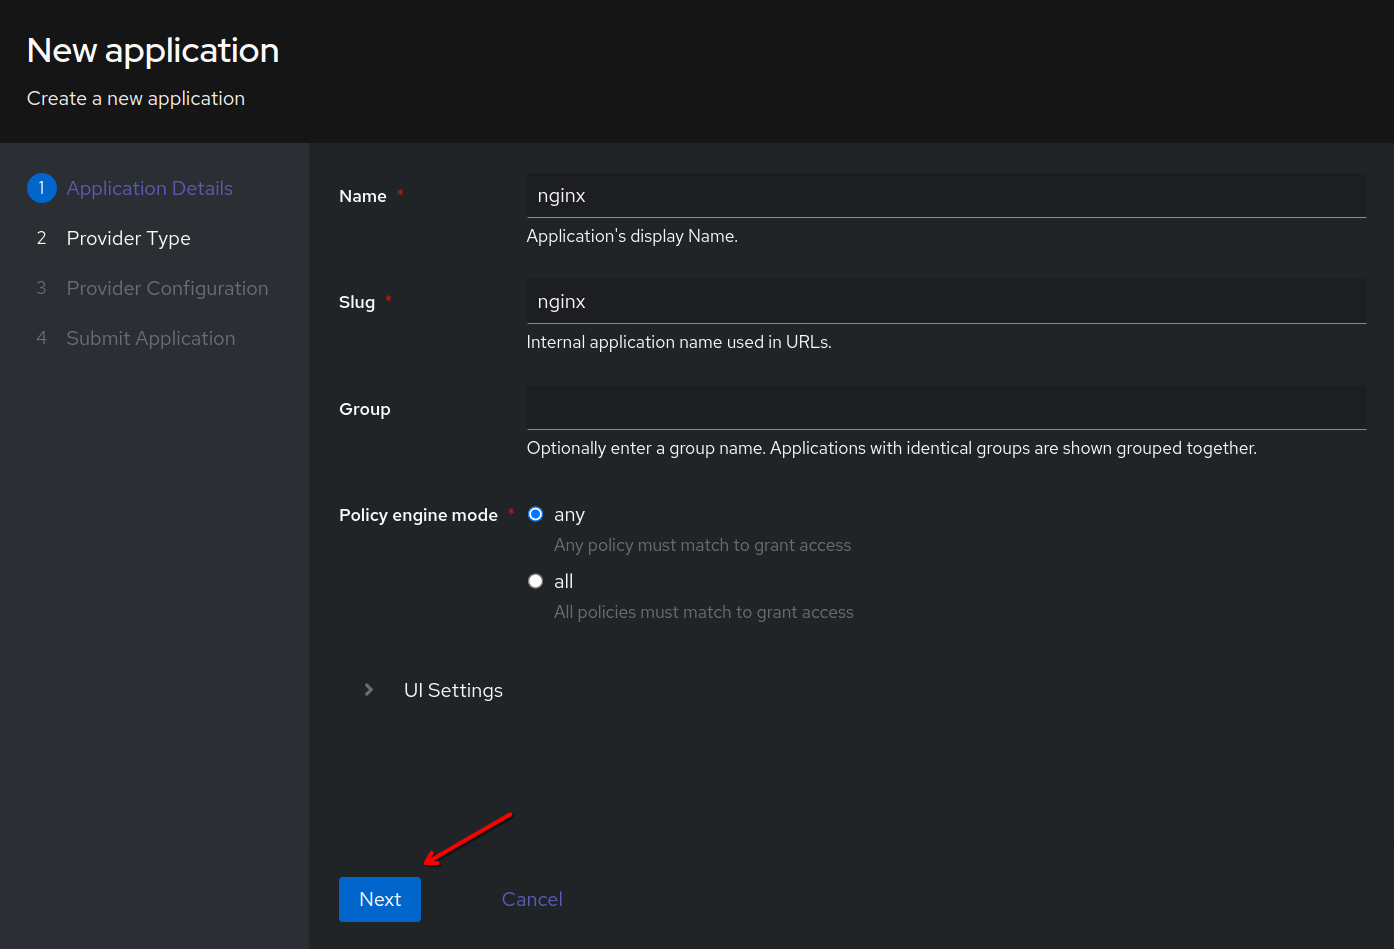
Enter a name for the application. For example nginx. It will auto-fill the slug. Then click Next.
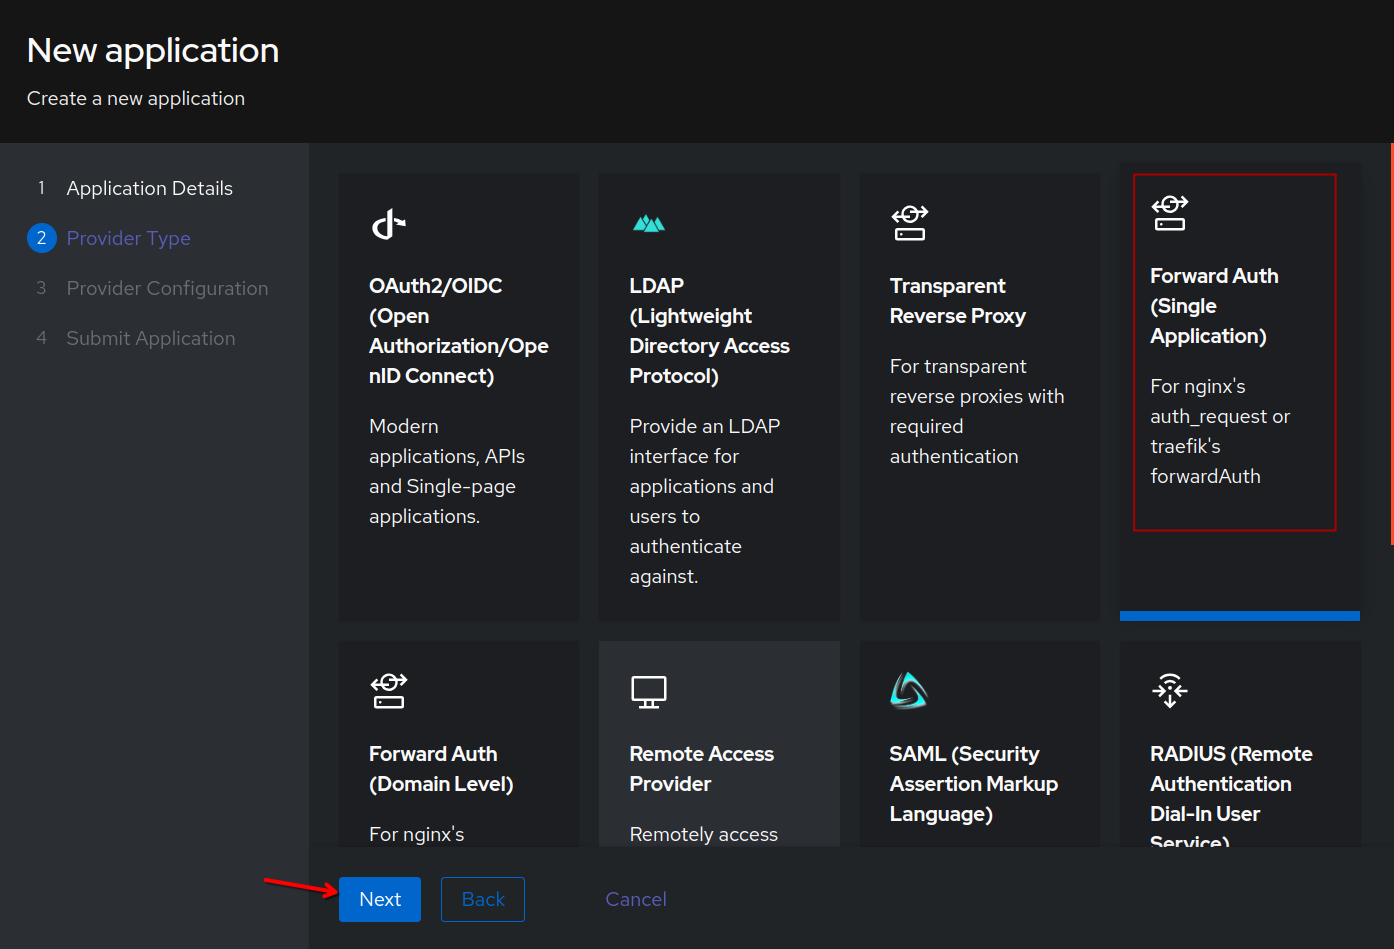
Select Forward Auth (Single Application). This provider type works with an existing reverse proxy and the forward_auth directive. This configuration in a reverse proxy effectively sends the requestor to a third party for authentication. If the authentication server returns a 401, the proxy will deny access.
You can choose to alter the name of the provider if you wish. Select the default-authentication-flow (Welcome to authentik!) and the default-provider-authorization-explicit-consent (Authorize Applicaiton). Enter the external url of your service in External host. This is the public domain name that we configured in the proxy host, not the internal IP/hostname and port.
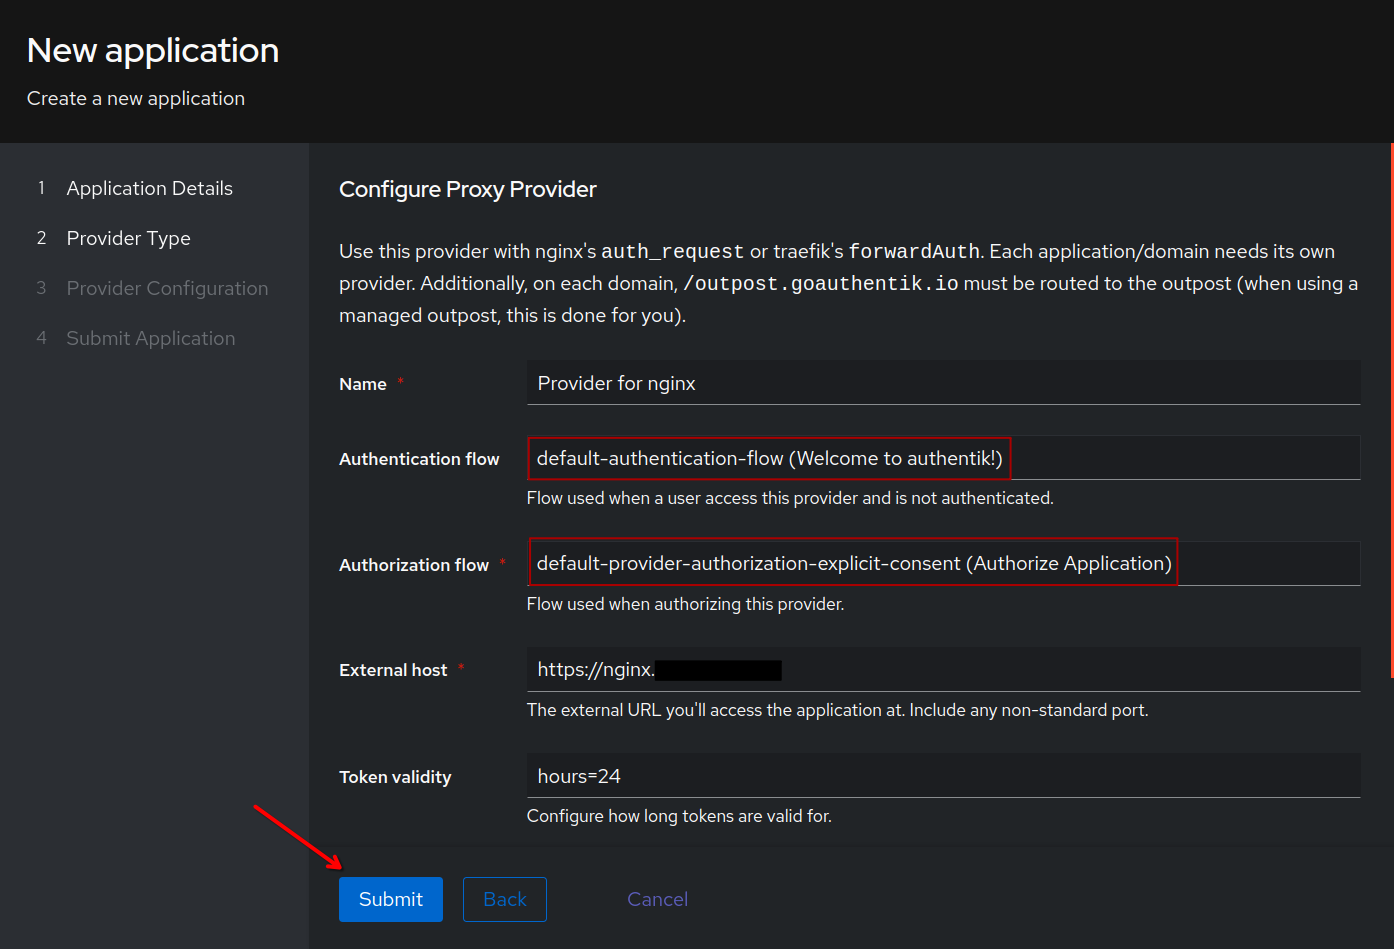
After submitting, go to Applications –> Providers and verify that the provider was created and has a green check mark indicating that it is associated with your application.

Configuring the Outpost
Now, we need to configure the Outpost. Go to Applications –> Outposts. Then click on the edit button for the authentik Embedded Outpost.

Select the provider we created int he previous step and use the arrow button to move it from Available applications to Selected Applications.
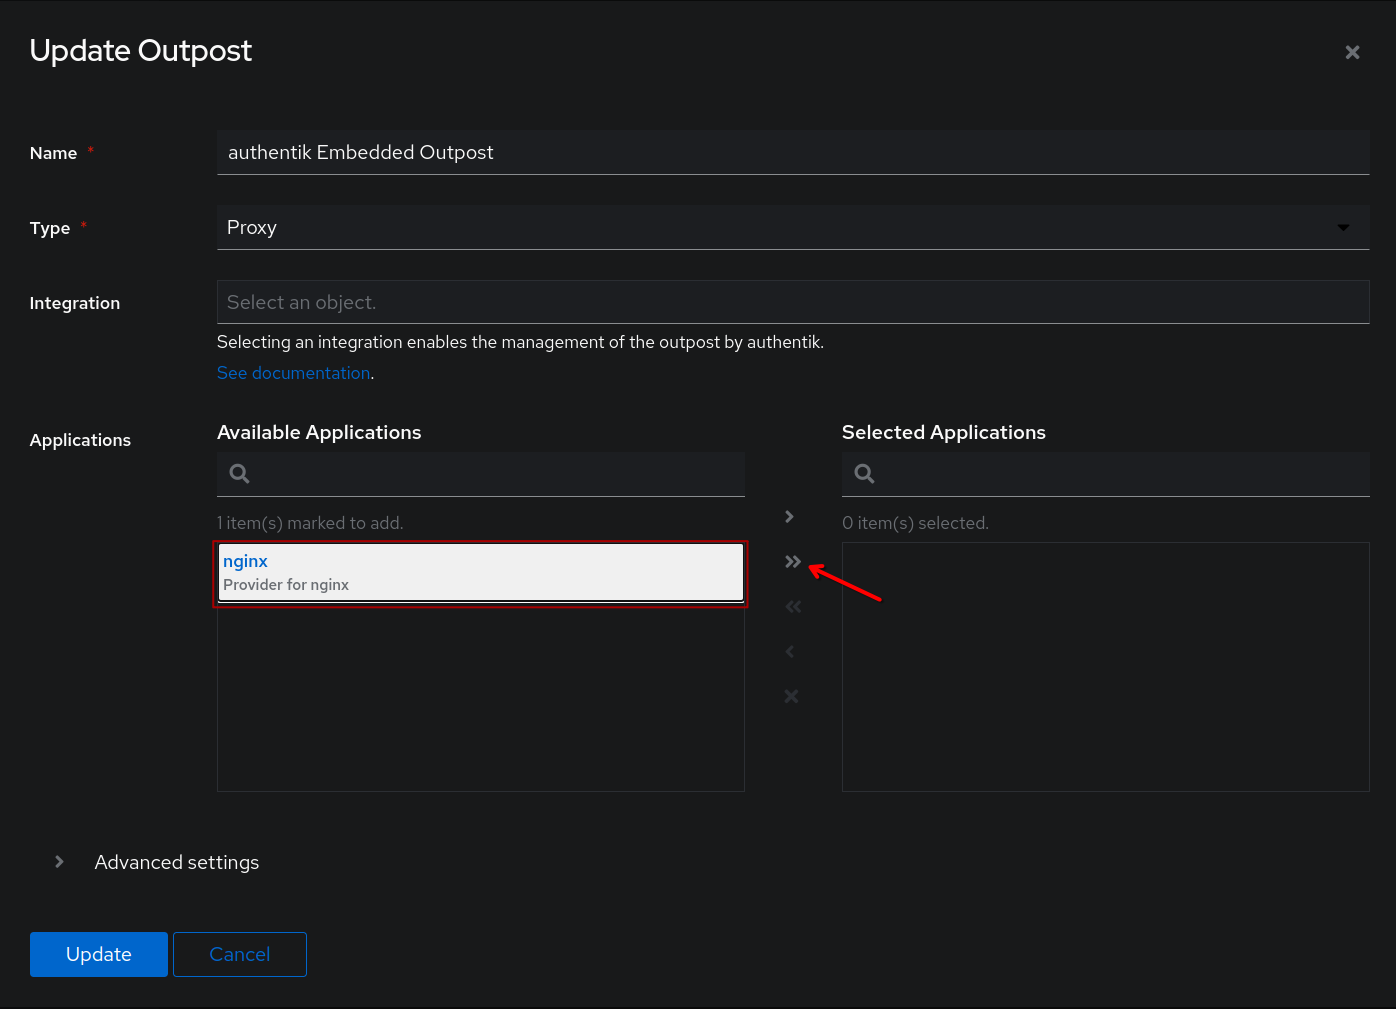
Then, expand the Advanced settings tab.
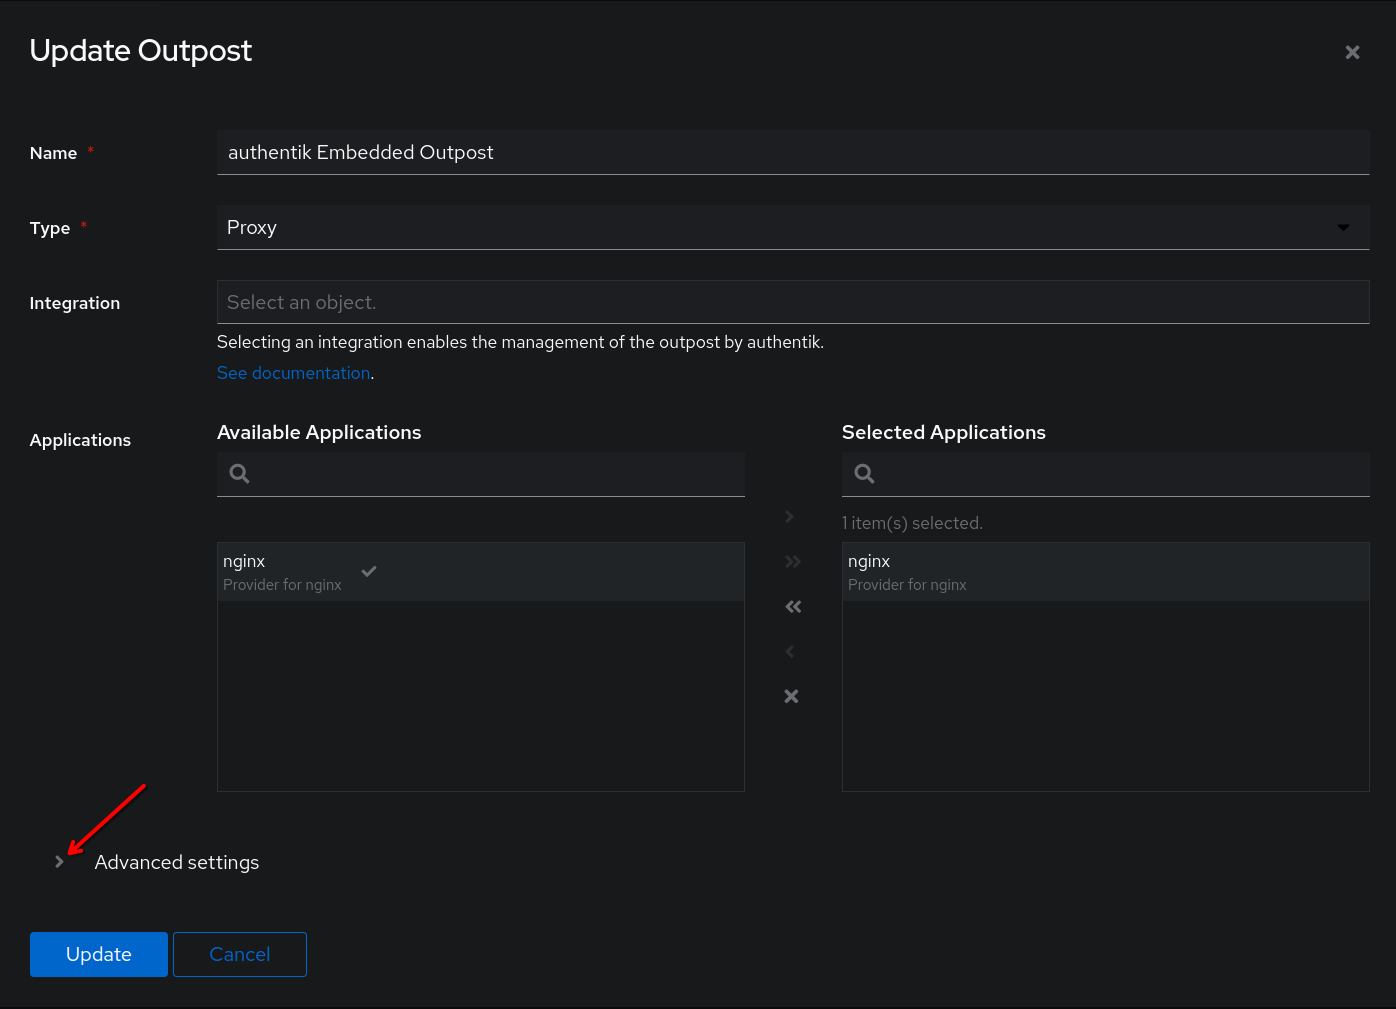
You will see a configuration that looks like this. Look for the authentik_host: field. Ensure this field matches the full url (including https://) of the public domain of your authentik instance. This would be the domain name you configured in the proxy host in NPM. Depending on how you installed Authentik, this may have something else by default. Change it if necessary.
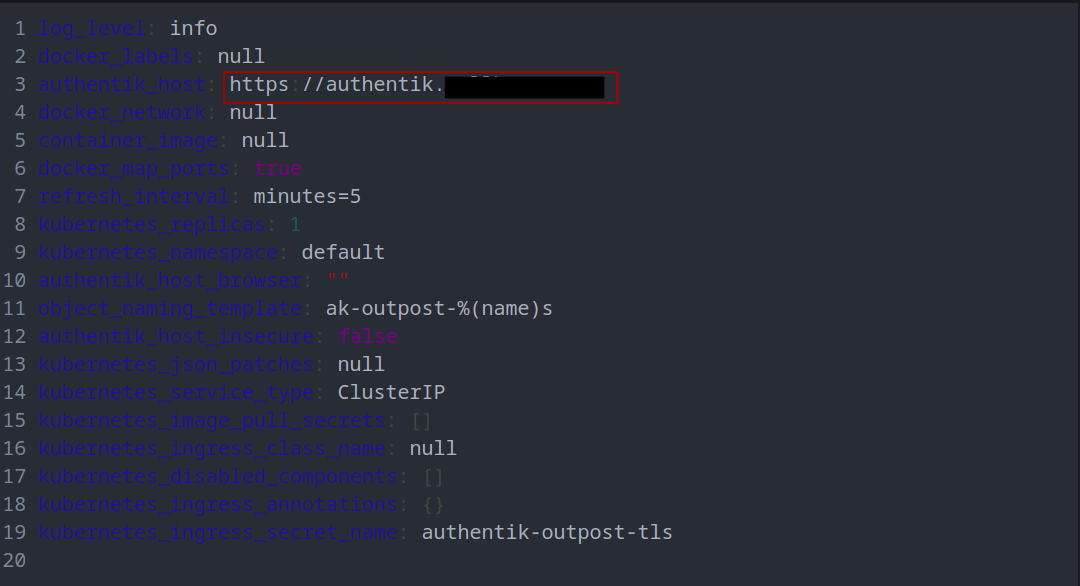
Finally, click Update.
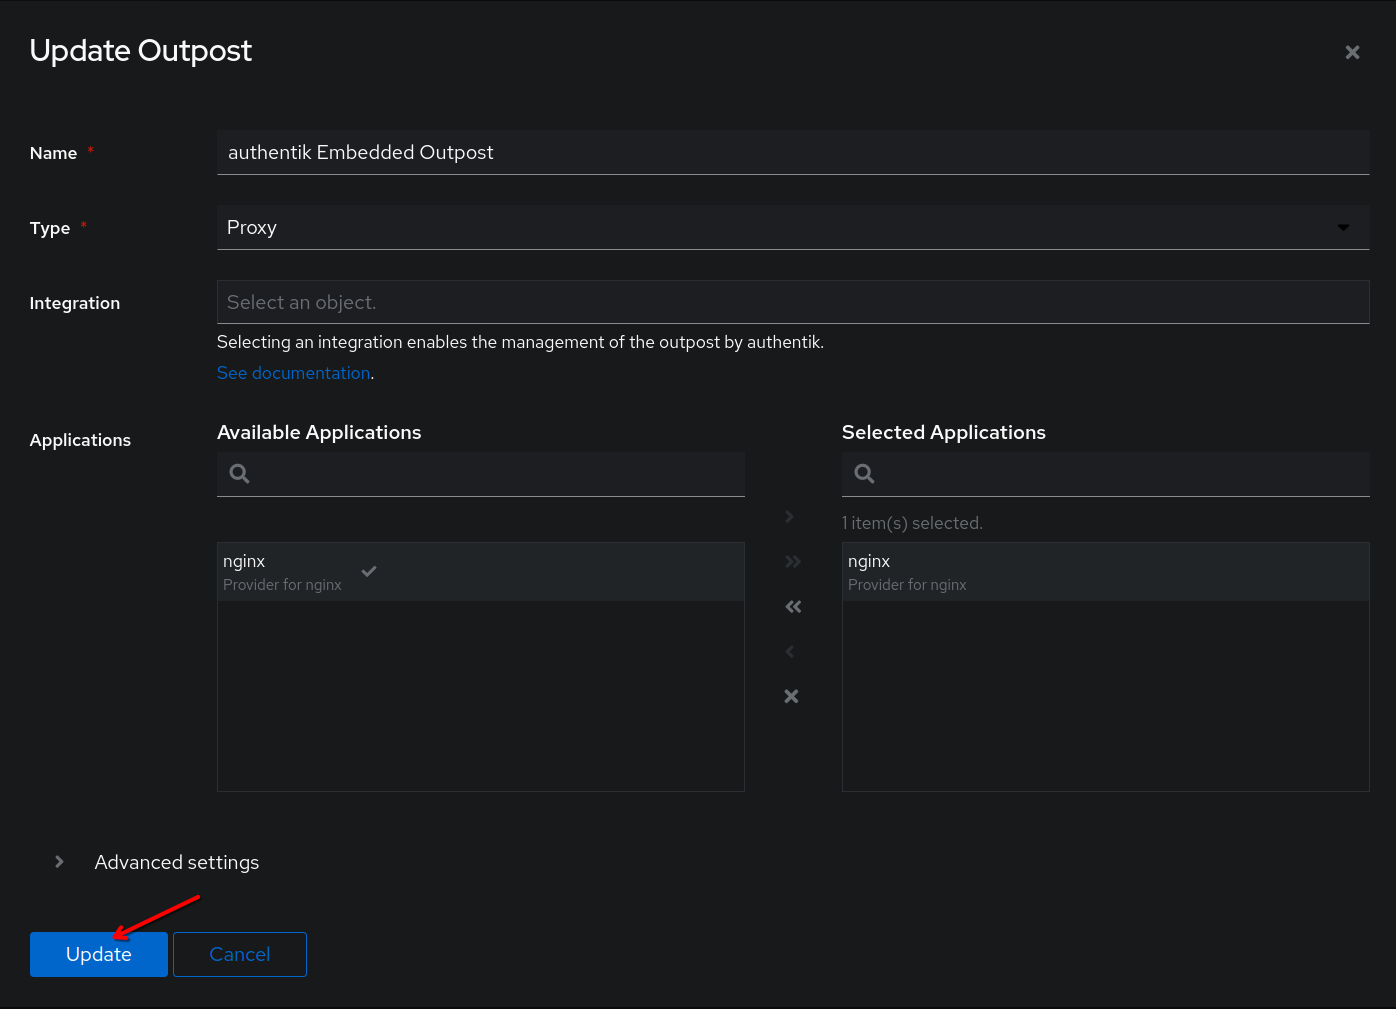
Verify that you have a green checkmark under authentik Embedded Outpost and that you are logging in via the correct public URL that you configured for Authentik in NPM.

Getting the forward auth configuration for NPM
As of version 2024.8.3, Authentik will provide a code snippet that looks like this. This will not work. Use the below code snippet instead. In the location /outpost.goauthentik.io section, be sure to replace the URL with the public URL of your authentik instance.
# Increase buffer size for large headers
# This is needed only if you get 'upstream sent too big header while reading response
# header from upstream' error when trying to access an application protected by goauthentik
proxy_buffers 8 16k;
proxy_buffer_size 32k;

# Make sure not to redirect traffic to a port 4443
port_in_redirect off;

location / {
    # Put your proxy_pass to your application here
    proxy_pass          $forward_scheme://$server:$port;
    # Set any other headers your application might need
    # proxy_set_header Host $host;
    # proxy_set_header ...
    # Support for websocket
    # proxy_set_header Upgrade $http_upgrade;
    # proxy_set_header Connection $connection_upgrade_keepalive;

    ##############################
    # authentik-specific config
    ##############################
    auth_request     /outpost.goauthentik.io/auth/nginx;
    error_page       401 = @goauthentik_proxy_signin;
    auth_request_set $auth_cookie $upstream_http_set_cookie;
    add_header       Set-Cookie $auth_cookie;

    # translate headers from the outposts back to the actual upstream
    auth_request_set $authentik_username $upstream_http_x_authentik_username;
    auth_request_set $authentik_groups $upstream_http_x_authentik_groups;
    auth_request_set $authentik_email $upstream_http_x_authentik_email;
    auth_request_set $authentik_name $upstream_http_x_authentik_name;
    auth_request_set $authentik_uid $upstream_http_x_authentik_uid;

    proxy_set_header X-authentik-username $authentik_username;
    proxy_set_header X-authentik-groups $authentik_groups;
    proxy_set_header X-authentik-email $authentik_email;
    proxy_set_header X-authentik-name $authentik_name;
    proxy_set_header X-authentik-uid $authentik_uid;

    # This section should be uncommented when the "Send HTTP Basic authentication" option
    # is enabled in the proxy provider
    # auth_request_set $authentik_auth $upstream_http_authorization;
    # proxy_set_header Authorization $authentik_auth;
}

# all requests to /outpost.goauthentik.io must be accessible without authentication
location /outpost.goauthentik.io {
    # When using the embedded outpost, use:
    proxy_pass              http://authentik.company:9000/outpost.goauthentik.io;
    # For manual outpost deployments:
    # proxy_pass              http://outpost.company:9000;

    # Note: ensure the Host header matches your external authentik URL:
    proxy_set_header        Host $host;

    proxy_set_header        X-Original-URL $scheme://$http_host$request_uri;
    add_header              Set-Cookie $auth_cookie;
    auth_request_set        $auth_cookie $upstream_http_set_cookie;
    proxy_pass_request_body off;
    proxy_set_header        Content-Length "";
}

# Special location for when the /auth endpoint returns a 401,
# redirect to the /start URL which initiates SSO
location @goauthentik_proxy_signin {
    internal;
    add_header Set-Cookie $auth_cookie;
    return 302 /outpost.goauthentik.io/start?rd=$request_uri;
    # For domain level, use the below error_page to redirect to your authentik server with the full redirect path
    # return 302 https://authentik.company/outpost.goauthentik.io/start?rd=$scheme://$http_host$request_uri;
}
For the intellectually curious, here’s where you should get the code snippet from:
At the Outposts menu, click on the provider we configured for nginx in the providers column.

At the bottom, under Setup you will see several tabs for different reverse proxies. Select Nginx (Proxy Manager). Here you will see the code snippet that Authentik provides. Feel free to compare and contrast to the working code snippet that I provided above.
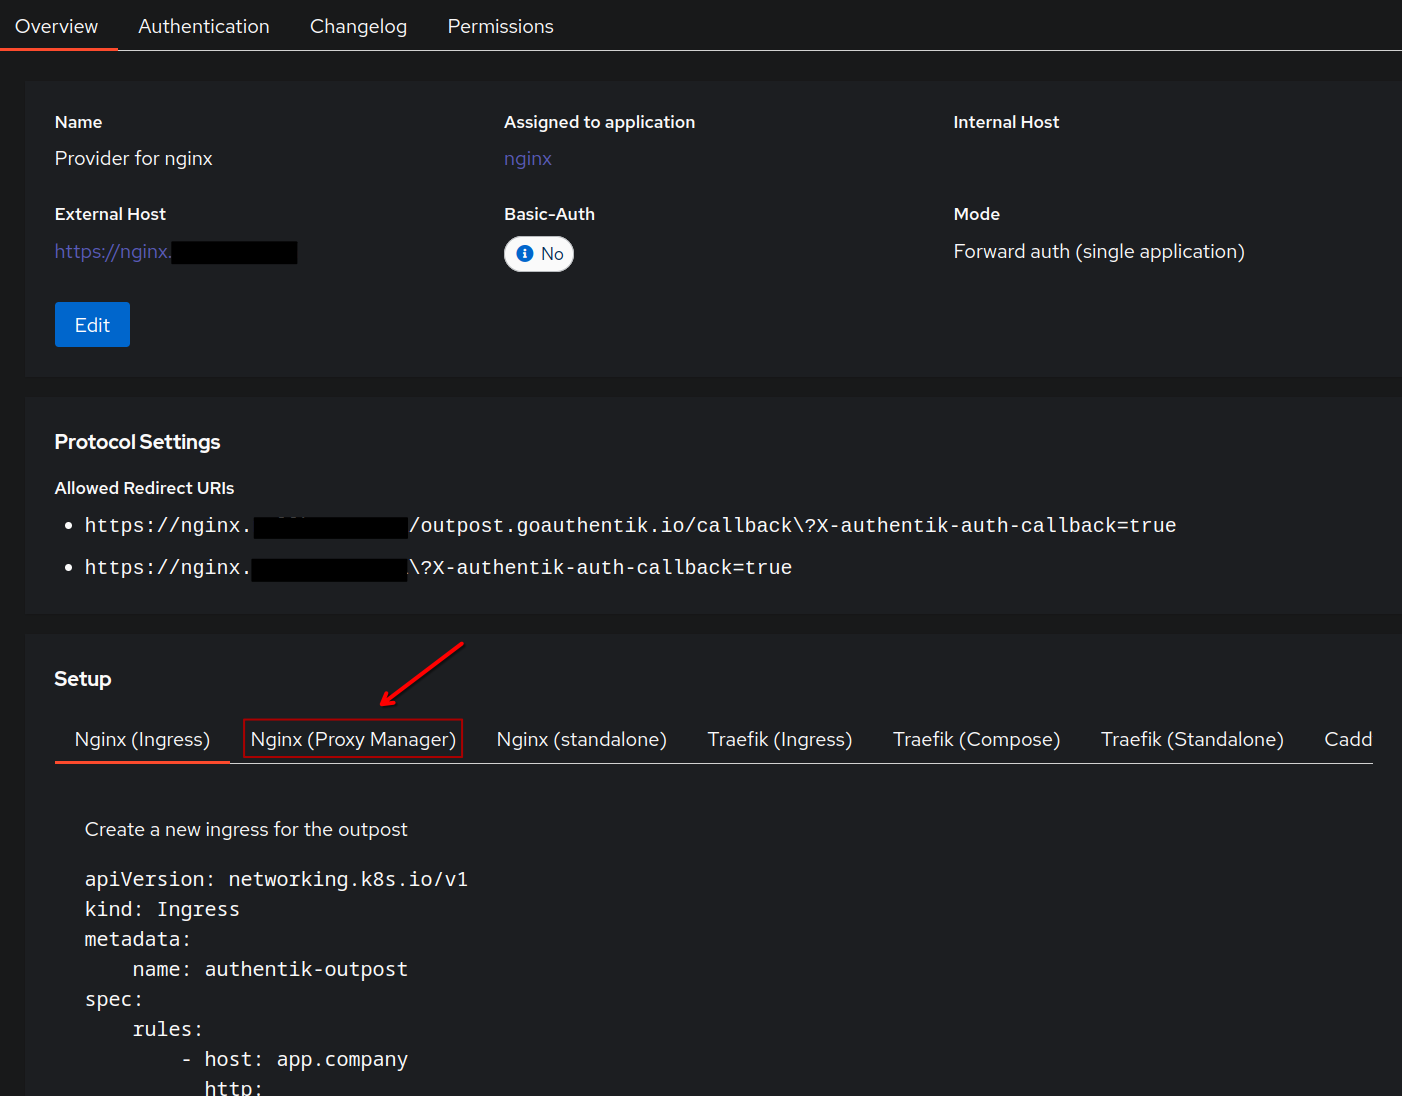
Adding the forward auth configuration to NPM
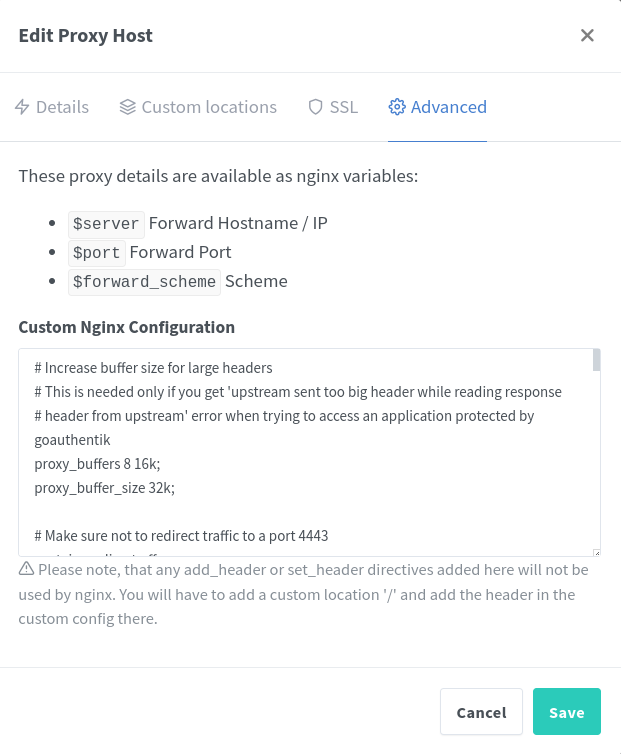
Log back in to NPM and edit the proxy host for your nginx server. In the Advanced tab, paste the code snippet I provided above, double checking that you replaced the URL with your Authentik’s URL.
Testing authentication
If you haven’t done so already, create a user to test with. Go to Directory –> Users.
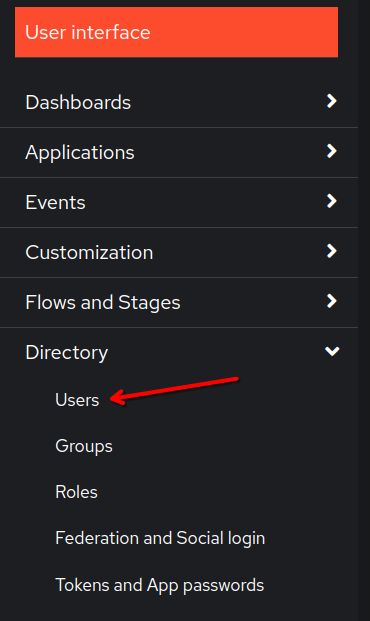
Then click Create.

Fill out the necessary info. Be sure to select Internal for User type.
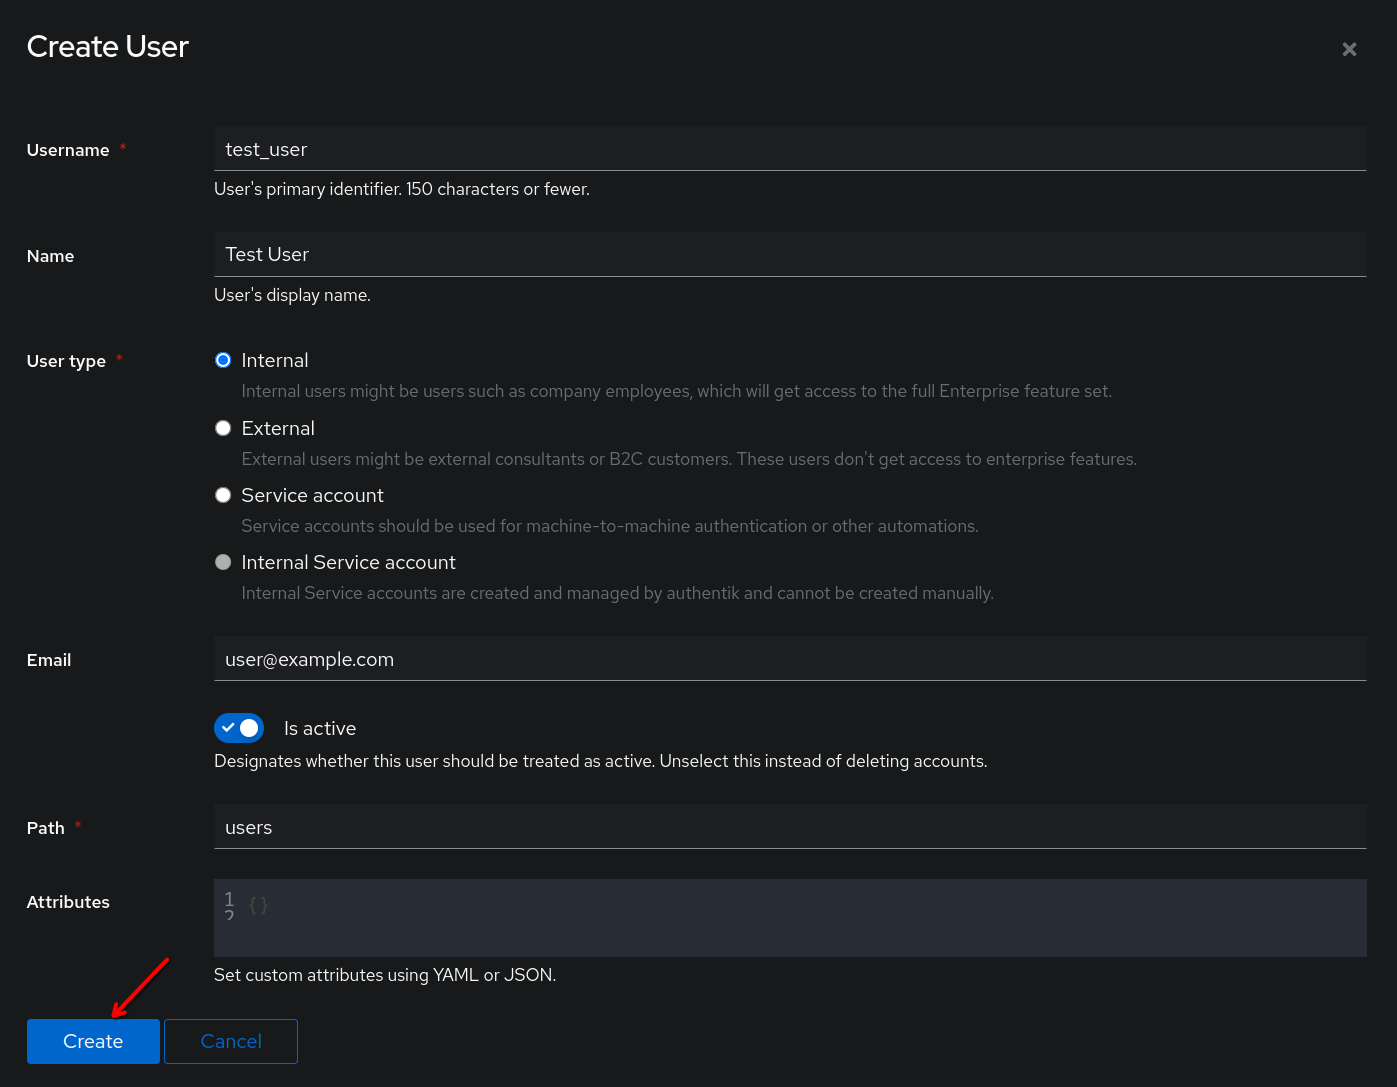
To set the password, click on the username after it has been created.

Then click Set password.

Finally, we’re ready to test! Open a browser and navigate to https://nginx.example.com – you should be redirected to an Authentik login screen.

Log in with the test user we just created.

Click continue when prompted. (This is the explicit part of the authorization flow we selected – using implicit will bypass this).
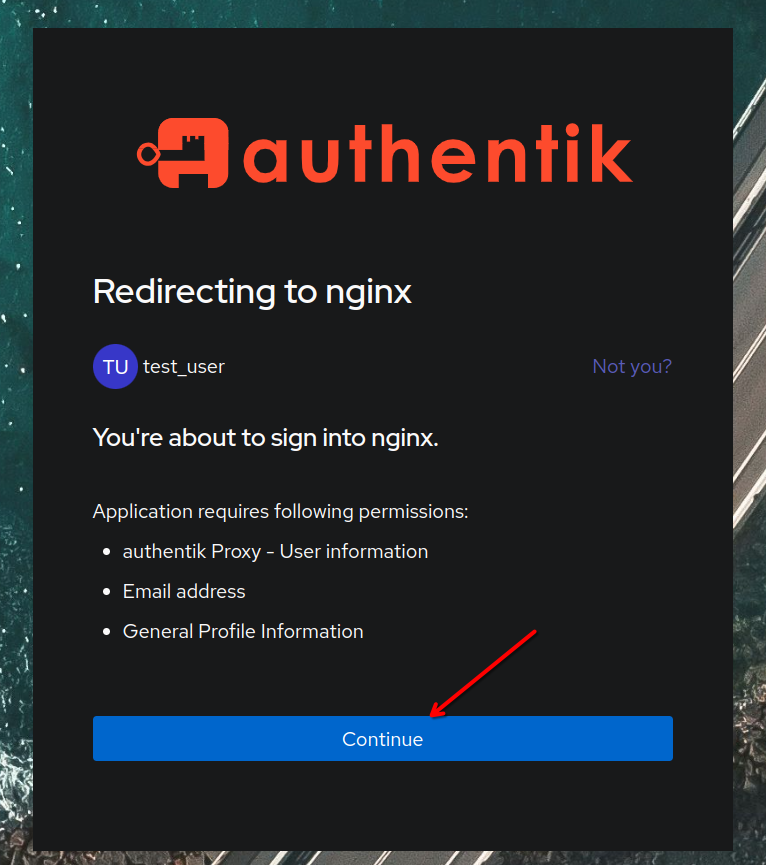
After logging in, you should be greeted with the nginx splash page!

Conclusion
Authentik has a bit of a learning curve, but appears to be very flexible when it comes to providing single sign-on for just about anything – even applications that don’t support authentication at all. It’s not without its quirks though… as you saw, I had to do some tinkering to get the configuration right. I’m looking forward to exploring more of what Authentik has to offer!
