Introduction
I want to preface this post with – I do not think Ceph is a bad storage option. My implementation of it, however, was certainly bad. As with all things in life (and especially IT), if you’re wondering if Ceph is for you, the answer is “It depends.”
Alas, sometimes, perspective is everything. You may not realize just how bad something is until you’ve seen how good something else can be. That was my case with using Ceph as a shared storage option for my VMs on Proxmox.
How I Got Started with Ceph
When I first built my cluster, I wanted to have high availability (HA) so that if one of my nodes ever went down, the VMs running on that node would migrate to another and cause minimal to no downtime for any services I was running on it. A requirement for HA, however, is shared storage among all nodes.
You can go about this several ways. There’s iSCSI, SMB, or NFS shares from a NAS. There’s also ZFS replication; you can create separate ZFS pools on each node, name them the same, and proxomx can conduct VM failover by sending periodic ZFS replication snapshots over to the other nodes. I chose to go with Ceph though, because… well, I was unfamiliar with it and wanted to learn a little more about it! Plus I knew it was capable of handling drives of multiple different sizes, which is what I had on hand to work with.
I followed VirtualizationHowTo’s video on YouTube to get set up, along with perusing Proxmox and Ceph’s documentation. The video was a great tutorial and I had no issues getting up and running. However, one thing that I intentionally did wrong in the setup was that I did not put Ceph on it’s own dedicated, high speed network. Why? Because I didn’t have one. The hardware recommendations for Ceph state that you should provision at least 10 GB/s networking for it. But I’m just running a homelab, not a datacenter. So I figured I would just send it.
My Problem with Ceph
All went well for a while. I even found out just the other day that HA was, in fact, doing its job when I woke up to find my PiHole server on another node and one of my node’s uptime changed from nearly 6 months to just over 24 hours. Apparently, at some point the morning prior, one of my nodes rebooted for an unknown reason. I never even noticed!
However, what has been getting to me lately is the latency of my VMs. I’ve been working on a lot of automation through Ansible roles and playbooks, and noticed that VMs were incredibly slow to spin up and configure themselves through cloud init. We’re talking 10-15 minutes from deploying them to being able to log in. Additionally, commands in the terminal were slow to respond. Particularly docker for some reason. The output of docker ps would take over 30 seconds to produce output at times.
I blamed the speeds on my hardware. I figured it was because I have old, slow disks, and old CPUs (my cluster runs on Dell OptiPlex 7040s with 6th gen intel i7 CPUs). But the other day I thought to myself “Could it be Ceph?”
So, I deployed a test VM to the local-lvm storage on one of my nodes. I am not even exaggerating when I say it felt 20 times faster. It deployed in less than three minutes and the terminal was as snappy as my local machine. It turns out my Ceph setup was, in fact, that bad.
My Plan
I have three disks (one per node) in my existing Ceph pool. The plan was to recoup these disks from the pool and reformat them into a single-disk ZFS pool and conduct HA through ZFS replication. The step-by-step looks like this:
- Add temporary storage to Proxmox cluster
- Migrate VMs to temporary storage
- Remove disks from Ceph pool
- Reformat disks to ZFS
- Migrate VMs back to original disks
- Profit
Adding Temporary Storage
So, first I needed a temporary form of storage to move my VMs to. I would have just used local-lvm but unfortunately I wouldn’t have had enough space. I created an NFS share on my TrueNAS server for this, but there are several other options if you ever find yourself in a similar situation. To add storage options to your proxmox cluster, go to Datacenter –> Storage —> Add.
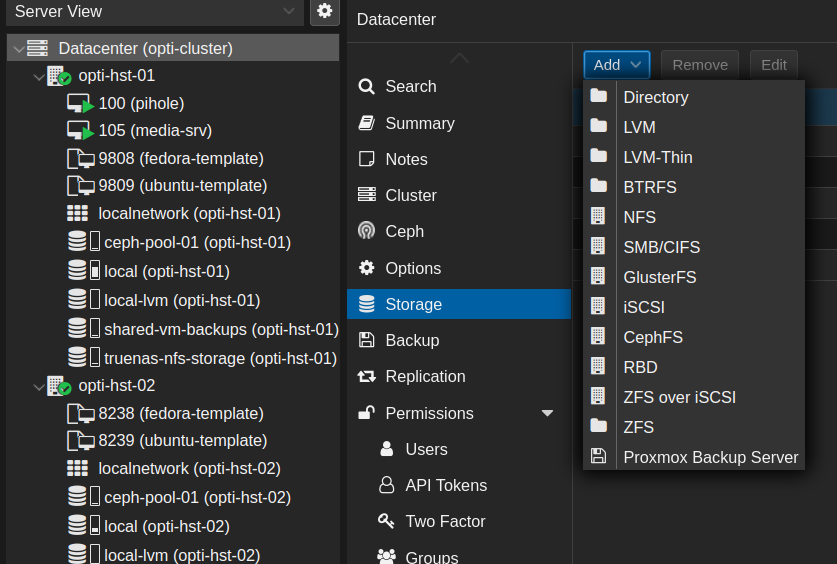
Adding an NFS share is fairly self-explanatory from that point forward. But be sure the content type is set to Disk image.
Migrating VMs to Temporary Storage
Once I had a temporary, alternate storage option for my VMs, I needed to migrate their VM hard disks to it. You can do this by selecting the VM, going to Hardware and selecting the hard disk. If the VM has multiple disks, you’ll have to do this process for each one.
You’ll notice that my VM has a CloudInit Drive. These drives cannot be migrated. However, since they’re meant to be ephemeral, they can just be deleted and recreated on the proper storage.
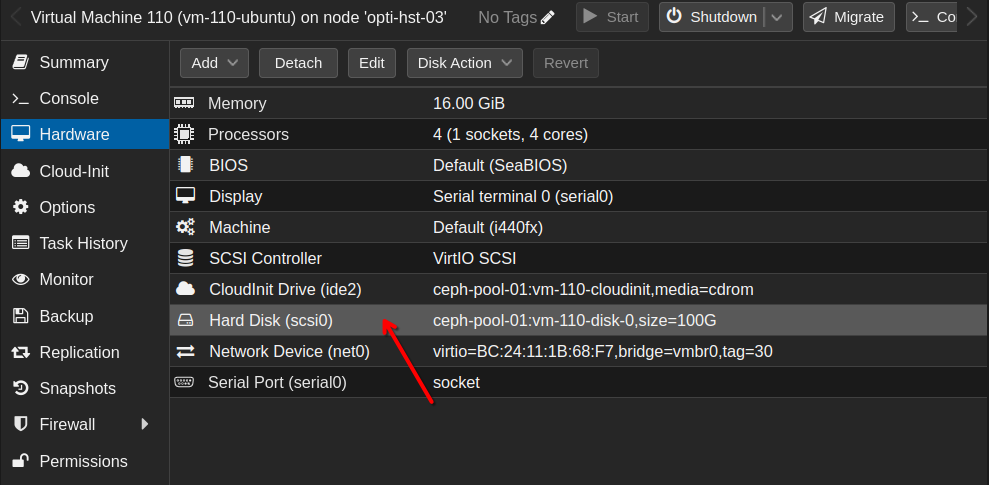
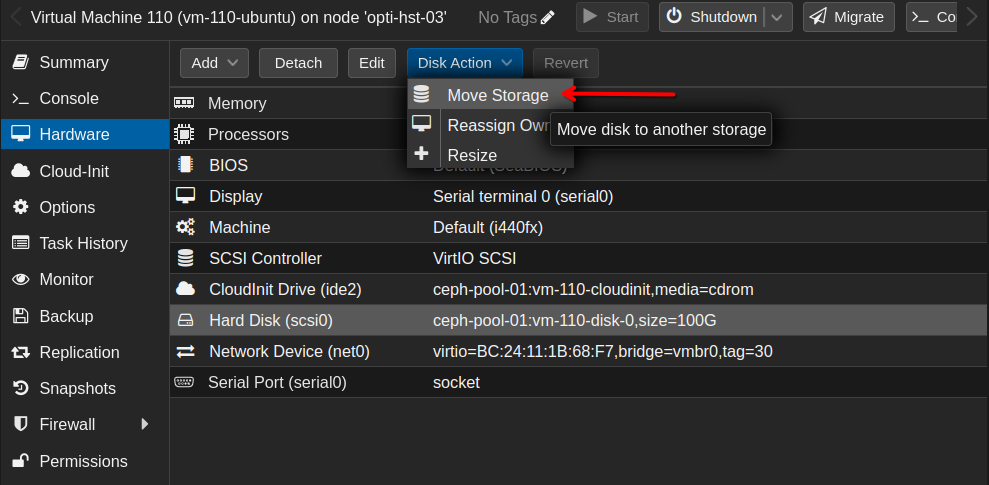
After highlighting the hard disk, select the Disk action dropdown menu and click Move storage.
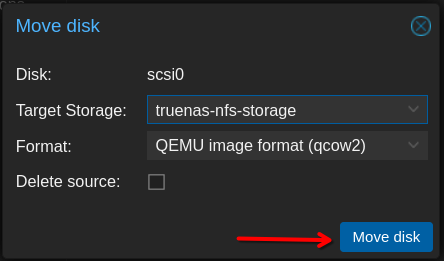
In the pop-up, there will be another dropdown menu for target storage. Select the desired storage here. In my case, this will be my NFS share.
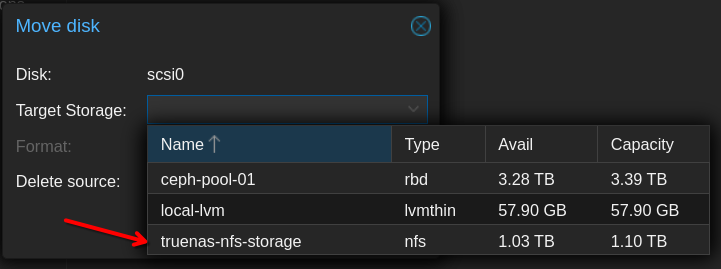
Then select Move disk. I chose not to check the Delete source box. On the off chance that something went wrong, I wanted the ability to revert back to the original disk. This will leave your VM with an additional unused hard disk attached to it that will need to be deleted once you verify that everything is working properly. Repeat this process for each VM.
Removing Disks from Ceph
I originally wanted to remove Ceph completely from my system. Unfortunately, as I found in some forum discussions, this isn’t a simple process. Proxmox doesn’t seem to have anything in their official docs outlining the proper way to remove Ceph completely. It seems everyone is reliant on these commands posted in the forums. In the interest of keeping this process as simple as possible I decided to leave Ceph on my system and simply destroy the pool and remove the OSDs (my hard drives). I followed the recommendations in this reddit thread.
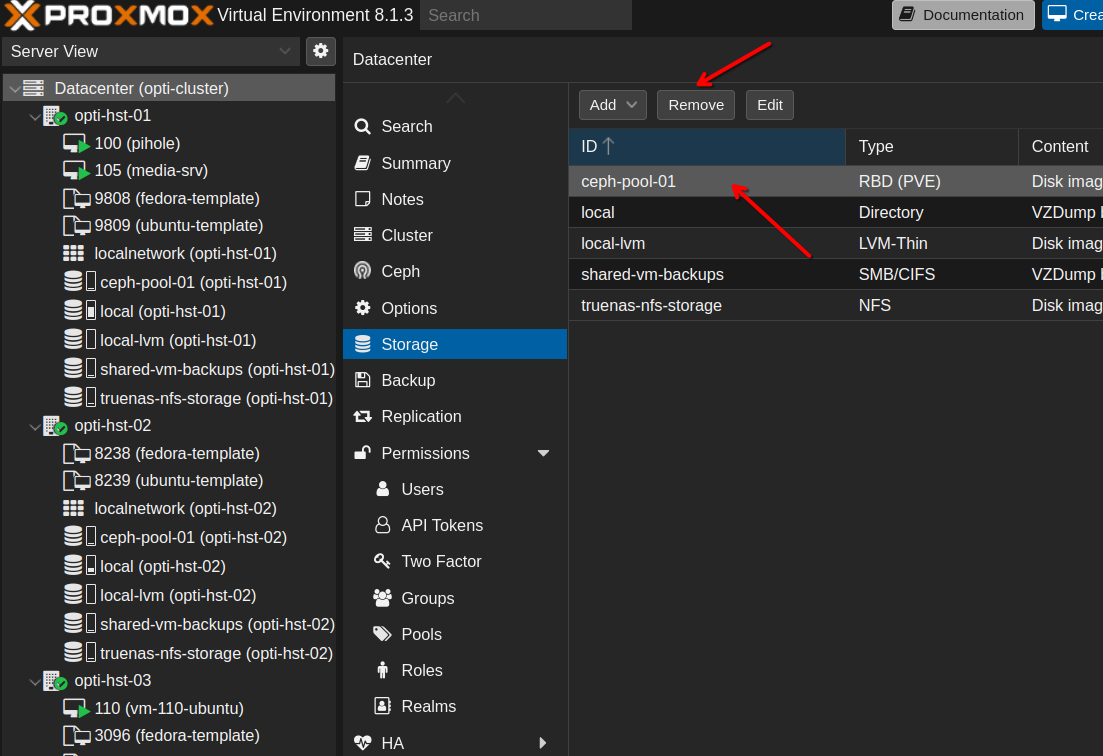
First, we need to remove the Ceph pool as a storage option in Proxmox. Otherwise, Proxmox won’t let us destroy the pool. Go to Datacenter –> Storage and select the Ceph pool. Then click Remove.
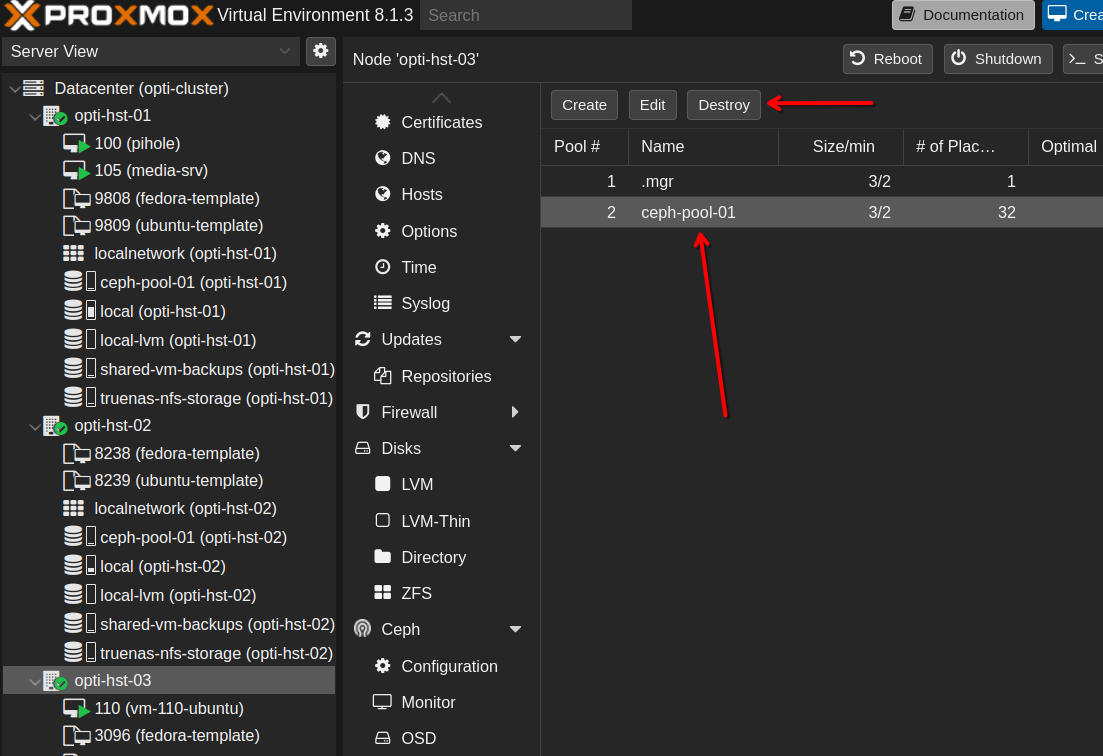
Then we can destroy the pool. Now, you would think you could do this from the Datacenter section, but actually you need to do this from one of your nodes in the cluster. Go to a node, then Ceph –> Pools. Then select the pool and click Destroy.
Once the pool was destroyed, I could out the OSDs, stop the OSDs and then destroy the OSDs. Once again, go to a node in your cluster, then Ceph –> OSD. Select an OSD, then click Out. Repeat this for every OSD.
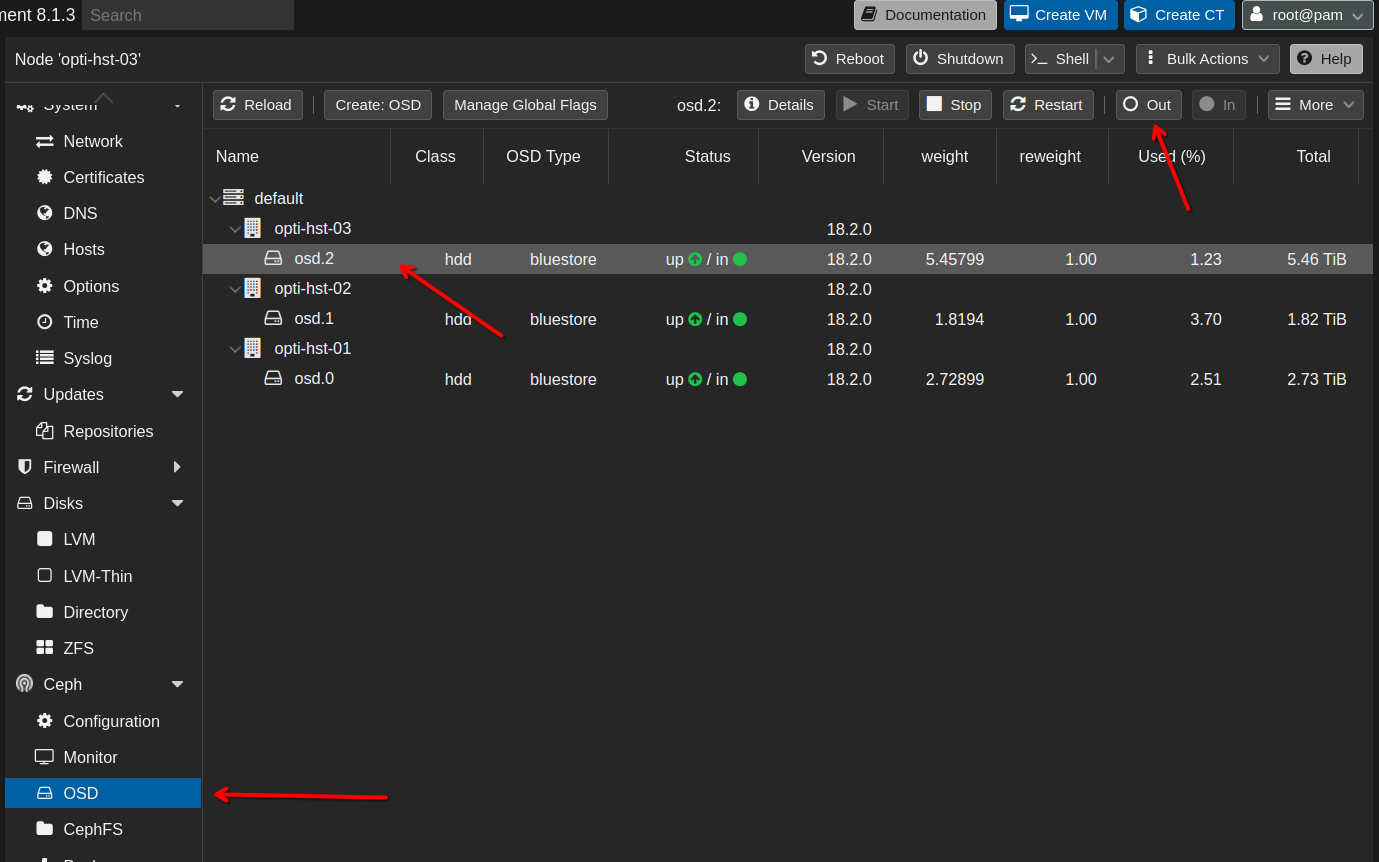
Once all of the OSDs are in an out state, stop each one individually through the same process, this time clicking the Stop button.
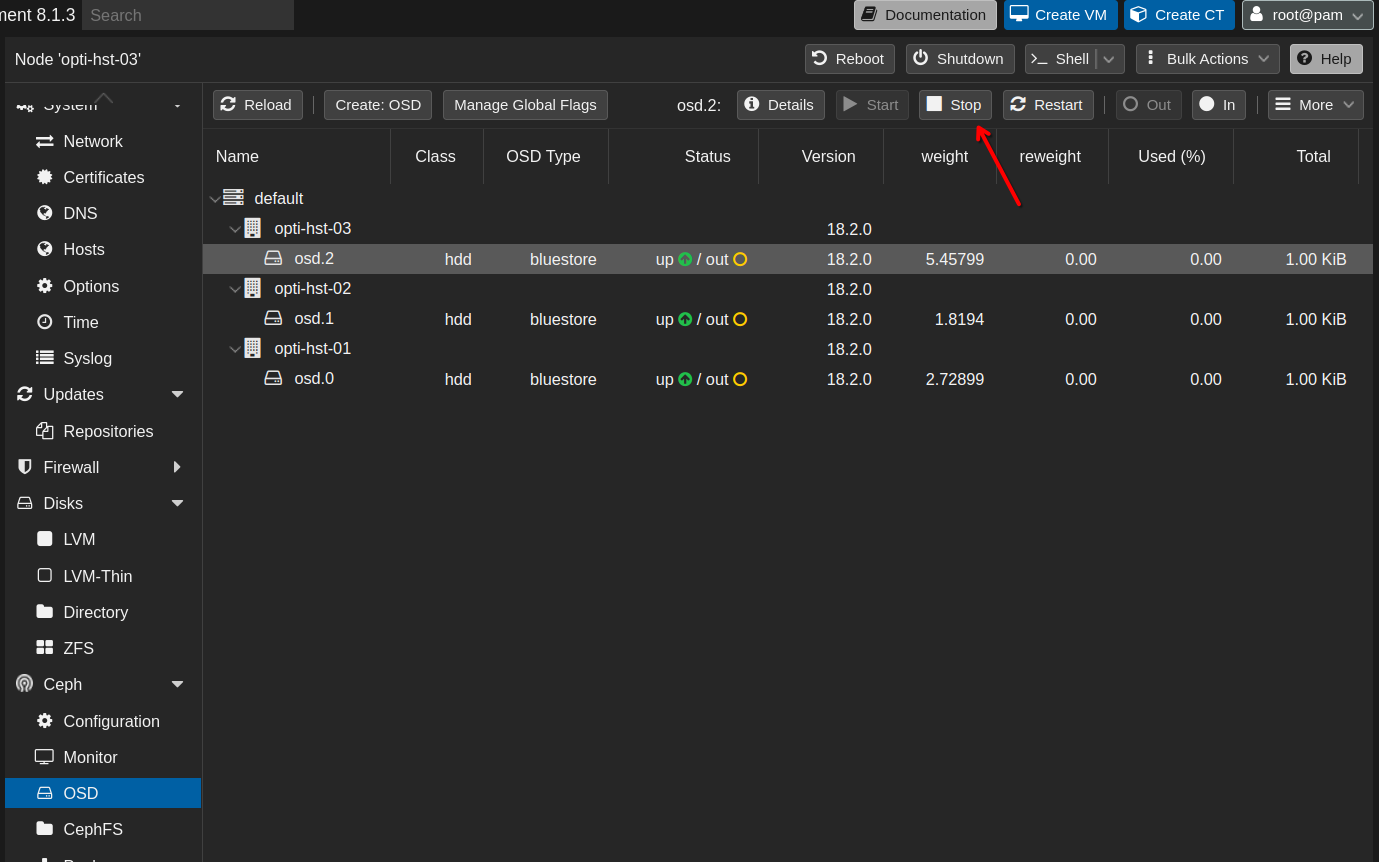
After stopping the first OSD, you’ll receive a warning that it’s unsafe to stop any more. Since I won’t be using Ceph for anything anymore, I selected Stop OSD anyway.

Once all of the OSDs are stopped, you can destroy each one by clicking the More dropdown and selecting Destroy. (It might have been Remove… I forgot to take screenshots of that part, sorry).
Reformatting Disks to ZFS
Finally, the disks are ready to be repurposed. First, we’ll need to wipe each disk. Do this by going to each node, select Disks then select the disk and click Wipe disk.
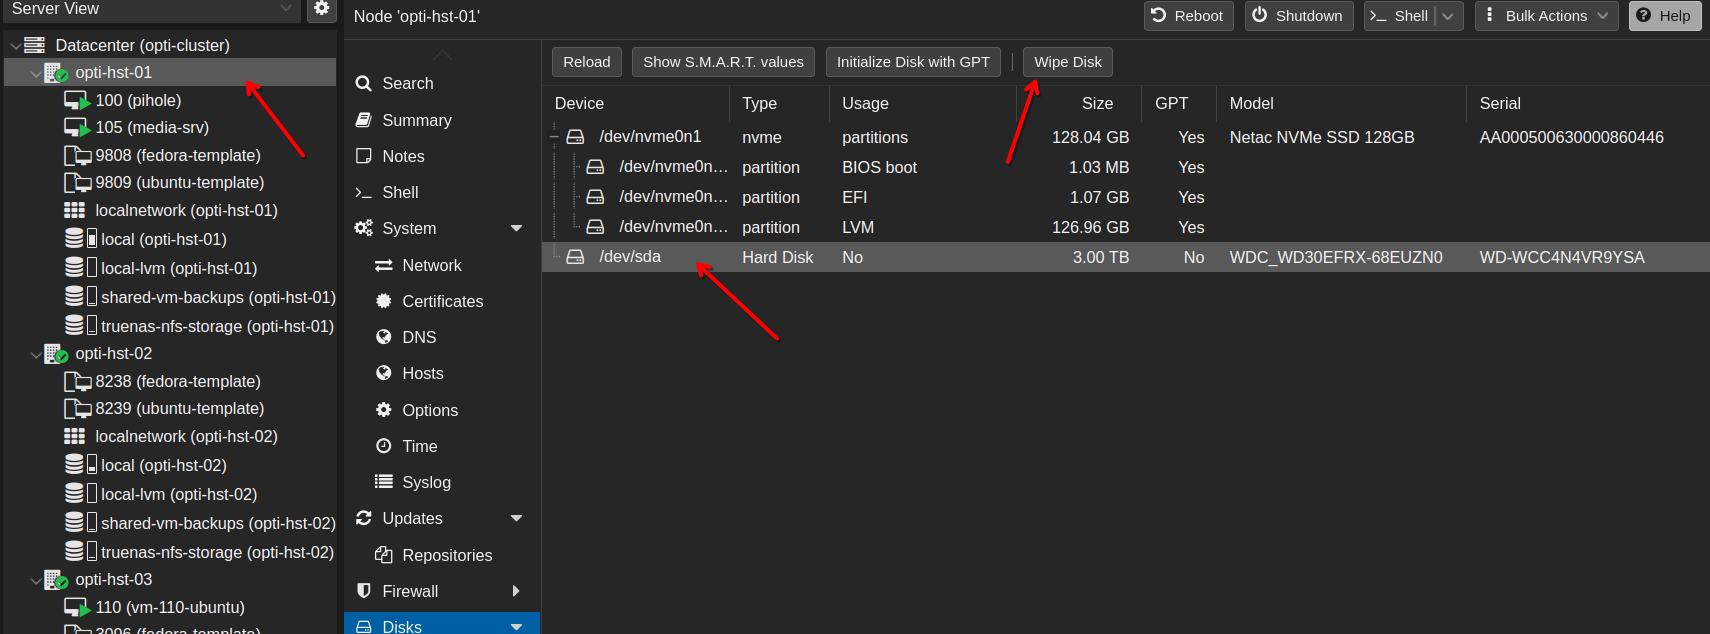
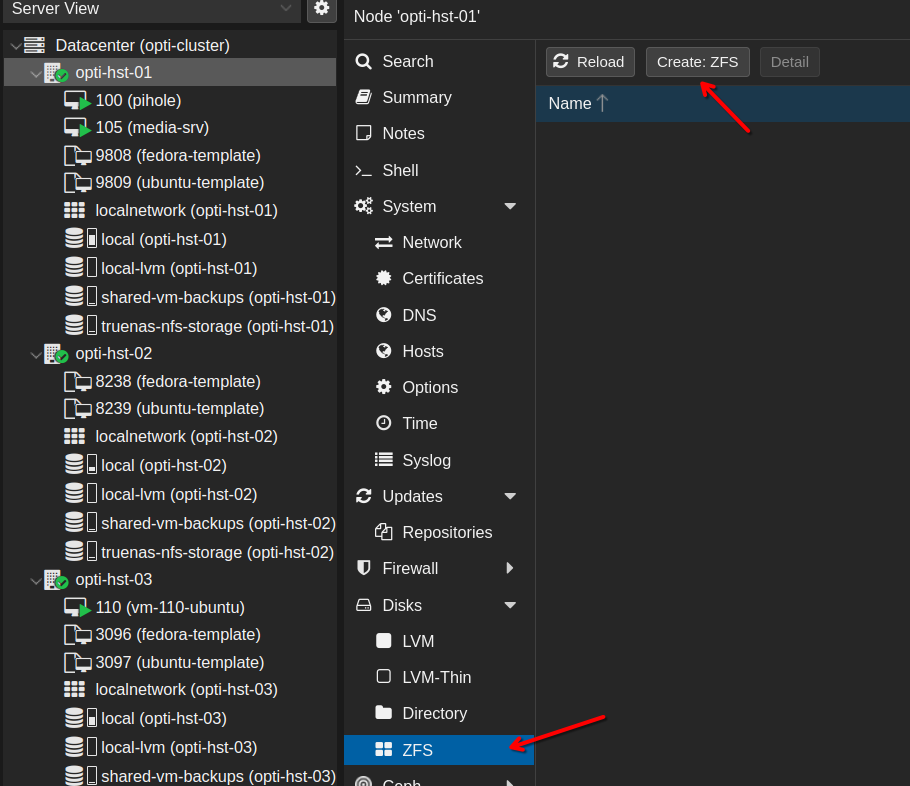
Now, we can reformat this disk to ZFS. From the same node, select ZFS and then Create ZFS.
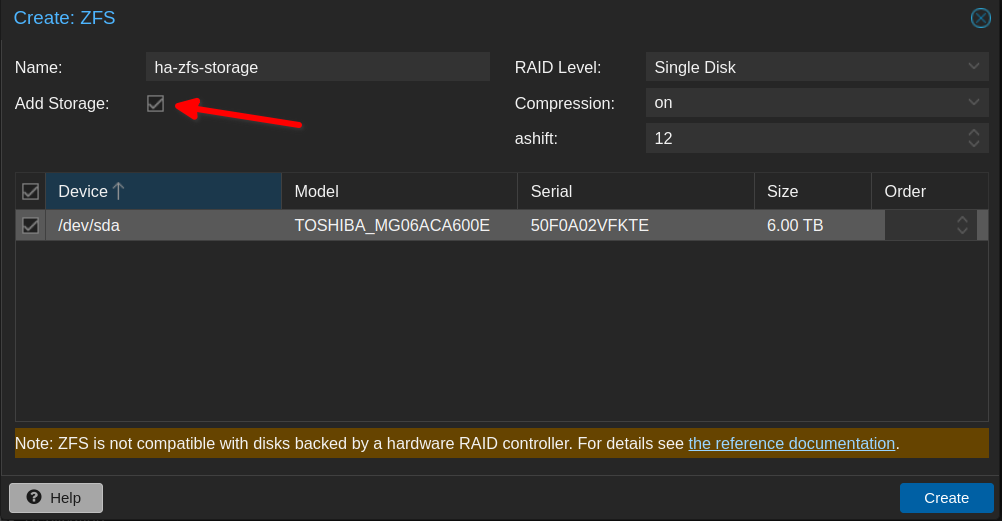
In the pop-up menu, give the pool a name and select your disk. You must give each pool on each node the same name in order for HA to work. If you have multiple disks per node that you are adding to the pool (RAID array), be sure to select the RAID level in the dropdown.
IMPORTANT!
On the first node only select the Add storage checkbox. As you repeat this process for other nodes, do not select that box. This is also important for HA to work properly.
Once you’ve completed this process on each node, go to Datacenter –> Storage and select your ZFS pool, then click Edit.
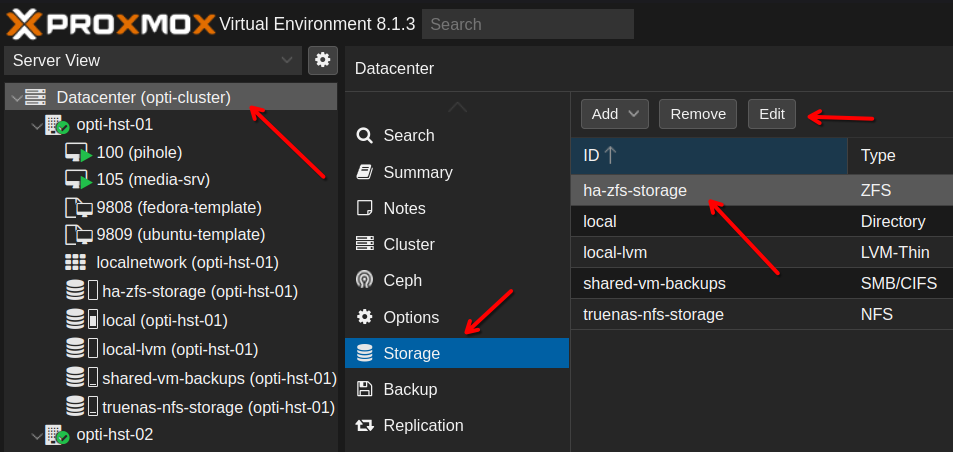
In the pop-up menu, under Nodes, select all of the nodes in your cluster. This will make the separate ZFS pools on each node appear to Proxmox as shared storage for HA.

Migrating VMs Back to Original Disks
Now we’re ready to migrate the VM disks off of the temporary NFS share and back onto their original disks! Follow the exact process that we did earlier, but this time select your ZFS pool when migrating.
Conclusion
As it turns out, when the docs recommend certain hardware (like a dedicated 10 GB/s network or faster), sometimes they mean business. When it comes to Ceph, that is certainly the case. I think if you have the resources to give it, Ceph would be a great and flexible storage option. Though it definitely has a learning curve.
Until the next problem. Happy homelabbing!
