
Introduction
If you’re not living under a rock, you have probably used a Large Language Model (LLM). Something like ChatGPT, Google’s Gemini, Claude etc.
Maybe you used it to help you write some code. Maybe you used it to help you with your homework (or to do your homework for you). Maybe you used it to write that cruel breakup letter to your now ex-boyfriend or girlfriend. It’s 2025 and I’m not judging.
Whatever your use case, chances are that you’ve stumbled across some AI by now. But, chances are also that you’ve used some form of SaaS (Software as a Service) to access it. Meaning that you had to create an account and send your prompts to a server somewhere in the world that you don’t control.
Now, obviously, like the diligent citizen of the internet that you are, you read the privacy statement word for word when you signed up. So you know that all of your data is kept and used to further train their models (and also probably sold to third parties for profit).
Wouldn’t it be great if you could self-host an LLM and get the ChatGPT-like experience locally? Well, like I said, it’s 2025. Open source software is still awesome. And, you can do exactly that.
OpenWebUI is an amazing self-hosted service that can interface with Ollama to produce an LLM-based chatbot just like ChatGPT, Google Gemini, or the many other services on the internet. It also has configuration options for web search, image generation, and can even conduct RAG (Retrieval Augmented Generation) from your own data by uploading documents to a knowledge base.
Oh, and if you’re a masochist like me, you can even run it on an old mac-mini from your garage.
The end result looks like this:
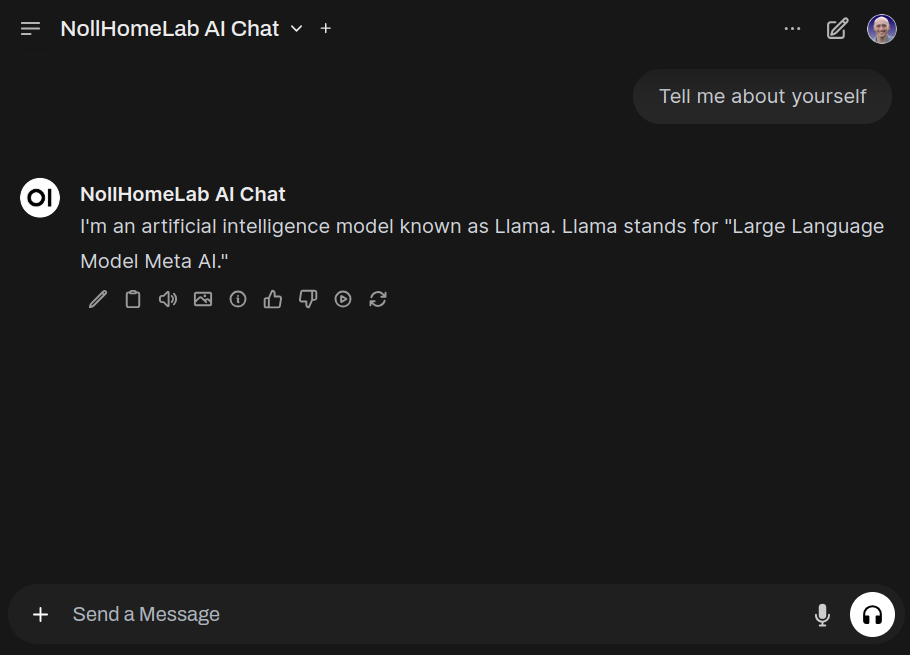
I think it looks pretty slick for something that’s completely self-hosted.
Ideally, you would run this on a machine that has a dedicated GPU (like an old gaming PC) but don’t let your lack of a GPU stop you from trying this out. Like I said, my instance runs on an M1 Mac Mini (running Asahi linux). It has trouble running some of the larger models, but for models under 7b parameters, it performs remarkably well.
Prerequisites
This post isn’t a step-by-step tutorial that you’ll be able to follow and replicate my setup exactly. I’m assuming that you have some knowledge and experience with linux, Docker and Ansible. So if it feels like I’m glossing over way too many details, make sure you’re digging into the respective documentation and modifying commands as necessary for your setup.
Everything I talk about here can be run on a single machine and everything runs in Docker. So, at a minimum you’ll need a single machine or VM with Docker installed. Remember, you don’t need a GPU to get started. Try this out on whatever hardware you have now. You can always upgrade later!
Architecture
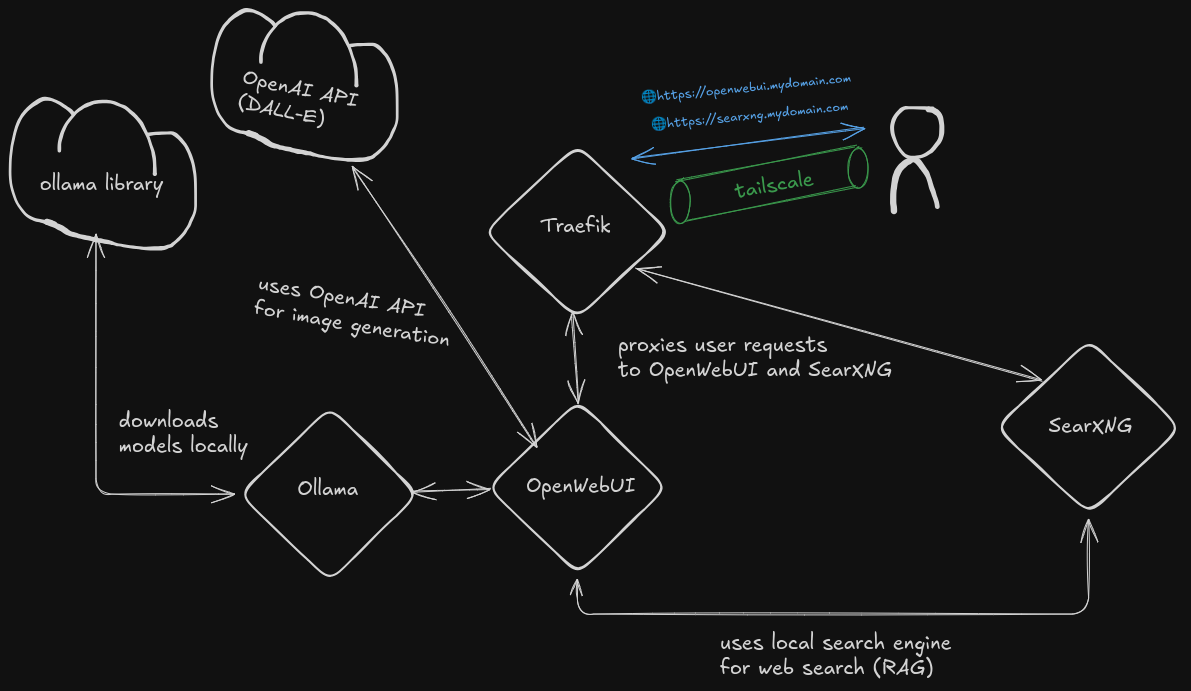
There are four local services at play with this setup and, optionally, one remotely hosted one.
Local:
- Traefik (a reverse proxy, which I cover in the homelab section of this website.)
- OpenWebUI (the GUI frontend)
- Ollama (which downloads and runs the models)
- SearXNG (a locally hosted search engine that can be used by OpenWebUI)
Remote:
- OpenAI API (to use the DALL-E models for generating images)
Traefik proxies the user requests to the frontend, which is OpenWebUI.
OpenWebUI connects to Ollama, which downloads the LLMs locally.
To allow the service to run searches for you on the internet, it can also connect to a locally hosted SearXNG instance.
Finally, there are several options for image generation. But, because of my hardware constraints, I’ve opted to use OpenAI’s API for this.
As always, a picture for the visually inclined:
I won’t cover the Traefik setup in this post; that’s a topic deserving of its own post. Note that OpenWebUI runs on HTTP only and you’ll require a reverse proxy to serve it over HTTPS. Certain features, such as text to speech, will not work if you run your instance using only HTTP. Everything I cover in this post, however, should work over HTTP.
Deploying Ollama
Ollama is incredibly simple to spin up. It can be deployed with CPU only using a single docker run command.
docker run -d -v ollama:/root/.ollama -p 11434:11434 --name ollama ollama/ollama
If you have a GPU, make sure you follow their documentation to ensure that the Docker container can access it.
Below is my custom Ansible playbook which I used to deploy Ollama. I covered a bit of how this works in a previous post. The full code is also available on my github at:
https://github.com/joshrnoll/ansible-playbook-homelab
---
- name: Deploy {{ deploy_container_service_name }}
  hosts: "{{ deploy_container_host_group_name }}"
  vars:
    deploy_container_service_name: ollama # Service/container name
    deploy_container_host_group_name: ollama # Host group for container to be deployed to
    deploy_container_service_image: ollama/ollama # Container image -- ex. louislam/uptime-kuma
    deploy_container_service_tag: latest # Image tag -- ex. latest
    deploy_container_service_port: "11434" # Must be quoted -- ex. "80" not 80
    deploy_container_service_scheme: http # http or https
    deploy_container_forward_auth: false # true or false
    deploy_container_tailnet_name: "{{ tailnet_name }}"
    deploy_container_oauth_client_secret: "{{ tailscale_containers_oauth_client['secret'] }}"
    deploy_container_domain_name: "{{ domain_name }}"
    deploy_container_cloudflare_email: "{{ cloudflare_email }}"
    deploy_container_cloudflare_api_token: "{{ cloudflare_api_token }}"
    deploy_container_volumes: # Customize or omit
      - /home/{{ ansible_user }}/{{ deploy_container_service_name }}/data:/root/.ollama
    deploy_container_labels: # Customize or omit
      - key: "nautical-backup.enable"
        value: "true"

  tasks:
    - name: Include vars
      ansible.builtin.include_vars:
        dir: "{{ root_playbook_dir }}/vars"

    - name: Deploy container
      ansible.builtin.include_role:
        name: "{{ root_playbook_dir }}/roles/deploy_container"
...
Once ollama is deployed, you can verify it by accessing your instance in the browser. If you aren’t using a reverse proxy like I am, the URL will be something like:
http://ip-address-of-instance:11434
if you are running on localhost, you can use:
http://localhost:11434
You should see a message “Ollama is running” in the browser if it deployed correctly.
Deploying OpenWebUI
OpenWebUI can also be deployed with a single docker run command:
docker run -d -p 3000:8080 -e OLLAMA_BASE_URL=https://example.com -v open-webui:/app/backend/data --name open-webui --restart always ghcr.io/open-webui/open-webui:main
Ensure that the parameter you pass to OLLAMA_BASE_URL is the URL to your Ollama instance from before.
NOTE: You can skip spinning up Ollama and omit the OLLAMA_BASE_URL environment variable when deploying OpenWebUI. If you do this, OpenWebUI will automatically spin up an Ollama container for you. However, I prefer not to do it this way as you don’t get as much control over the Ollama deployment and the Ollama instance becomes too tightly coupled to the lifetime of the OpenWebUI container.
Below is my Ansible playbook which deploys OpenWebUI:
---
- name: Deploy {{ deploy_container_service_name }}
  hosts: "{{ deploy_container_host_group_name }}"
  vars:
    deploy_container_service_name: ai # Service/container name
    deploy_container_host_group_name: ollama # Host group for container to be deployed to
    deploy_container_service_image: ghcr.io/open-webui/open-webui # Container image -- ex. louislam/uptime-kuma
    deploy_container_service_tag: v0.5.10 # Image tag -- ex. latest
    deploy_container_service_port: "8080" # Must be quoted -- ex. "80" not 80
    deploy_container_service_scheme: http # http or https
    deploy_container_forward_auth: false # true or false
    deploy_container_tailnet_name: "{{ tailnet_name }}"
    deploy_container_oauth_client_secret: "{{ tailscale_containers_oauth_client['secret'] }}"
    deploy_container_domain_name: "{{ domain_name }}"
    deploy_container_cloudflare_email: "{{ cloudflare_email }}"
    deploy_container_cloudflare_api_token: "{{ cloudflare_api_token }}"
    deploy_container_volumes: # Customize or omit
      - /home/{{ ansible_user }}/{{ deploy_container_service_name }}/data:/app/backend/data
    deploy_container_env_vars: # Customize or omit
      WEBUI_NAME: "NollHomeLab AI"
      OLLAMA_BASE_URL: "https://ollama.{{ domain_name }}"
      ENABLE_OAUTH_SIGNUP: "true"
      ENABLE_RAG_WEB_SEARCH: "true"
      RAG_WEB_SEARCH_ENGINE: "searxng"
      RAG_WEB_SEARCH_RESULT_COUNT: "3"
      RAG_WEB_SEARCH_CONCURRENT_REQUESTS: "10"
      SEARXNG_QUERY_URL: "https://search.{{ domain_name }}/search?q=<query>"
      OAUTH_MERGE_ACCOUNTS_BY_EMAIL: "true"
      OAUTH_CLIENT_ID: "{{ openwebui_client_id }}"
      OAUTH_CLIENT_SECRET: "{{ openwebui_client_secret }}"
      OPENID_PROVIDER_URL: https://authentik.{{ domain_name }}/application/o/openwebui/.well-known/openid-configuration
      OPENID_REDIRECT_URI: https://ai.{{ domain_name }}/oauth/oidc/callback
      OAUTH_PROVIDER_NAME: NollHomeLab SSO
      OAUTH_SCOPES: "openid email profile"
      OAUTH_ROLES_CLAIM: "roles"
      OAUTH_ALLOWED_ROLES: openwebui_users,nollhomelab_users
      OAUTH_ADMIN_ROLES: openwebui_admins
    deploy_container_labels: # Customize or omit
      - key: "nautical-backup.enable"
        value: "true"

  tasks:
    - name: Include vars
      ansible.builtin.include_vars:
        dir: "{{ root_playbook_dir }}/vars"

    - name: Deploy container
      ansible.builtin.include_role:
        name: "{{ root_playbook_dir }}/roles/deploy_container"
...
You’ll notice that I’ve provided quite a few extra environment variables. These are necessary for setting up SSO with my Authentik instance, and for connecting to SearXNG to allow OpenWebUI the capability to do web search.
Deploying SearXNG
SearXNG is also quite simple to get going on its own. You can follow their documentation for the Docker install, but it really boils down to a simple docker run command:
docker run --rm \
             -d -p 8080:8080 \
             -v "${PWD}/searxng:/etc/searxng" \
             -e "BASE_URL=http://localhost:8080/" \
             searxng/searxng
You can modify the port and volume on the host if desired. If you’re running behind a reverse proxy, you’ll want to adjust the BASE_URL environment variable accordingly.
Connecting SearXNG to OpenWebUI
If you look at OpenWebUI’s documentation on setting up web search with SearXNG… you may get a little overwhelmed. Here’s what it boiled down to for me…
You need to disable the rate limiter in the SearXNG settings.yml file
OpenWebUI’s instructions are meant to get things working without disabling the rate limiter (which you would want, if your SearXNG instance was open to the internet). In my case, SearXNG is private and only accessible through my tailnet. So, simply disabling the rate limiter works for me.
Below is what OpenWebUI’s docs recommend the settings.yml file to look like. I simply changed the limiter setting to false instead of true.
# see https://docs.searxng.org/admin/settings/settings.html#settings-use-default-settings
use_default_settings: true
server:
  # base_url is defined in the SEARXNG_BASE_URL environment variable, see .env and docker-compose.yml
  secret_key: # your secret key here
  limiter: false  # Set to false to disable rate limiter!
  image_proxy: true
  port: 8080
  bind_address: "0.0.0.0"

ui:
  static_use_hash: true

search:
  safe_search: 0
  autocomplete: ""
  default_lang: ""
  formats:
    - html
    - json

redis:
  url: redis://your.redis.hostname:6379/0
I simply made these changes and used my Ansible playbook to template the file out to the server before starting the container. You’ll notice that I’m also templating a limiter.toml file in the playbook. I think this is unnecessary with the rate limiter disabled. But, I left it in there since everything is still working. If it ain’t broke, don’t fix it. That file looks like this:
# This configuration file updates the default configuration file
# See https://github.com/searxng/searxng/blob/master/searx/limiter.toml

[botdetection.ip_limit]
# activate link_token method in the ip_limit method
link_token = false

[botdetection.ip_lists]
block_ip = []
pass_ip = []
And here is the playbook that puts everything together:
---
- name: Deploy {{ deploy_container_service_name }}
  hosts: "{{ deploy_container_host_group_name }}"
  vars:
    deploy_container_service_name: search # Service/container name
    deploy_container_host_group_name: searxng # Host group for container to be deployed to
    deploy_container_service_image: docker.io/searxng/searxng # Container image -- ex. louislam/uptime-kuma
    deploy_container_service_tag: 2025.2.12-d456f3dd9 # Image tag -- ex. latest
    deploy_container_service_port: "8080" # Must be quoted -- ex. "80" not 80
    deploy_container_service_scheme: http # http or https
    deploy_container_forward_auth: false # true or false
    deploy_container_tailnet_name: "{{ tailnet_name }}"
    deploy_container_oauth_client_secret: "{{ tailscale_containers_oauth_client['secret'] }}"
    deploy_container_domain_name: "{{ domain_name }}"
    deploy_container_cloudflare_email: "{{ cloudflare_email }}"
    deploy_container_cloudflare_api_token: "{{ cloudflare_api_token }}"
    deploy_container_volumes: # Customize or omit
      - /home/{{ ansible_user }}/{{ deploy_container_service_name }}/config:/etc/searxng
    deploy_container_env_vars: # Customize or omit
      SEARXNG_HOSTNAME: "search.{{ domain_name }}"
    deploy_container_labels: # Customize or omit
      - key: "nautical-backup.enable"
        value: "true"

  tasks:
    - name: Include vars
      ansible.builtin.include_vars:
        dir: "{{ root_playbook_dir }}/vars"

    - name: Ensure config directory exists with correct permissions
      become: true
      ansible.builtin.file:
        path: /home/{{ ansible_user }}/search/config
        state: directory
        mode: "0774"
        owner: "977"
        group: "977"

    - name: Template settings.yml to server
      become: true
      ansible.builtin.template:
        src: settings.yml.j2
        dest: /home/{{ ansible_user }}/search/config/settings.yml
        mode: "0774"
        owner: "977"
        group: "977"

    - name: Template limiter.toml to server
      become: true
      ansible.builtin.copy:
        src: limiter.toml
        dest: /home/{{ ansible_user }}/search/config/limiter.toml
        mode: "0774"
        owner: "977"
        group: "977"

    - name: Install Redis
      ansible.builtin.include_role:
        name: joshrnoll.homelab.tailscale_container
      vars:
        tailscale_container_tailnet_name: "{{ tailnet_name }}"
        tailscale_container_oauth_client_secret: "{{ tailscale_containers_oauth_client['secret'] }}"
        tailscale_container_no_serve: true
        tailscale_container_service_name: search-redis
        tailscale_container_image: docker.io/library/redis
        tailscale_container_tag: alpine
        tailscale_container_userspace_networking: "false"
        tailscale_container_volumes:
          - /home/{{ ansible_user }}/search-redis/data:/data
        tailscale_container_commands: --save 60 1 --loglevel warning
        tailscale_container_labels:
          nautical-backup.enable: "true"

    - name: Deploy container
      ansible.builtin.include_role:
        name: "{{ root_playbook_dir }}/roles/deploy_container"
...
Logging in and Downloading Models
Once you have everything set up, you can log in to OpenWebUI. You’ll be prompted to create an admin account on the first log in. To download a model, click your profile icon in the top right and go to the admin panel.
In the admin panel, go to settings –> connections and verify that your Ollama URL is correct. You can click on the gear icon to change it if need be.
To download a model, click the Manage button (which looks like a download icon, in previous versions of OpenWebUI it was a wrench).

This will bring up the following screen. Enter the name of the model in the first text entry box along with the model size in the format of model:size. If you don’t know what you’re looking for, go to the Ollama library to find models to download.
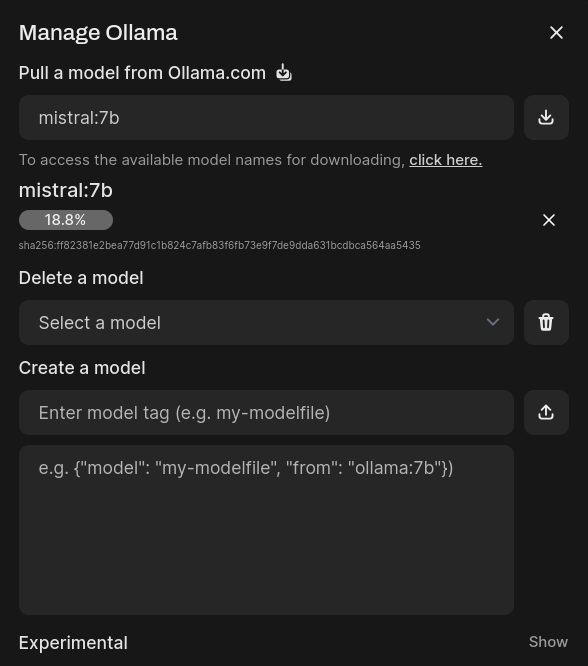
Clicking the download button to the right of the text entry box will initiate the download of the model. Once the download is complete, you can go back to the main page to chat with the LLM.
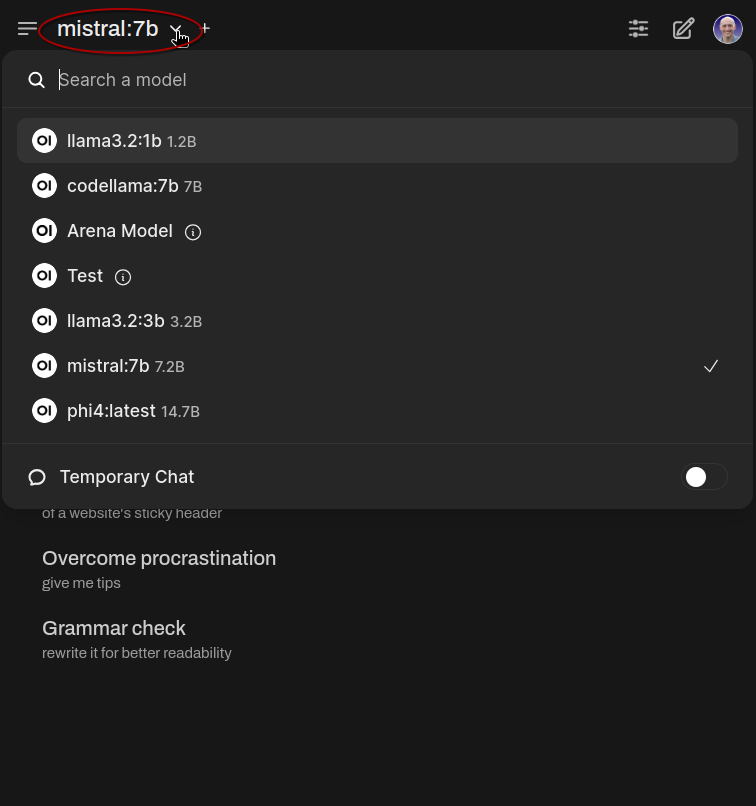
If you download multiple models, you can select the desired model in the chat window using the dropdown menu as shown below.
Setting up Image Generation with an OpenAI API Key
OpenWebUI has a couple of self-hosted options for image generation. However, because I’m not working with a GPU, I opted to use OpenAI’s API for this.
No, it’s not self-hosted. No, it isn’t free. And, yes, they’re probably storing my prompts to further train their models. But, it’s incredibly cheap and it works super well.
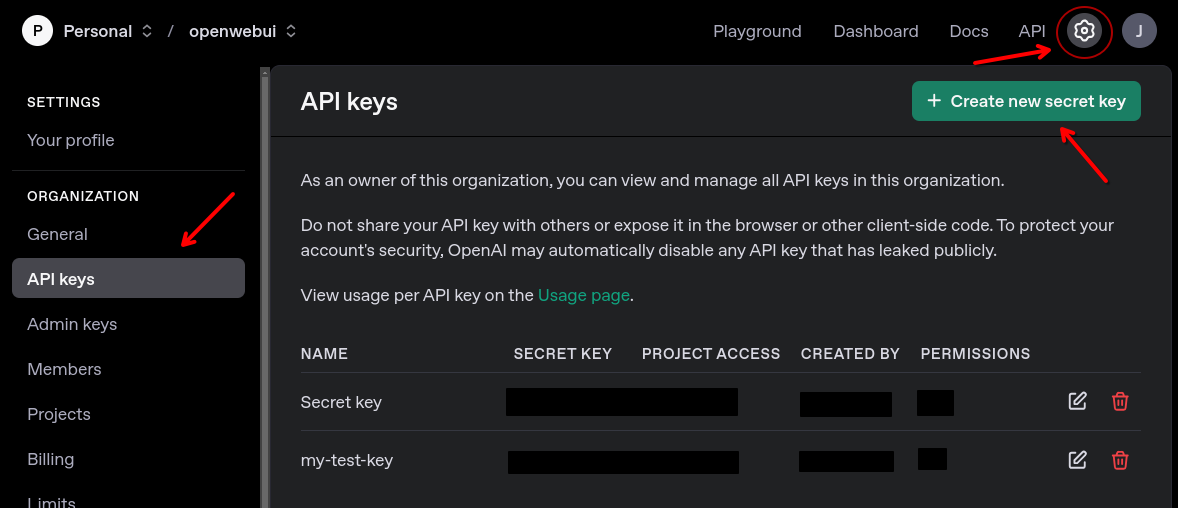
To get started you’ll need to go to https://platform.openai.com and make an account. Once you’re logged in, click the gear icon and go to API keys –> Create new secret key.
OpenAI API keys need to be associated to a “project.” You can either use the default project or create a new one. Once you’ve generated your API key, I recommend saving it in a password manager.
Finally, go to billing and set up your payment method. Once you have a payment method set up, you can click Add to credit balance and load some money onto your account. I loaded $5 several months ago and have only used $0.20 of that so far. YMMV.
Now, go back to your OpenWebUI instance and go to the admin panel. Click on settings –> images:

- Ensure the image generation and image prompt generation settings are switched on.
- Enter your API key in the provided field
- Enter dall-e-3 in the Set Default Model field (You can choose dall-e-2 if you want… but trust me, it sucks compared to dall-e-3)
- Enter 1024x1024 in the Set Image Size field (DALL-E 3 supports 1024x1024, 1792x1024, or 1024x1792 – you can adjust this to your liking)
Finally, click save and go back to the main screen.
When starting a new chat, you should now be able to select the Image button before giving your prompt to generate an image.
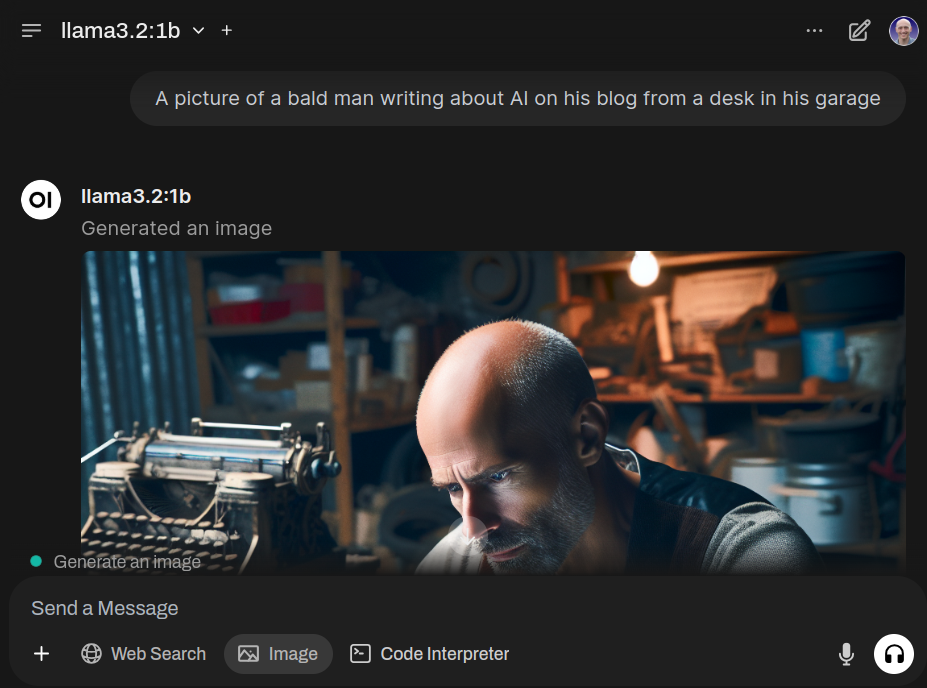
I wish I could grow a beard like that…
Uploading Files for RAG
LLMs are trained on a static dataset. This means that they only have knowledge about information contained within that dataset. Sometimes an LLM will respond to your prompt by explaining that they only have knowledge up to a certain date in the past.
But what if you want to ask the LLM about something that happened yesterday? That’s where Retrieval Augmented Generation (RAG) comes in.
RAG is a technique of essentially adding to an LLMs training set, allowing it to have new context which provides better accuracy in its responses.
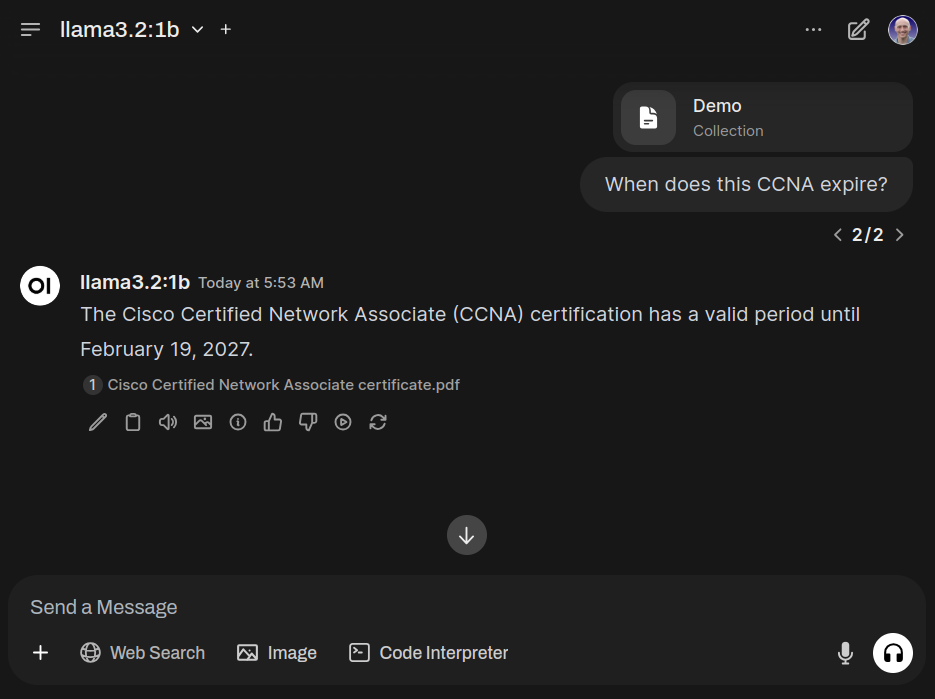
OpenWebUI allows you to do this through a feature called Knowledge Workspaces. You can upload files to a Knowledge Workspace, and reference that workspace in your prompt to give the LLM context over what you are asking.
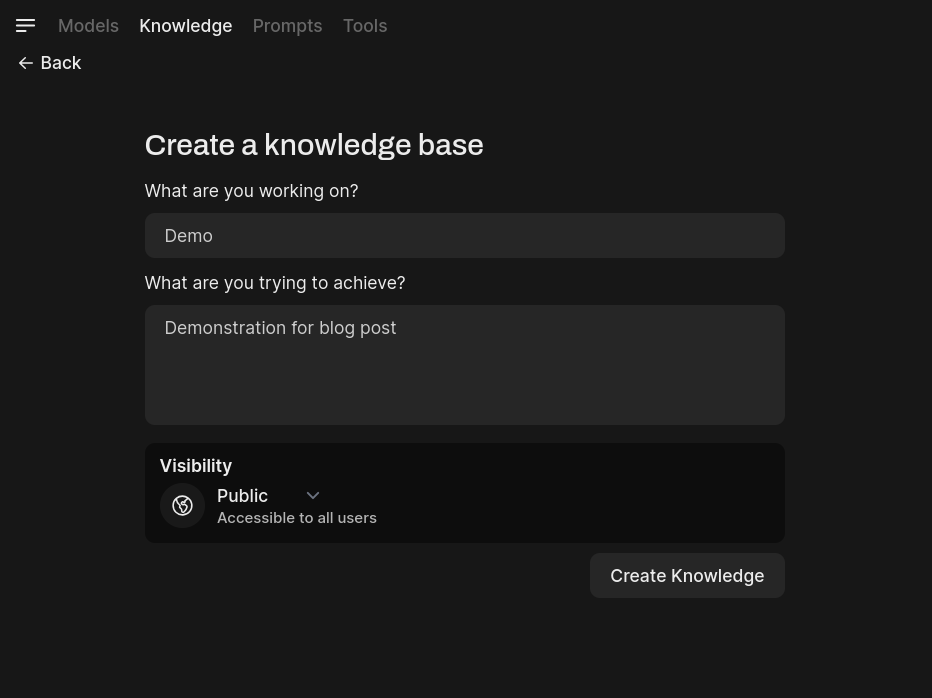
To do this, click on workspaces –> knowledge and create a workspace. Give it a name and description and click Create Knowledge. You can choose whether the workspace should be public (available to other users) or private.
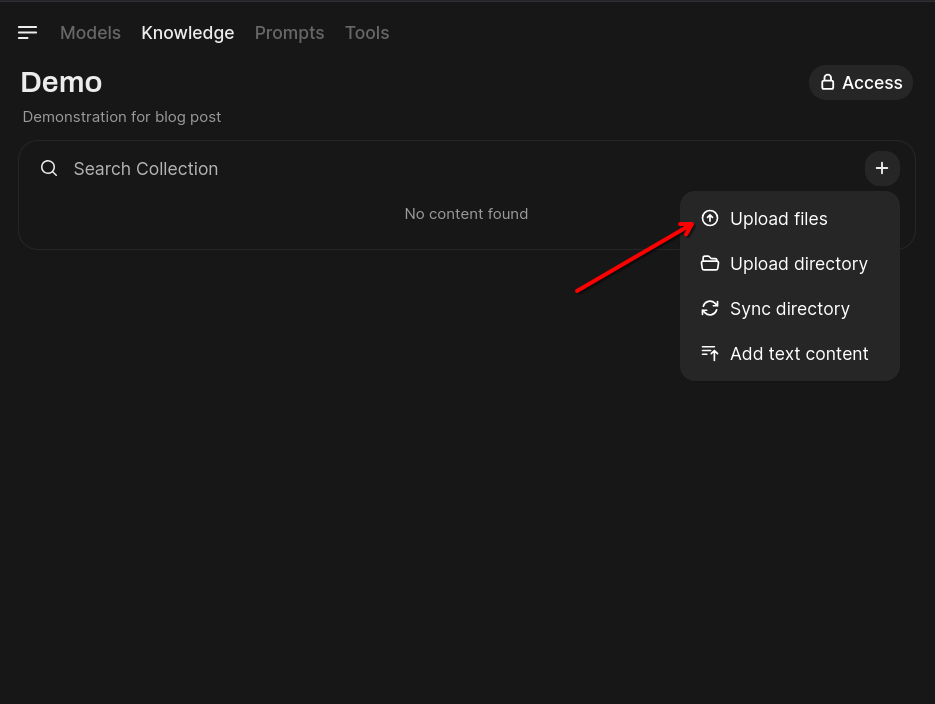
Then, click on the workspace you just created, click on the + button –> upload files. I uploaded my CCNA certificate for this demonstration
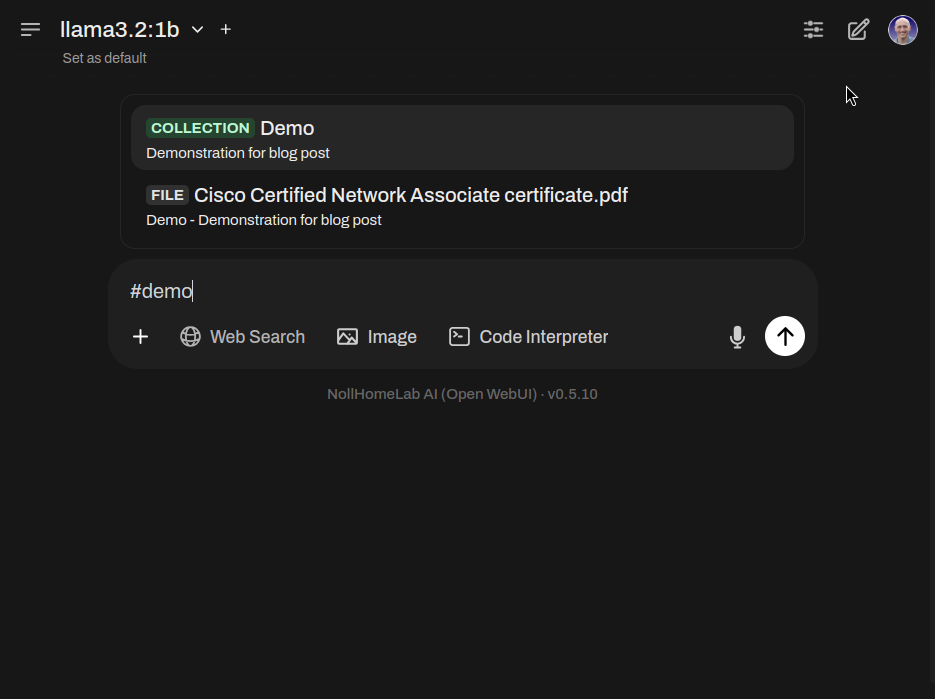
Referencing Files
To reference a file or knowledge collection, use the # symbol at the prompt.
Conclusion
2025 is a wild time to be alive. Not only can AI do some incredible things, but it can be done locally on hardware you already own. You don’t need thousands of GPUs. You don’t need a datacenter. And you don’t need to pay a subscription and give your data to a third party either. You can run a full suite of AI from your garage (or your office, closet, bathroom… whatever).
2025… What a wild time to be alive!
If you found this post interesting or helpful, reach out to me on social media! I love hearing from readers who got some value out of my nerdy ramblings.