Introduction
In my last post, I went over how to use the Tailscale Kubernetes operator to securely expose applications outside of the cluster. There’s only two things I don’t like about this setup:

- A separate Tailscale machine is added for every service you expose. Tailscale’s free tier generously allows you to have up to 100 devices on your Tailnet. For most people, this might not be an issue… but for a Tailscale psycho like me, it can fill up quickly… at which point, I channel my inner Kylo Ren…
How the heck can you have more than 100 devices??
If you read about my current homelab setup, you’ll know that I use Tailscale Docker containers to get everything… and I mean everything on Tailscale. This means for every app, for every database, for every redis… there’s a machine added in Tailscale. That stuff can add up.
- You can’t use a custom domain. With the Tailscale ingress controller, you’re at the mercy of your Tailnet name, which falls under the ts.net subdomain. I want to expose my apps over a domain that I can buy, own, and manage myself. Something like mylittlehomlab.dev (on sale for $4.99 last I checked…)
The Architecture
Here’s the concept…
- A user goes to https://app.mylittlehomlab.dev
- Their device sends a DNS request for app.mylittlehomlab.dev, which makes its way to a recursive resolver (Cloudflare, in my case), which resolves it via an A record to a Tailscale IP
- That Tailscale IP is assigned to the service object for Traefik. So, if you’re on my Tailnet (or you’re on your own Tailnet and I’ve shared Traefik with you), you will be able to reach it. If not, you will get no response.
- Traefik will forward the request on to the appropriate service using cluster-internal traffic.
A drawing for the visual learners like me:
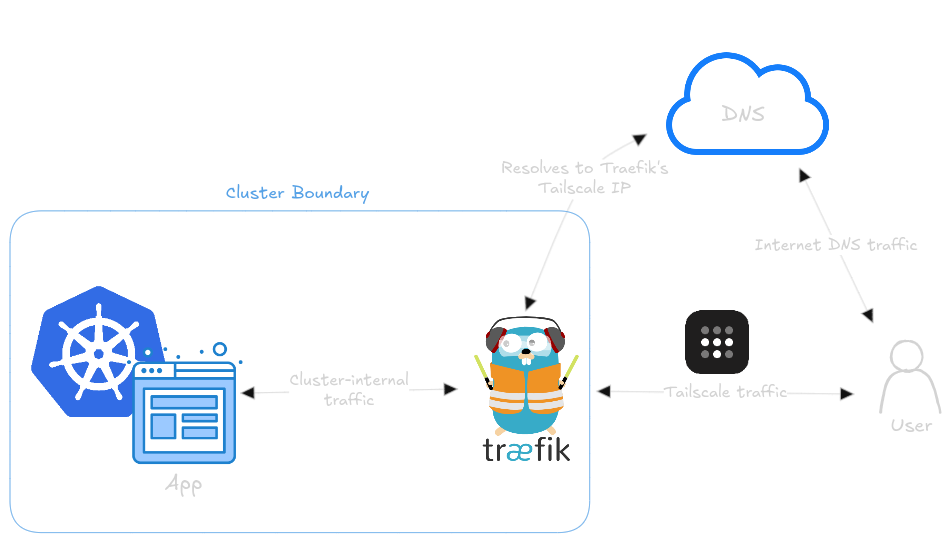
The benefit of this setup is that I can significantly reduce the amount of machines on my Tailnet. The only machines will be Traefik and any of my personal client machines (laptop, phone, ipad etc.)
We can also use a custom domain and Traefik will manage HTTPS certificates for that domain using letsencrypt.
So let’s get started.
Installation
We’ll install traefik via Helm, which means we’ll need a values.yaml file. Mine is a beefy one, so I’ll explain each section:
---
image:
  repository: traefik
  tag: v3.3.3
  pullPolicy: IfNotPresent

globalArguments:
  - "--global.sendanonymoususage=false"
  - "--global.checknewversion=false"

additionalArguments:
  - "--serversTransport.insecureSkipVerify=true"

ports:
  websecure:
    tls:
      enabled: true
      certResolver: cloudflare
  web:
    redirections:
      entryPoint:
        to: websecure
        scheme: https
        permanent: true

persistence:
  enabled: true
  size: 128Mi
  storageClass: longhorn
  accessMode: ReadWriteMany
  path: /data

deployment:
  enabled: true
  replicas: 3
  initContainers:
    - name: volume-permissions
      image: busybox:latest
      command: ["sh", "-c", "touch /data/acme.json; chmod -v 600 /data/acme.json"]
      volumeMounts:
      - mountPath: /data
        name: data

service:
  enabled: true
  type: LoadBalancer
  spec:
    loadBalancerClass: tailscale

certificatesResolvers:
  cloudflare:
    acme:
      email: [email protected]
      storage: /data/acme.json
      # caServer: https://acme-v02.api.letsencrypt.org/directory # prod (default)
      caServer: https://acme-staging-v02.api.letsencrypt.org/directory # staging
      dnsChallenge:
        provider: cloudflare
        #disablePropagationCheck: true # uncomment this if you have issues pulling certificates through cloudflare, By setting this flag to true disables the need to wait for the propagation of the TXT record to all authoritative name servers.
        #delayBeforeCheck: 60s # uncomment along with disablePropagationCheck if needed to ensure the TXT record is ready before verification is attempted
        resolvers:
          - "1.1.1.1:53"
          - "1.0.0.1:53"

env:
  - name: CF_DNS_API_TOKEN
    valueFrom:
      secretKeyRef:
        key: apiKey
        name: cloudflare-api-token

logs:
  general:
    level: DEBUG # --> Change back to ERROR after testing
  access:
    enabled: false
Values Explained
image:
This section defines the Traefik container image to use. We’re using traefik (obviously), and specifying version v3.3.3. We’re also telling Helm to only pull the image if it’s not already present on-disk.
globalArguments:
I’ve specified two global arguments. One is simply saying that we don’t want to send anonymous usage data to Traefik. The other is telling Traefik not to bug us about updating to a new version.
additionalArguments:
The one additional argument is disabling SSL certificate validation. This will allow us to access services even if the certificate we receive was invalid. This helps with debugging/testing and can likely be removed later.
ports:
The ports section is where we specify what certificate resolver we’ll be using for HTTPS (cloudflare, in my case). We’ll also set up a permenant redirect from port 80 (HTTP) to 443 (HTTPS).
persistence:
When a traefik detects a new service, it will request a certificate using your configured certificate resolver. Without a place to store these certificates, it would need to request them again any time traefik restarts. This section defines a PVC using Longhorn mounted at /data for storing the certificates.
deployment:
In this section you can customize the Kubernetes deployment for Traefik. This is where we can specify how things like how many replicas we would like. We also need to add this busybox init container. The purpose of this init container is to ensure the file acme.json exists with the appropriate permissions inside the of the /data directory we defined previously in the persistence section.
service:
Remember how I said Traefik will be one of the few machines on my Tailnet? This is where we make that happen. We’re using Tailscale’s loadBalancerClass, so traefik will show up in the tailnet as traefik-traefik.
certificatesResolvers
This is where we define the details of our DNS provider for the ACME DNS challenge that Traefik will use to retrieve certificates for our domain. We’re also specifying where to store them (/data/acme.json).
You’ll notice there are two caServer lines and that one is commented out. One of these lines is acme’s production server, and the other is a staging (or testing) server. Since ACME has a rate limit on their production server, it’s best to start out with staging until you have your setup working as expected. Otherwise, you could be blocked from requesting any new certificates for your domain… for a week… not that I’m speaking from experience or anything.
env:
This is where you can define any number of environment variables. In my setup, I need to specify the CF_DNS_API_KEY variable which allows Traefik to create a TXT record on my behalf to complete the ACME DNS challenge when requesting certificates.
You’ll notice that this is referencing a Kubernetes secret. We’ll create that momentarily.
logs:
Finally, we define the log level. I leave this set to DEBUG when testing, and change it back to ERROR once everything is running as expected.
Note: Everyone’s
values.yamllooks a little different. I encourage you to do your own research and customize it to your use case.
Storing Cloudflare API Key in Kubernetes Secret
Here’s that Kubernetes secret we just mentioned:
apiVersion: v1
kind: Secret
metadata:
    name: cloudflare-api-token
    namespace: traefik
type: Opaque
stringData:
    email: [email protected]
    apiKey: your-api-key-here
Save this as cloudflare-creds.yaml and apply to the cluster with:
kubectl apply -f cloudflare-creds.yaml
Install with Helm
We’re just about ready to install Traefik. Let’s create the traefik namespace:
kubectl create namespace traefik
Then, we’ll add the helm repo and update:
helm repo add traefik https://helm.traefik.io/traefik && helm repo update
And, finally, install traefik:
helm install --namespace=traefik traefik traefik/traefik --values=values.yaml
We’ll need to add a public DNS A record for each of our services referencing traefik’s tailscale IP. You can check the tailscale IP either by going to the Tailscale admin console, or by checking the external-ip of the traefik service object:
kubectl get service -n traefik
NAME      TYPE           CLUSTER-IP     EXTERNAL-IP                                         PORT(S)                      AGE
traefik   LoadBalancer   10.101.95.24   100.91.213.116,traefik-traefik.mink-pirate.ts.net 80:31766/TCP,443:30741/TCP   22s
Deploying an App
We’re ready to deploy an app with a custom domain now. Let’s use my Uptime Kuma deployment once again. Notice we have a standard ClusterIP service object, but the Ingress object has a spec.rules section where we can define the routing rules for Treafik.
This is saying to route requests for the domain uptimekuma.mydomain.com to the uptimekuma service object. Notice the paths: section. This is where we could define custom paths. So, if I wanted to route uptimekuma.mydomain.com/home, I could define that here.
The rest is the standard deployment and Longhorn PVC that you’ve seen in my previous posts.
---
apiVersion: v1
kind: Service
metadata:
  name: uptimekuma-service
spec:
  selector:
    app: uptimekuma
  type: ClusterIP
  ports:
    - protocol: TCP
      port: 3001
      targetPort: 3001
---
apiVersion: networking.k8s.io/v1
kind: Ingress
metadata:
  name: uptimekuma-ingress
spec:
  rules:
  - host: "uptimekuma.mydomain.com"
    http:
      paths:
      - path: /
        pathType: Prefix
        backend:
          service:
            name: uptimekuma-service
            port:
              number: 3001
---
apiVersion: apps/v1
kind: Deployment
metadata:
  name: uptimekuma
  labels:
    app: uptimekuma
spec:
  replicas: 1
  selector:
    matchLabels:
      app: uptimekuma
  template:
    metadata:
      labels:
        app: uptimekuma
    spec:
      containers:
      - name: uptimekuma
        image: louislam/uptime-kuma
        ports:
        - containerPort: 3001
        volumeMounts: # Volume must be created along with volumeMount (see next below)
        - name: uptimekuma-data
          mountPath: /app/data # Path within the container, like the right side of a docker bind mount -- /tmp/data:/app/data
      volumes: # Defines a volume that uses an existing PVC (defined below)
      - name: uptimekuma-data
        persistentVolumeClaim:
          claimName: uptimekuma-pvc
---
apiVersion: v1
kind: PersistentVolumeClaim
metadata:
  name: uptimekuma-pvc
spec:
  accessModes:
    - ReadWriteOnce
  resources:
    requests:
      storage: 1Gi
  storageClassName: longhorn # https://kubernetes.io/docs/concepts/storage/storage-classes/#default-storageclass
Before applying this manifest, I’ll need to make sure there is a DNS record in cloudflare for uptimekume.mydomain.com pointing to the IP of the traefik service object that we found earlier. (Notice the entry looks like it’s just for uptimekuma – cloudflare automatically appends the domain at the end of the entry).

With that complete, I can apply the manifest:
kubectl apply -f uptime-kuma.yaml
Alright, cross your fingers, open a browser tab to https://uptimekuma.mydomain.com and…
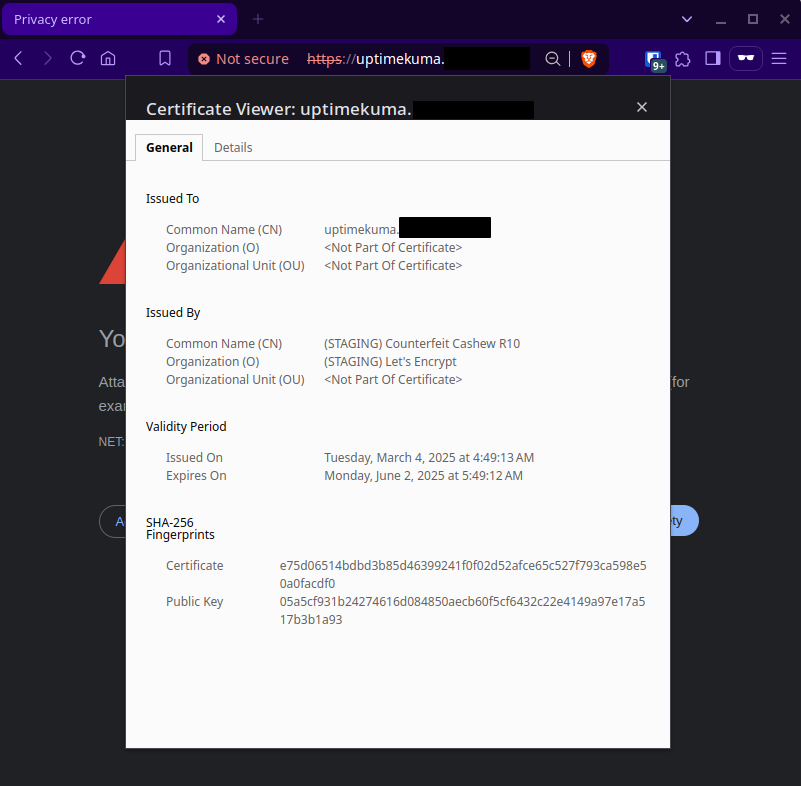
We get an invalid certificate… Why?
Well, remember how we set the ACME URL to their staging server? That’s why. These certificates are just for testing and are therefore not a signed by a recognized certificate authority.
Note: make sure you inspect the certificate and ensure that it was issued by Let’s Encrypt. If the certificate was issued by traefik (traefik default certificate), then that means something is wrong with your certificatesResolver settings. Double check your email and API keys.
Cool, so we know it’s working as expected. Let’s change the ACME URL to prod now. Go back to the traefik values.yaml file and adjust the following lines under certificatesResolvers:
certificatesResolvers:
  cloudflare:
    acme:
      email: [email protected]
      storage: /data/acme.json
      # Uncomment this line
      caServer: https://acme-v02.api.letsencrypt.org/directory # prod (default)
      # Comment/remove this line
      # caServer: https://acme-staging-v02.api.letsencrypt.org/directory # staging
      dnsChallenge:
        provider: cloudflare
        #disablePropagationCheck: true # uncomment this if you have issues pulling certificates through cloudflare, By setting this flag to true disables the need to wait for the propagation of the TXT record to all authoritative name servers.
        #delayBeforeCheck: 60s # uncomment along with disablePropagationCheck if needed to ensure the TXT record is ready before verification is attempted
        resolvers:
          - "1.1.1.1:53"
          - "1.0.0.1:53"
Then, we can apply the changes with the helm upgrade command.
helm upgrade --namespace=traefik traefik traefik/traefik --values=values.yaml
Now, traefik may still have that staging certificate stored in the acme.json file. We can exec into one of the pods to fix that. First, list the pods in the traefik namespace:
kubectl get pods -n traefik
NAME                      READY   STATUS    RESTARTS   AGE
traefik-77bb9bd5d-9622p   1/1     Running   0          20m
traefik-77bb9bd5d-sw9dp   1/1     Running   0          20m
traefik-77bb9bd5d-x4gt7   1/1     Running   0          21m
Then, exec into one of the pods (any of them should work):
kubectl exec traefik-77bb9bd5d-9622p -it -n traefik -- sh
This will drop us into the shell of that pod. We only have one certificate, so we’ll simply clear the entire contents of the file with this command:
> data/acme.json
If there are other certificates that you want to keep, you’ll want to selectively delete the uptimekuma cert from the file. But be aware, the traefik container doesn’t have nano, so you’ll have to brush up on those vim skills!

Upgrading helm doesn’t automatically redeploy the traefik pods, so they’ll still be running with the configuration for the staging certificate server. We can redeploy the traefik pods with:
kubectl rollout restart traefik -n traefik
With that all done, delete and redeploy the uptimekuma deployment:
kubectl delete -f uptime-kuma.yaml
then
kubectl apply -f uptime-kuma.yaml
Now, if we visit https://uptimekuma.mydomain.com we should have a valid certificate!
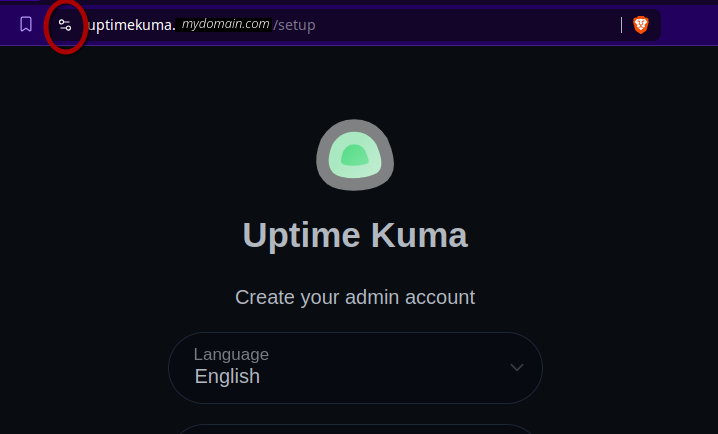
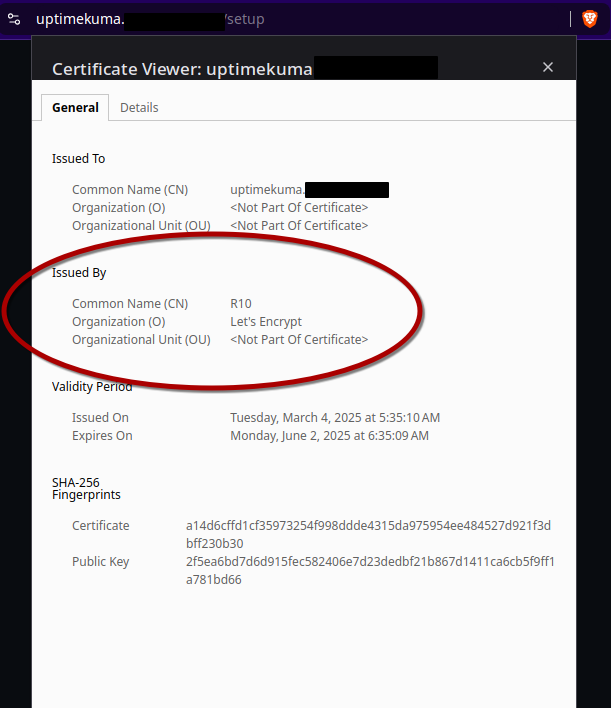
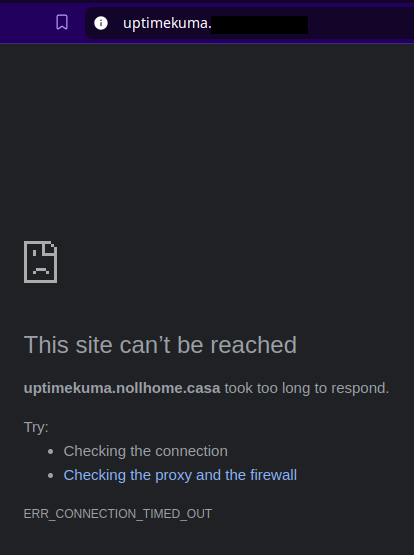
And of, of course, if we were to turn off Tailscale on our client, we would get no response from the server.
Conclusion
Traefik can be a lot to wrap your head around (kind of like Kubernetes), but once you get it working it is an incredibly powerful and customizable tool. With this setup, I can have an app deployed and running over HTTPS with a custom domain in minutes.
What are you using for a reverse proxy? How are you managing your certificates? Hit me up on social media and let’s nerd out.
